

Have you finally had it with your boring old furniture? Do you want to inject some individuality and imagination into your home? Stop right there! In this post, we’ll look at ten easy ways to improve your home’s furnishings without breaking the bank. Whether you’re a seasoned DIYer or just getting your feet wet, you’ll find something here to spark a new take on your furniture. Prepare to let your imagination run wild as you transform boring old furniture into conversation starters.
- 1. Introduction
- 1.1. Why update your furniture?
- 1.2. Benefits of DIY furniture updates
- 1.3. Choosing the right furniture pieces to update
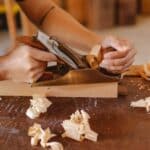
- 1.4. Essential tools and materials
- 2. Preparation
- 2.1. Cleaning and repairing furniture
- 2.2. Removing old paint or finishes
- 2.3. Sanding and smoothing surfaces
- 2.4. Choosing the right paint or finish
- 2.5. Protecting the work area
- 3. DIY Furniture Update Ideas
- 3.1. Repainting and restyling
- 3.2. Adding new hardware
- 3.3. Stenciling and decoupage
- 3.4. Upholstery and fabric updates
- 3.5. Creative repurposing
1. Introduction
Have you finally had it with your boring old furniture? Do you wish to modernize its appearance? Stop right there! In this post, we’ll look at 10 easy ways to improve your home’s furnishings without breaking the bank. These low-cost strategies will not only let you express your individuality and flair, but will also save you money. DIY projects are a great way to give old furniture a new lease on life, whether it’s a dresser, coffee table, or bookcase. Get ready to get your hands dirty and give your furniture a fresh new look with these creative methods!
1.1. Why update your furniture?
Changing up your old furniture for new pieces can completely revitalize your home’s aesthetic. Making DIY furniture changes is a cost-effective and creative solution whether you’re bored with your current furniture or just want to give your home a fresh makeover. You may save a lot of money and make your home more unique by giving your old furniture a makeover and giving it a new purpose. In this post, we’ll go over ten easy DIY furniture makeovers that will freshen up your space and show off your personal taste and flair.
1.2. Benefits of DIY furniture updates
DIY-ing a furniture makeover is a great way to give your home a facelift without breaking the budget. You can easily update the look of vintage furniture with only a little ingenuity and some inexpensive tools. Some advantages of tackling furniture refurbishments on your own include:
One of the primary benefits of do-it-yourself furniture renovations is that they save money. You don’t need to go out and buy brand new furniture when you can recycle and modernize the items you already have.
Second, you may make it uniquely yours by putting your own stamp on it through do-it-yourself renovations. You have complete freedom to express yourself with your selection of finishes, patterns, and colors.
Thirdly, you’re helping the environment by not purchasing brand-new furniture and instead giving it a facelift. Recycling old furniture cuts down on landfill trash and new furniture manufacturing.
DIY furniture makeovers allow for the release of creative energy. You can personalize and make one-of-a-kind furniture by trying out various methods, designs, and coatings.
DIY projects are great opportunities to learn new skills and gain insight into the process of refinishing furniture. Painting, upholstery, and woodworking are just some of the abilities that may be honed here.
The pride and satisfaction you feel after completing a do-it-yourself furniture makeover is reason number six. Show off your hard work with the satisfaction of knowing you made something ugly into something lovely.
In conclusion, there are several upsides to making your own furniture improvements, such as saving money, making something uniquely yours, helping the environment, gaining valuable skills, and feeling accomplished. Get ready to get your hands dirty and completely revamp your home with these clever do-it-yourself furniture upgrades!
1.3. Choosing the right furniture pieces to update
Updating just a few key pieces of furniture may have a dramatic effect on how your space feels and looks. DIY furniture renovations are a terrific way to exhibit your creativity and style, whether you’re wanting to add a modern touch or give a vintage piece a new lease on life. You may save money and make something truly one-of-a-kind and representative of your style by giving existing furniture a new lease on life. In this post, we’ll look at ten unique ways that you may update your furniture with basic tools and supplies, hopefully sparking some ideas for your own DIY home improvement projects.
1.4. Essential tools and materials
Do-it-yourself furniture makeovers can be a game-changer when it comes to giving your home a new and distinctive look. In addition to serving as a platform for your individuality to shine through, they can save you money on furniture replacement. DIY projects are fun, but you should make sure you have everything you need before you start. In addition to simplifying the process, these tools will guarantee that your final product looks polished and professional. In order to successfully complete your do-it-yourself furniture refurbishment projects, you will need the following:
One essential tool for putting together or taking apart furniture is a collection of screwdrivers with a variety of head sizes and shapes.
Sandpaper is a must have for sanding down furniture before painting or staining. It is useful for stripping off old coatings, filing down sharp edges, and otherwise preparing a surface for adhesion.
Tools for applying paint or stain, including brushes and rollers of various sizes and shapes to accommodate different pieces of furniture.
Paint or stain the walls with high-quality products in hues that go well with the rest of your home’s decor. Give some thought to the desired finish, whether it be matte, glossy, or distressed.
Fifth, safety equipment: security must always come first. Purchase safety equipment like a dust mask, goggles, and gloves to shield yourself from harmful particles and prevent harm.
Sixth, a measuring tape: Precise measurements are essential for getting furniture that fits in the intended area. You can use a measuring tape to get exact measurements for your plans.
If you want your furniture to be perfectly straight and balanced, you need a level.
Make holes, fasten hardware, or adorn your furniture with the help of a drill and an assortment of drill bits.
Adhesive: You could require adhesive like wood glue, epoxy, or adhesive tape to put your creation together or decorate it.
Upholstery fabric, foam, batting, and a staple gun are all things you’ll need if you want to give your upholstered furniture a facelift.
Having these basic supplies on hand will help you get started on the path to DIY furniture makeover success. Now that you have the tools at your disposal, you can have fun creating one-of-a-kind pieces of furniture.
2. Preparation
This post delves into a trove of gluten-free and dairy-free baked good recipes. Indulge in the pleasures of baking without sacrificing your health or way of life with these recipes that are tailored to those with dietary restrictions or preferences. These recipes can help you indulge your sweet tooth while adhering to your dietary restrictions, whether you have celiac disease, lactose intolerance, or just want to try something new. You’re about to uncover a universe of gluten- and dairy-free desserts that are still bursting with taste and satisfaction.
2.1. Cleaning and repairing furniture
Before starting a do-it-yourself furniture upgrade job, it’s important to clean and fix any damage. These steps can help you remodel your home whether you’re using new or antique furniture.
Start by giving the piece of furniture a good washing with some mild soap and water or another appropriate cleaning solution. Sweep away any accumulated dust, debris, or grime. Focus on the nooks and crannies and the finer points.
Next, take a look at the furnishings to see if anything needs fixing. Look for damaged surfaces, loose screws, and shaky legs. Fixing these problems before updating will prolong the life of your furniture.
You might try using some furniture touch-up products or techniques to fix any dings or scratches. Sanding, filling, or applying a stain or paint to the wood to make it look like new are all options.
It is also essential to examine the furniture’s upholstery or fabric covering. You can reupholster it or get new fabric if the current one is discolored or worn. This will not only improve the aesthetics, but also give you with a pristine working environment for any do-it-yourself renovation.
Achieve beautiful results in remodeling your home by giving it a firm foundation by cleaning and repairing your furnishings before beginning the creative DIY modifications.
2.2. Removing old paint or finishes
In order to give furniture a fresh look with a do-it-yourself makeover, it is necessary to strip off any existing paint or finishes. Removing the old paint or finish thoroughly is essential for a smooth and long-lasting effect whether you’re giving new life to an antique or recycling a discovery from the thrift store. Some options for stripping away old paint or finishes off furniture are shown below.
One of the most common and efficient approaches is sanding, which is using sandpaper or a power sander to gradually remove the previous paint. You can get a smoother result by starting with a coarser grit of sandpaper and working your way up to a finer one.
To properly dissolve old paint or finishes, you can use chemical strippers, which are widely accessible at hardware stores. Always work in a well-ventilated location and strictly adhere to the manufacturer’s guidelines.
Using a heat gun to soften the previous paint or finish before scraping it off with a putty knife or paint scraper is a useful third option. If you’re going to use a heat gun, use it with care and don’t apply too much heat or you could end up damaging the furniture.
In contrast to chemical strippers, citrus-based strippers pose less of a threat to human health and the environment. These strippers use citrus-based natural solvents to effectively dissolve the previous coating.
Pressure washing can be an efficient means of removing old paint or finishes from outdoor furniture or large objects that can tolerate water pressure. It is important to adjust the pressure settings appropriately for the furniture’s material.
When working with paint strippers or sanding, always remember to use protective gear including gloves, safety glasses, and a mask. Make sure your solution won’t damage the furniture by trying it out on a small, hidden area first. If you’re doing a do-it-yourself furniture makeover, you can move on to the next stage once the old paint or finish has been removed.
2.3. Sanding and smoothing surfaces
Preparing furniture for a DIY makeover involves sanding and leveling the surface. Having a smooth, defect-free surface is essential before beginning any painting or staining project. Sanding smoothes out bumps, removes old finishes, and prepares a surface for new paint or finishes. The smoother the surface is, the better the paint or stain will stick to it, leading to a more durable and polished final product. Here, we’ll go through why sanding and smoothing surfaces is so crucial, and offer some advice on how to do it properly to get professional results with your furniture makeover.
2.4. Choosing the right paint or finish
Working remotely, where one may do one’s job from virtually anywhere, has grown in popularity in recent years. While working from home has several advantages, including reduced commute times and greater scheduling freedom, it also presents its own unique obstacles. Here we’ll look at some of the most typical difficulties encountered by telecommuters and offer advice for overcoming them.
2.5. Protecting the work area
Protecting the work space before beginning a do-it-yourself furniture makeover is essential for keeping things neat and tidy as you work. To help you get started on your creative projects, here are some steps to take:
First, make sure you have a clean working environment by putting away any clutter. With this much room available, you won’t have to worry about bumping into anything or damaging your furnishings.
To prevent paint drips, stains, and other damage to the floor, step two is to cover it with a drop cloth or some old newspapers. The subsequent tidying up should be a breeze now.
Get together all the equipment and supplies you’ll need before beginning the do-it-yourself furniture makeover. Include things like the materials you’ll need to complete the project, such as paint, brushes, sandpaper, screws, and so on.
Fourth, take precautions by using protective equipment including safety glasses, gloves, and a face shield. It’s preferable to err on the side of caution.
The time and effort you put into updating your furnishings on your own will pay off in spades if you take the time to set up a safe and well-organized workspace.
3. DIY Furniture Update Ideas
Changing out your old furniture for new pieces can be a great way to breathe new life into your space without breaking the bank. You can make your old, worn furniture look brand new with some ingenuity and do-it-yourself know-how. If you’re looking for some DIY furniture makeover ideas, go no further than these top ten projects.
One of the simplest methods to modernize old furniture is by painting it and adding a stencil design. Pick a shade that harmonizes with the rest of your furnishings, and then use stencils to create one-of-a-kind motifs. A piece of furniture’s appearance can be drastically altered by employing this one easy method.
Second, if you have a piece of furniture that has worn out or out-of-date upholstery, you should think about updating it. You can customize the look of your furniture by reupholstering it with textiles that reflect your personal taste and sense of style.
Decoupage is a well-liked art form in which furniture is embellished with paper cuts and then varnished to protect the design. It’s a fun way to give your furniture a new lease of life with a splash of color or a nostalgic feel.
Changing the hardware on your furniture can do wonders for its overall aesthetic. Knobs, handles, and pulls tend to wear out over time, so it’s a good idea to replace them with newer, more fashionable versions.
5. Use the ombre effect to fade from one color to another, giving your furniture a modern look. This method is very effective on wooden pieces, and the results can be a gorgeous showpiece.
Stained glass accents are a great way to give your furniture a sophisticated look and feel. Stained glass may be a beautiful addition to any cabinet door, tabletop, or drawer front.
Wallpaper Magic Number Seven: It’s not only for the walls! Applying it on surfaces or drawer fronts will completely change the look of your furniture. This is a fantastic alternative to painting your furniture if you want to experiment with different patterns and textures.
Make your furniture have a shabby chic or rustic appearance by distressing it. To make it look old and aged, sand down the edges and corners. If you’re going for a rustic or retro look, this method is the way to go.
Use chalkboard paint to transform a dull piece of furniture into a multipurpose, conversation starter. You may use this to customize your home furnishings by adding notes, drawings, and other personal touches.
Including fabric panel inserts in your furniture is a simple way to upgrade its look and feel. If you remove some of the wood and replace it with fabric panels, the result will be a beautiful contrast between the two materials.
DIY furniture makeovers like this are only the beginning. Go crazy with your creativity and try out new methods and materials to make one-of-a-kind decorations for your home. You may completely revamp the appearance of your home with just a small bit of time and effort spent refinishing your furniture.
3.1. Repainting and restyling
Changing the look of your home can be as simple as repainting the walls and rearranging the furnishings. If you want to give your old, worn-out furniture a new lease on life or you just want to give your area a facelift, DIY furniture renovations are a fun and inexpensive option.
You may easily give your furniture a fresh look by repainting it. Pick a shade that blends nicely with the rest of your furnishings, or make a statement with a daring color choice. Apply a primer and multiple coats of paint after washing and sanding the surface to achieve a smooth and professional appearance. Painting techniques like distressing and stenciling can also be used to add personality.
Restyling your furniture is another option for giving it a modern look. The hardware, such as doorknobs and drawer pulls, may need to be updated to get the desired look. Molding and trim are additional options for upgrading the visual appeal of your furniture. Chairs that have seen better days can be given new life by being reupholstered or having new cushions added as part of a restyling project.
Modifying your furniture yourself is a great way to give your home a distinctive look and feel. It’s amazing what you can do to your house and furniture with only a little ingenuity and some inexpensive tools.
3.2. Adding new hardware
Changing the hardware on your furniture may give it a whole new feel and aesthetic. If you want to give a tired dresser or boring cabinet a facelift, try switching out the hardware. You might update the look of your furniture by replacing the knobs and pulls. You have your pick of many different styles, from ultra-modern to retro, and from conventional to eccentric. Furthermore, you can improve the look of your furniture by experimenting with different finishes, such as brass, chrome, or matte black. Changing the hardware on a piece of furniture is a quick and easy way to update its look and give it a unique touch.
3.3. Stenciling and decoupage
Both stenciling and decoupage are wonderful methods for giving old furniture a new lease on life. Intricate motifs and patterns can be painted onto the surface of your furniture using a stencil. With this method, you can give your furniture that special something and make it fit in perfectly with your home’s aesthetic. Stenciling allows for an almost infinite variety of designs, from geometric shapes to floral patterns.
In contrast, decoupage entails using specialized glue to adhere decorative paper or fabric to the surface of your furniture. By stacking various patterns and textures, you may produce stunningly complex creations. Decoupage allows for limitless artistic expression, whether you want to go for a retro feel with old newspaper clippings or a bright, modern design.
Stenciling and decoupage are low-cost options for giving new life to old furniture. They are also ideal for do-it-yourselfers, who take pleasure in the challenge of taking a common object and giving it a unique twist. To transform furniture using stenciling and decoupage, gather your paints, glue, and stencils and let your creativity run wild!
3.4. Upholstery and fabric updates
Improvements in upholstery and fabric may do wonders for a piece of furniture. DIY upholstery projects provide you the freedom to create anything from a brand new sofa to a colorful makeover for your weary old dining chairs. Changing the upholstery on your furniture can completely alter the look of your home. You can make a statement with daring patterns or choose fabrics that go with your current style. You can breathe new life into old furniture with only a little ingenuity and some fundamental sewing skills.
3.5. Creative repurposing
Reusing old pieces of furniture is a great way to inject some originality into your interior design. Old furniture may be updated to look modern and serve modern purposes with only a little creativity and do-it-yourself know-how. Here are ten ingenious ways you may refresh your home with a little DIY:
Adding legs and a glass top transforms a vintage suitcase into a one-of-a-kind and endearing nightstand. Your bedroom will get some storage and a touch of rustic charm from this recycled furniture.
To make a comfortable bench for a hallway or study nook out of an old bookshelf, simply add a cushioned seat. You can make the bookcase more unique by painting it a color that complements your room’s scheme.
Wine barrels may be repurposed into charming coffee tables with a little sanding and staining. Put a glass top on it for a sophisticated look, and it will become the focal point of your living area.
Headboard from a Recycled Door: Put that old door to good use as a headboard. Make the door the focal point of your bedroom by painting or refinishing it to complement your existing furniture.
Create a one-of-a-kind and practical set of shelves by stacking and mounting old drawers on the wall. The drawers can be painted a bright color or left unfinished for a more rustic appearance.
Dismantle a wooden pallet and reassemble it as a sleek TV stand. If you give it a coat of paint or stain, you may turn it into a rustic entertainment center on a cheap.
Seventh, a medicine cabinet made out of a suitcase: turn an old luggage into a fun addition to your bathroom by mounting it on the wall. To complete the makeover, put in some shelves or organizers to hold toiletries and a mirror.
Refinish an antique dresser by painting it a bright color or a neutral shade to complement your existing furniture. Upgrade the hardware to give your space a more polished look.
Use used materials like old barn boards to build a one-of-a-kind bookcase. For a more natural and weathered look, sand and seal the wood.
Remove the seat off an old chair and place a pot in its place to create a unique planter. You can make a beautiful focal point by painting the chair and putting it in your garden or on your porch.
These ingenious do-it-yourself furniture makeovers will not only help you save money, but will also lend your home a distinct look and feel. Get your hands on some tools, let your imagination go wild, and start repurposing old furniture into chic new additions to your home.
Conclusion
In conclusion, you can completely revamp your home with the help of these 10 inventive do-it-yourself furniture modifications. You can give your furniture and room a whole new look with just a little ingenuity and some do-it-yourself expertise. All it takes is a little creativity to turn these tips into a fun and satisfying home renovation project, whether it’s reusing old products or giving new life to old ones.


These 10 innovative and imaginative DIY home decor ideas from [object Object] provide a refreshing approach to enhancing ones living…