
Do you want your home to feel more like a reflection of who you are? Put away your search! Here, we’ll take a look at ten easy-to-implement DIY projects that can completely revamp your home’s aesthetic. These do-it-yourself projects, which range from recycling to original creation, will give you ideas and help you improve your home’s decor. Prepare to let your creative side out and give your home a spectacular makeover with these unique decorative items!
- 1. Introduction
- 1.1. Why DIY home accents are popular
- 1.2. Benefits of creating your own home accents
- 1.3. Materials and tools needed for DIY home accents
- 1.4. Important tips for successful DIY home accents
- 1.5. Inspiration for creative DIY home accents
- 2. 1. Upcycling Furniture
- 2.1. Repurposing old furniture
- 2.2. Painting techniques for a new look
- 2.3. Adding unique hardware and details
- 2.4. Creating statement pieces
- 2.5. Tips for choosing the right furniture to upcycle
- 3. 2. Wall Art and Decor
- 3.1. Making personalized photo frames
- 3.2. Creating unique wall hangings
- 3.3. Designing custom wall decals
- 3.4. Using stencils for wall art
- 3.5. Tips for arranging and displaying wall decor
- 4. 3. Handcrafted Textiles
1. Introduction
Do you want to spruce up your home with some original decor? If so, good fortune finds you! In this article, we’ll go over ten easy-to-make decorative elements that can give your home a fresh new look and feel. These projects are great for everyone, whether you’re an experienced DIYer or just getting started. We have everything you need, from unique wall hangings to repurposed furniture. Prepare to let your creative side out and give your house a one-of-a-kind look!
1.1. Why DIY home accents are popular
The trend of making one’s own decorative accents for the house has grown in recent years as more and more people seek to give their homes a unique feel. Making one-of-a-kind and artistic decorations for your home doesn’t have to break the bank anymore, thanks to the vast availability of materials and the plethora of online tutorials. Homeowners may make their houses feel more like homes by taking on DIY projects and injecting their own sense of style and character into the process. In this post, we’ll look at ten easy-to-make decorative items that add a splash of style to your home.
1.2. Benefits of creating your own home accents
Making your own decorative elements for the house is a great way to give your home a one-of-a-kind look and feel. It’s a great way to show off your artistic skills, and it also lets you tailor your interior design to your personal tastes. DIY decorations have several advantages, including those listed below.
Making your own home accents might save you money compared to buying store-bought versions. You may make beautiful things without breaking the bank by reusing materials or purchasing inexpensive components.
DIY decorations allow you to tailor your home to your unique style and preferences. You have the freedom to express yourself through your home’s decor by using colors, patterns, and designs that are special to you.
Making your own decorative accessories is a great way to give your home a one-of-a-kind look that no one else will have. You can create one-of-a-kind works of art that will never be duplicated.
Fourth, the happiness and pride that come from making anything from scratch cannot be matched. DIY decor lets you express your individuality while also providing instant gratification.
5. It’s good for the environment because you’re not buying mass-produced things and instead making your own decorations. By finding new uses for old things, you may help make the world a better, greener place to live.
Making your own decorative touches for the house has several advantages, like saving money, adding a special touch, standing out from the crowd, and feeling accomplished. Get ready to get your hands dirty, grab your materials, and let your imagination run wild as you revamp your home with these 10 ingenious Do-It-Yourself decorations.
1.3. Materials and tools needed for DIY home accents
Having the proper supplies and equipment is essential while working on do-it-yourself home decor. Whether you’re a seasoned DIY pro or just getting your feet wet, having all the tools at your disposal will make your creative process easier and more pleasant.
Here are some of the tools and supplies you’ll need to get started on your DIY home decor project:
One, paint and brushes; you can make anything look brand new with just a coat of paint. It’s important to have a wide selection of paints and brushes in order to create the required results.
Wood and/or metal: Having some wood planks or metal sheets will be beneficial depending on the type of accents you want to make. You can build shelves, picture frames, or accent pieces using these supplies.
Third, you’ll need fabric, foam padding, and upholstery tools like a staple gun and thread to recover old furniture or make new upholstered pieces.
4. Adhesives: Having a variety of adhesives, from glue guns to strong adhesives like epoxy or wood glue, will allow you to hold various materials together.
5.Cutting instruments: A utility knife, scissors, and a saw are all essential cutting instruments for precise cloth trimming, wood or metal cutting, and other cutting tasks.
Gather ornamental components such as beads, ribbons, buttons, or even seashells to put the finishing touches on your DIY accents.
Tools for taking precise measures Accurate measurements are a must for every do-it-yourself endeavor. Accurate dimensions and alignment depend on the use of a measuring tape, ruler, and level.
Wear protective clothing and equipment at all times. Wear protective gear including goggles, gloves, and a mask when handling hazardous substances.
You’ll be prepared to start making your own decorative items for the home as soon as you have these things on hand. Don’t be afraid to let your imagination go wild as you make your home a reflection of your own personality and sense of design.
1.4. Important tips for successful DIY home accents
Making your own decorative elements for the house may be a rewarding and inexpensive hobby. These clever DIY projects will help you turn your house into a fashionable and one-of-a-kind retreat, whether you’re decorating for a party or just giving a room a facelift. In this post, we’ll go over some helpful hints that will turn your do-it-yourself home accent projects into a smashing success. These guidelines can help you construct beautiful finishing touches that will wow your guests and give you a sense of pride in your work, whether you’re just starting out or a seasoned veteran.
1.5. Inspiration for creative DIY home accents
Do you want to make some interesting and original additions to your home? Put away your search! In this essay, we’ll go over 10 great ways to make your house a home for style. These do-it-yourself projects, which range from recycling to original creation, will let you express your individuality in your home’s design. Prepare to let your imagination run wild as you create a home that is unlike any other.
2. 1. Upcycling Furniture
If you want more people to read your blog and for it to have a wider impact, you need to make it easier for search engines to find it. Increasing your blog’s visibility in search results is a top priority, and in this post we’ll discuss 10 proven methods that will help you do just that. Using these methods, you may increase your blog’s organic traffic, boost your online profile, and broaden your audience’s exposure. Let’s dive in and learn how to increase your blog’s visibility in search engines.
2.1. Repurposing old furniture
Putting old furniture to new uses is a great way to personalize your home. You may give your old furniture a second life by upcycling it, rather than getting rid of it or selling it. Upcycling is the practice of repurposing unwanted materials into new products with increased usefulness and aesthetic appeal. It’s a great way to express yourself artistically and show off your unique taste. If you’re like do-it-yourself projects or you just want to give your house a little more personality, check out these 10 clever suggestions.
2.2. Painting techniques for a new look
Changing the look of your furniture and room with paint is a terrific DIY project. Upcycling furniture through painting can be a fun and creative DIY project, whether you have old or worn-out furniture that needs a makeover or you just want to add a personal touch to your house.
Different effects and styles can be achieved using various painting techniques. Distressing is a popular method whereby furniture is given the appearance of age and use on purpose. This can be accomplished by using a crackling medium, sanding down specific sections, or building up several coats of contrasting paint.
Painting portions of your furniture in contrasting or complementary colors is another option. In the right context, this may make for a strikingly contemporary aesthetic, especially when paired with simple, geometric forms.
Using stencils or decals, you may add one-of-a-kind patterns or designs to your furniture for a more artistic and quirky look. This is a terrific option for adding character to your home.
Faux finishing techniques, including as marbleizing and wood graining, can be used to achieve a more understated and sophisticated appearance. By employing these methods, you may make your furniture appear as though it were crafted from high-end materials.
No matter what kind of painting you intend to do, you must first carefully prepare your furniture. In order to get good paint adherence and a very smooth finish, you may need to clean, sand, or prime the surface first.
In conclusion, there is no limit to what you can do with paint to give your furniture a facelift or your room a new feel. Whether you’re going for a distressed, retro appearance or a sleek, contemporary color scheme, there’s a painting method that will work for you.
2.3. Adding unique hardware and details
Unique hardware and accents added to repurposed furniture can make a world of difference in the look and feel of a room. Whether you’re working with an antique dresser or a boring coffee table, adding unique hardware and embellishments may completely transform the piece.
Changing up the existing knobs or handles for something more eye-catching is one method to personalize hardware. Try repurposing materials like little toys or seashells, or even something as simple as an antique doorknob. These unique additions can transform the look of your furniture in an instant.
Adding ornamental touches to your furniture is still another choice. Using stencils, you may decorate otherwise boring surfaces, such the fronts of drawers or a tabletop. You may also improve the look of your furniture by adding decorative trim or molding to the edges.
The secret to adding one-of-a-kind hardware and details is to allow your imagination run wild. You can make unique accents that are a reflection of your style and taste by experimenting with different materials, colors, and styles.
2.4. Creating statement pieces
Improving the on-page SEO and search engine rankings of your blog relies heavily on the quality of your post titles. A search engine optimized title can increase traffic and boost your position in the results.
If you want to improve the readability of your blog article titles, consider the following:
First and foremost, use your target phrase in the title of your blog post to give search engines an idea of the content. This explains to search engines why your material is relevant to certain queries.
Second, make sure it’s not too long and that it adequately conveys the substance of your blog article. Titles should not be too long or ambiguous because they may confuse readers and search engines.
Third, make use of “power words,” or words with a lot of impact that readers will associate with your titles and want to learn more about. Powerful words can do things like arouse strong feelings, provide a sense of urgency, or make a valuable promise.
Make sure your title can be read and understood by everybody. Make sure you capitalize properly and punctuate your writing correctly. Try to limit your use of any special characters or symbols.
Use exciting titles that make the reader want to know more to pique their interest and keep them reading. If you want more people to read your blog, you need a catchy title that makes them want to click on it.
Create headlines that are shareable on social media and optimize for social sharing. Make your material more discoverable and shareable by include relevant keywords and hashtags.
7. Use an A/B test to compare the success of alternative names for your blog posts. Using A/B testing, you can find the title that gets the most clicks and comments.
While it’s crucial to design captivating titles, it’s also important to avoid clickbait, or names that promise more than they can give. You risk losing readers and increasing your blog’s bounce rate if you use clickbait.
Make your information more scannable and digestible by including numbers or creating list-type titles. Users are attracted to titles that promise a certain number of instructions, actions, or suggestions.
Ten. Analyze what other businesses in your market are calling their products. Finding out what people are searching for might help you create more interesting and relevant titles.
Keep in mind that improving the titles of your blog posts is simply one part of on-page SEO. Use it in tandem with other proven SEO strategies to boost your blog’s position in search results and bring in more targeted readers.
2.5. Tips for choosing the right furniture to upcycle
Picking the proper pieces of furniture to upcycle can have a huge impact on the finished product. The perfect pieces of furniture for your upcycling projects can be found by following these guidelines.
Prior to beginning any upcycling project, make sure the furniture you select is of high quality construction. Don’t buy anything that’s damaged beyond repair or has serious structural flaws.
Second, think about the aesthetic you want to accomplish for your home as a whole when deciding on a style. Whether you’re going for a modern, vintage, rustic, or eclectic vibe, be sure to pick out some fitting furniture.
Third, evaluate the state of things by inspecting the furnishings up close. Fixing minor flaws like scratches, dents, or stains is usually simple, but fixing major issues like decay may not be worthwhile. Pick parts with lots of possibility for alteration.
Fourth, consider how you will actually use the furniture you are upcycling. Look for furniture with drawers or shelves if you need more space. Choose a piece of furniture with an interesting shape or a special function if you want it to stand out.
Measure the area that will house the furniture; this is a very important step. Pick elements that complement the existing decor without taking over the space.
Using these guidelines, you may pick the proper pieces of furniture for your upcycling projects and make beautiful, inexpensive additions for your house.
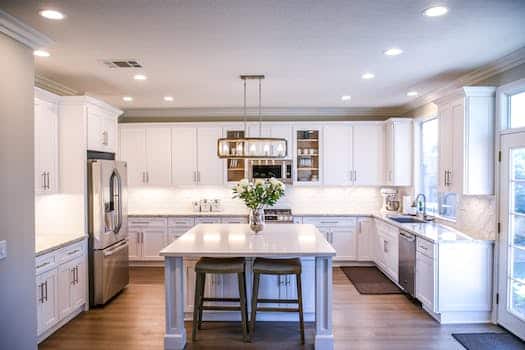
3. 2. Wall Art and Decor
Adding some decorative pieces to your walls can do wonders for the room’s look. There are a lot of cool things you can do on your own if you want to spice things up, make a statement, or show off your sense of style. There is a wide range of options, from complex wall hangings and striking mirrors to hand-painted canvases and framed photographs. These do-it-yourself touches will help you quickly and cheaply turn your home into a relaxing oasis that is uniquely you.
3.1. Making personalized photo frames
Using header tags correctly is a major factor in enhancing your blog’s on-page SEO. Header tags, like as H1, H2, H3, etc., assist you organize your content and give search engines insight into the hierarchy and structure of your website.
It’s crucial to maintain a strict hierarchy while using header tags. Your article’s primary title has to be included in an H1 tag to emphasize its significance. H2 and H3 tags can be used to emphasize particularly weighty subsections of the article.
When used properly, header tags tell search engines what your content is primarily about, which improves your page’s indexing and ranking. Header tags improve the user experience by making your information more legible and scannable.
It is critical, however, that header tags not be overused or misused. There should be only one H1 tag per page, denoting the page’s primary topic. It’s recommended to use H2 tags for the next level of headings (main sections) and H3 tags for the next level of headings (subsections) within the main sections.
The on-page search engine optimization (SEO) of your blog can be improved by the strategic use of header tags. Having a well-organized site is great for search engine rankings, but it also makes your material more user-friendly and interesting to read.
3.2. Creating unique wall hangings
Adding new wall art and decorative accents may completely alter the ambiance of a room. DIY wall hangings are a fun way to give your walls a personalized appearance and feel. You’ll walk away with something very special: the knowledge that you had a hand in making something truly original.
The options for making one-of-a-kind wall decor are virtually limitless. Fabric, wood, and even repurposed materials can all be used to create something one-of-a-kind. The secret is to allow your imagination run wild and try out new approaches.
Making a wall hanging out of a stunning textile is one option. You can pick a fabric that blends in with the rest of your furnishings, or you can pick one that stands out. Fabric can be stretched and secured over a wooden frame or embroidery hoop. To make a greater fashion statement, you might add accessories such as beads or tassels.
Making a wooden wall hanging is still another choice. Use salvaged lumber or buy a pre-made, unadorned plaque of wood. It can be painted any color you like, or left natural for a more rustic feel. Then, paint your own unique pattern or design onto the wood using either stencils or freehand. This might range from a basic geometric figure to a highly detailed piece of art.
Make a wall hanging out of discarded materials if you’re in the creative mood. Reusing outdated media such as compact discs or vinyl records can provide striking results. Use them as a foundation for yarn or twine, or arrange them in a design.
Making your own wall hangings gives you the freedom to express your unique sense of style. The options are limitless, whether you’re looking for something sleek and contemporary or free-spirited and eclectic. Try not to restrict your creativity to the standard methods or materials. With enough effort and ingenuity, you can make wall art that is both beautiful and original, completely changing the feel of your home.
3.3. Designing custom wall decals
Personalize your home with unique wall decals you design yourself. There is no limit to what you can do with custom wall decals; you may use them to make a mural, exhibit artwork, or highlight quotes. They’re a quick and simple method to give your walls a new look without any hassle. You may make a statement about who you are by selecting a design, size, and color that is uniquely you. Personalized wall decals are an easy way to make any plain wall into a conversation starter.
3.4. Using stencils for wall art
Creating unique wall art using stencils is a fun and easy way to put your stamp on your home. Stencils are multifunctional tools that enable the creation of elaborate wall designs without the requirement for expert painting abilities. Stencils are versatile enough to be used for both dramatic statement walls and understated accents.
Stencils allow for infinite creative expression, which is one of their many benefits. There are a wide variety of stencil designs available, from geometric patterns to those inspired by nature. Wall stencils come in a variety of sizes and shapes, allowing you to create unique designs that are perfect for your home.
Stencils are inexpensive, which is another perk. Stencils can save you a lot of money when compared to buying finished wall art. Stencils may be used again and over again, saving you money while allowing you to play around with various patterns and hues. Stenciling your walls is a great way to give your home a unique look and feel while also enjoying a satisfying DIY activity.
It is crucial to thoroughly prepare walls before utilizing stencils for wall art. Before applying the stencil, make sure the surface is clean and flat. You may keep the stencil from moving around while you paint by taping it down using painter’s tape. For the greatest effects, use a high-quality paint and a foam roller or stencil brush.
of conclusion, when it comes to decorating the walls of your home, utilizing stencils is an innovative and inexpensive option. Stenciling can be a fun and gratifying experience for anybody, from experienced DIYers to newcomers. Try it out and inject some of your own style into your walls!
3.5. Tips for arranging and displaying wall decor
There are several rules of thumb you can follow to make sure your wall decorations appear well together and complement the rest of your room’s design. Here are some things to think about while working with wall art of any kind, from paintings and photographs to sculptures and installations:
The first step in hanging artwork is to figure out how you want everything to look. Think about the artwork’s proportions, as well as the wall’s form and size. Use paper templates or just place the pieces on the floor and see what works best.
Choose a wall or other spot in the room to serve as the room’s focal point. It may go over the hearth, behind the couch, or on an expansive blank wall. To capture the eye and anchor the arrangement, use a larger or more striking piece of wall art.
Third, don’t be scared to combine several styles of wall art. Add dimension and visual interest to your walls by combining framed artwork with mirrors, clocks, and even bookcases. Make your display more interesting to the eye by playing about with scale, texture, and color.
Fourth, think about the room’s current furniture and decor before hanging anything new. Pick out furniture and decor that fits along with the room’s theme and color scheme. The end result will be a more polished and put-together appearance.
It’s important to display artwork at eye level, so keep that in mind when deciding where to hang it. Although placing things at eye level is a decent rule of thumb, this should be modified depending on the room’s furnishings and purpose. Make sure everything is hung safely and evenly to avoid any mishaps.
Make it so the apparent weight of your wall hangings is evenly distributed. You can achieve symmetry by placing several smaller pieces opposite a bigger one. You can also achieve symmetry by positioning complementary elements on either side of a central focus.
Don’t be scared to try new layouts every so often with your furniture and wall hangings. You might try moving furniture about the house or just rearranging it all in one room. This will give your room a breath of fresh air and provide you more options for displaying your belongings.
Keep in mind that hanging wall art is an artistic endeavor, so go with your gut and try out some new ideas. Keeping these suggestions in mind can help you turn your home into a visually appealing and uniquely yours retreat.
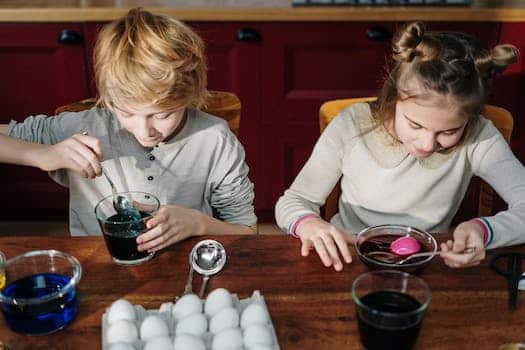
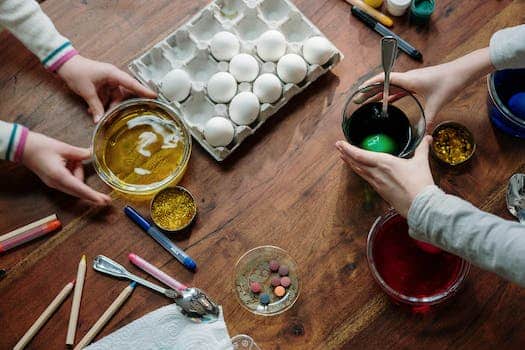
4. 3. Handcrafted Textiles
Decorative textiles made by hand are a great way to make a room seem more like home. Incorporating homemade textiles is a terrific way to inject your personal style into your living space, whether you’re trying to liven up the decor or just add a burst of color. The DIY potential of handcrafted textiles is practically limitless, ranging from woven tapestries to embroidered cushions.
Putting up wall hangings is a simple way to use your handcrafted textiles. A vibrant woven tapestry may be the showpiece of any room. Fabric scraps and hand-stitched needlework can be framed and displayed as wall art. The display may be anything you want it to be, and the options are limitless.
Throw blankets and cushions are another great place to showcase handmade textiles. A handmade quilt or knitted throw may do wonders for making your living area seem more like a home. You can also make your own pillowcases out of colorful fabric or repurpose old ones.
You can even try your hand at making your own textiles if you’re feeling particularly daring. DIY methods range from tie-dyeing fabrics to block printing, both of which allow you to make truly unique textiles for your house. As an added bonus, you may take pride in the fact that you created something truly one-of-a-kind for yourself.
In conclusion, incorporating handmade textiles into your home is a great strategy for doing just that. Whether you decide to buy them or construct them yourself, these home accents will completely change the look and feel of your space.
4.1. Sewing your own throw pillows
Making your own decorative pillows by hand with some sewing skills may be a relaxing and fulfilling hobby. Textiles that have been lovingly handcrafted exude an air of antiquity and can completely alter the atmosphere of a space. Beautiful decorative pillows can be made with few supplies and some simple sewing abilities.
Select a cloth that works well with the current decor and furnishings. Depending on your taste, you can choose a cloth with a solid color or a pattern. Think on the feel and longevity of the material because pillows get handled a lot.
Next, determine the shape of your pillow and use the measurements to cut the cloth into two identical squares or rectangles. Leave a 1/2-inch seam allowance on all sides. The pillow can then be stuffed and sewn.
Sew three sides together, leaving one free for stuffing, using a sewing machine or needle and thread. You can embellish the pillow with a straight stitch or a fancy stitch.
After the three sides have been stitched together, the cloth should be turned right side out and the seams pressed. This will make your pillow look more finished and will make stuffing it much simpler.
The exciting stage — filling the pillow — has finally arrived! This can be done with anything from new polyester fiberfill or foam to recycled pillows. Distribute the filling evenly as you fill the cushion to the firmness you like.
The next step is to use a slip stitch or a ladder stitch to hand sew the pillow’s open side shut. This will keep the filling safely enclosed.
Voila! You’ve finished sewing your very own decorative pillow! Create a matched set of pillows by following the steps again, or get creative by trying out new materials and patterns.
You may save money and express your individuality by making your own decorative pillows instead of purchasing them from a store. There is also the joy of knowing that you have decorated your home with one-of-a-kind, handmade ornaments that are a direct reflection of your own taste and creativity.
4.2. Embroidery and applique techniques
Handcrafted fabrics often feature embellishments like embroidery or appliqué. These methods are great for creating one-of-a-kind decorative touches for your house since they allow you to express your individuality via fabric and textiles.
Using a needle and thread, an embroiderer creates a design on a piece of fabric. With this method, you may make anything from the simplest patterns to the most complicated themes with ease and precision. Depending on the final product, embroidery can be completed either by hand or with the assistance of a sewing machine.
In contrast, applique is a decorative technique in which a design is created by stitching or fusing small pieces of fabric or other materials onto a background fabric. Using this method, you can create textile works with depth and visual appeal by combining materials and colors in interesting ways. Glues, sewing machines, and hand stitches are all viable options for completing an applique project.
There is no limit to what may be done with embroidery or applique. They are versatile and may be used to decorate everything from pillows and drapes to table runners and even garments. DIY projects using these methods can help you make your home a more beautiful and unique place to spend time.
Whether you decide to teach yourself embroidery and appliqué or seek out the skills of skilled artisans, combining these methods into your home accessories is a surefire way to give your house a special, one-of-a-kind look and feel.
4.3. Knitting or crocheting blankets
When it comes to making blankets with your hands, knitting or crocheting is a common choice. These lovely blankets can be used to keep warm, but they can also act as decorative accents in your home. Knitting or crocheting a blanket may be a relaxing and satisfying activity for anyone, regardless of their skill level. You may make your blanket reflect your individuality and taste by choosing from a wide range of yarns and patterns. In addition, blankets that you make yourself are much more likely to be gifts that come from the heart. Now is the time to break out the knitting needles or crochet hooks and make something warm and fuzzy for your home.
4.4. DIY curtains and window treatments
Curtains and window treatments that you make yourself can be a great way to express your individuality and improve the look of your home. Using handcrafted textiles is one inventive approach. The addition of even a few carefully designed handmade textiles can do wonders for the overall look and feel of a space.
The options for making your own curtains and window coverings out of handwoven textiles are practically unlimited. You have your pick of many different textiles, including cotton, linen, silk, and even upcycled materials. Curtains and window treatments can be made to look truly unique by including elaborate embroidery, appliqué, or block printing.
Handmade textiles not only have an endearing, artisanal quality, but they also provide you a chance to show off your own unique flair and originality. If you want your home to stand out from the crowd, choose drapes and window coverings that were crafted by hand because no two items will be identical.
Incorporating handcrafted textiles into your do-it-yourself curtains and window treatments will definitely create a lovely focal point in any room, whether you want a bohemian-inspired aesthetic, a modern and minimalist design, or a vintage and eclectic feel. So, be ready to get your hands dirty, round up some of your favorite fabrics, and let your creativity run wild as you embark on the adventure of making stunning custom curtains and window coverings for your house.
4.5. Tips for selecting the right fabrics for your projects
Choosing the appropriate fabrics is essential when it comes to making handmade textiles for do-it-yourself home accessories. The appearance and feel of your finished product may vary dramatically depending on the fabric you use. If you’re into DIY projects, you might be wondering how to pick the right textiles.
One must first think about why: Consider the intended purpose of the finished work. A plush and sumptuous fabric would be ideal for a beautiful pillow. However, if you’re making a table runner, you should use a fabric that can withstand spills and wear.
2. Give some thought to the room’s aesthetic by taking into account the current decor and color scheme. Fabrics with simple designs and basic colors are perfect for achieving a contemporary, minimalist aesthetic. Bright patterns and textured fabrics are perfect for achieving a boho or eclectic look.
Third, think about how long your DIY home accent will last; this is especially important if you plan to use it frequently. Fabrics that can resist repeated washings and wear and tear should be utilized if the item will see heavy use.
To conclude your fabric selection process, you should read the care instructions. Not all projects are suited to textiles that need particular treatment, such as dry cleaning or hand washing.
5. Think about your ability level; if you’re just starting out, use fabrics that won’t overwhelm you. Fabrics with a higher percentage of cotton, linen, or polyester tend to be more forgiving and simpler for novice sewers to work with.
By following these guidelines, you can select textiles for your DIY home accents that will look great in your space and perform as expected.
Conclusion
DIY home decor may have a dramatic effect on the look and feel of a room. You may make a place truly your own by furnishing it with special, one-of-a-kind items. There are countless ways in which these 10 suggestions can be implemented to improve your home’s aesthetics, whether through the recycling of old materials or the creation of brand-new ones. Prepare to let your imagination run wild as you create a home that is unlike any other.


These 10 innovative and imaginative DIY home decor ideas from [object Object] provide a refreshing approach to enhancing ones living…