
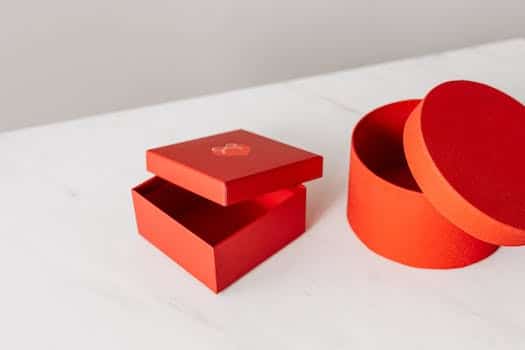
Decorative storage boxes are a great way to add a touch of style and organization to any space. Whether you’re looking to declutter your home or enhance the aesthetics of your office, these DIY ideas will inspire you to create beautiful storage solutions. From repurposing old shoeboxes to transforming plain cardboard boxes, this article presents 10 creative and budget-friendly projects that will make your storage boxes not only functional but also visually appealing. Get ready to unleash your creativity and give your space a personalized touch with these decorative storage box ideas.
- 1. Introduction
- 1.1. Why use decorative storage boxes?
- 1.2. Benefits of DIY decorative storage boxes
- 1.3. Materials needed for DIY decorative storage boxes
- 1.4. Safety precautions
- 1.5. Planning your DIY decorative storage boxes project
- 2. Choosing the Right Box
- 2.1. Selecting the right size
- 2.2. Considering the material
- 2.3. Exploring various designs
- 2.4. Determining the purpose
- 2.5. Budget considerations
- 3. Step-by-Step Guide
1. Introduction
Decorative storage boxes are a great way to add style and organization to your home. Whether you need a place to store your trinkets, craft supplies, or even just to declutter your space, these DIY ideas will inspire you to create beautiful and functional storage solutions. From repurposing old shoeboxes to transforming plain cardboard boxes into works of art, there are endless possibilities to explore. Get ready to unleash your creativity and enhance the aesthetics of your living space with these 10 creative DIY ideas for decorative storage boxes.
1.1. Why use decorative storage boxes?
Decorative storage boxes are a versatile and practical solution for organizing your belongings while adding a touch of style to any space. These boxes come in various sizes, shapes, and designs, making them suitable for a wide range of purposes. Whether you want to declutter and tidy up your home or office, or simply enhance the aesthetic appeal of a room, decorative storage boxes can be the perfect choice.
Not only do decorative storage boxes offer a visually pleasing way to store your items, but they also provide a convenient and efficient storage solution. Instead of leaving your belongings scattered around, these boxes allow you to neatly categorize and store them in one place. This not only saves space but also makes it easier to find and access your belongings when needed. Additionally, decorative storage boxes can be stacked or placed on shelves, maximizing vertical space and creating a more organized and streamlined look.
Another reason to use decorative storage boxes is their ability to protect your belongings. These boxes are often made from durable materials such as cardboard, fabric, or wood, which provide a protective barrier against dust, dirt, and moisture. By storing your items in these boxes, you can ensure that they remain in good condition and are less prone to damage. This is especially beneficial for delicate or valuable items that require extra care.
Furthermore, decorative storage boxes offer endless possibilities for customization and personalization. You can choose boxes that match your existing decor or opt for vibrant and eye-catching designs to add a pop of color to your space. Additionally, you can label or decorate the boxes to further enhance their functionality and visual appeal. This allows you to not only organize your belongings efficiently but also showcase your creativity and style.
In summary, decorative storage boxes are a practical and visually appealing solution for organizing your belongings. They offer convenience, protection, and customization options, making them a versatile choice for any space. Whether you need to declutter your home, enhance your office organization, or simply add a decorative element, these boxes are sure to meet your needs.
1.2. Benefits of DIY decorative storage boxes
Decorative storage boxes can be both functional and aesthetically pleasing additions to any home or office space. DIY (Do-It-Yourself) projects involving these boxes offer a unique and personalized touch to your storage solutions. Whether you are looking to organize your belongings or add a decorative element to your space, DIY decorative storage boxes can provide numerous benefits. In this article, we will explore the advantages of using DIY decorative storage boxes and how they can enhance your home decor and organizational needs.
1.3. Materials needed for DIY decorative storage boxes
When it comes to organizing and decluttering our living spaces, decorative storage boxes can be a stylish and practical solution. Instead of purchasing expensive storage options, why not try your hand at creating your own? DIY decorative storage boxes not only allow you to personalize your organization system but also give you the satisfaction of completing a fun and creative project. To get started, here are some materials you will need for your DIY decorative storage boxes:
1.4. Safety precautions
When it comes to DIY projects, decorative storage boxes are a popular choice for adding both functionality and style to any space. These versatile boxes can be customized to match your home decor and provide a practical solution for organizing belongings. However, it’s important to follow safety precautions while working on these projects to avoid any accidents or injuries. In this section, we will discuss some essential safety measures that should be taken when creating decorative storage boxes.
1.5. Planning your DIY decorative storage boxes project
Planning your DIY decorative storage boxes project
When it comes to organizing your home and adding a touch of personal style, decorative storage boxes can be a great solution. Not only do they provide a functional storage space, but they also add visual interest to any room. Whether you want to store small items like accessories or declutter larger items like books and magazines, a DIY decorative storage box project allows you to customize the design and make it uniquely yours.
Before diving into your DIY project, it’s important to plan and prepare. This will ensure that you have all the necessary materials and tools on hand, as well as a clear vision of what you want to achieve. Here are some steps to consider when planning your DIY decorative storage boxes project:
1. Determine your storage needs: Assess the type and quantity of items you want to store in the boxes. This will help you determine the size and dimensions of the boxes you need to create.
2. Choose the right materials: Select durable and sturdy materials that will withstand the weight and protect the contents of the boxes. Options include wooden crates, cardboard boxes, or even repurposed items like shoeboxes or wine crates.
3. Decide on the design and style: Consider the overall aesthetic of your space and choose a design that complements it. You can opt for a minimalist look, a rustic vibe, or a vibrant and colorful pattern, depending on your personal taste.
4. Gather the necessary tools: Make sure you have all the tools required for the project, such as a measuring tape, a utility knife, glue or adhesive, paint or decorative paper, and any additional embellishments you want to add.
5. Create a budget: Determine how much you’re willing to spend on materials and any additional decorations. DIY projects can be cost-effective, but it’s still important to set a budget to avoid overspending.
By taking the time to plan your DIY decorative storage boxes project, you’ll be well-prepared to embark on an exciting and creative endeavor. Remember to enjoy the process and let your imagination run wild as you transform simple storage boxes into beautiful and functional pieces that reflect your personal style.
2. Choosing the Right Box
Choosing the right box is essential when it comes to creating decorative storage solutions. Whether you are looking to organize your home or office, finding the perfect box can make all the difference. Here are some tips to help you choose the right box for your needs.
1. Size: Consider the size of the items you plan to store in the box. Make sure the box is large enough to accommodate your belongings without being too bulky or taking up unnecessary space.
2. Material: The material of the box is important both for its durability and aesthetic appeal. Options include cardboard, wood, plastic, and fabric. Choose a material that complements your decor and offers the necessary protection for your items.
3. Design: Look for boxes with unique designs or patterns that add a touch of style to your space. There are plenty of options available, from simple and sleek to bold and colorful.
4. Functionality: Consider how you plan to use the box. Will it be placed on a shelf, under the bed, or in a closet? Choose a box with features that suit your specific storage needs, such as handles, lids, or compartments.
5. Budget: Set a budget for your decorative storage boxes. Determine how much you are willing to spend and look for options within that price range. Remember, there are affordable options that still offer great quality and style.
By considering these factors, you can find the perfect box to meet your storage and decorative needs. Whether you are organizing your living room, bedroom, or office, a well-chosen box can add both functionality and aesthetic appeal to your space.
2.1. Selecting the right size
When it comes to selecting the right size for decorative storage boxes, there are a few factors to consider. First and foremost, you should think about the purpose of the box. Are you looking to store small trinkets or larger items? This will help determine the size of the box you need.
Next, consider the available space where the box will be placed. Measure the area and take note of any height or width restrictions. It’s important to choose a box that fits well in the designated space.
Additionally, think about the quantity of items you plan to store in the box. If you have a large collection or a lot of items to store, you may need a bigger box or multiple boxes.
Lastly, consider the overall aesthetic and design of the room where the box will be used. Choose a box that complements the existing decor and adds to the overall visual appeal.
By considering these factors and taking the time to choose the right size, you can ensure that your decorative storage box not only serves its purpose but also enhances the beauty of your space.
2.2. Considering the material
When it comes to choosing the right box for your decorative storage project, there are a few important factors to consider. The material of the box is one of the most crucial aspects to think about. Different materials offer various advantages and suit different purposes. Here are some popular options to consider:
1. Cardboard: Cardboard boxes are versatile, affordable, and readily available. They are lightweight and easy to customize, making them ideal for DIY projects. However, they may not be as durable as other materials.
2. Wood: Wooden boxes provide a classic and elegant look. They are sturdy and can withstand heavy items. Wood also offers a variety of finishes and can be painted or stained to match your desired aesthetic.
3. Plastic: Plastic boxes are durable, waterproof, and easy to clean. They come in various sizes and shapes, making them suitable for different storage needs. However, they may not offer the same aesthetic appeal as other materials.
4. Fabric: Fabric-covered boxes add a touch of softness and texture to your decor. They are lightweight and can be easily folded for storage when not in use. Fabric boxes are great for storing delicate items or for adding a cozy feel to any space.
5. Metal: Metal boxes provide a sleek and modern look. They are strong, durable, and often come with secure closures. Metal boxes are perfect for storing valuable or fragile items, as they offer enhanced protection.
Consider the purpose, durability, aesthetic appeal, and budget when choosing the right material for your decorative storage box. Each material has its own advantages and can add a unique touch to your DIY project.
2.3. Exploring various designs
When it comes to decorative storage boxes, the options are endless. Choosing the right box design can greatly enhance the overall aesthetic of your space. Whether you are looking for a box to store your belongings or simply want to add a touch of style to your decor, there are various designs to explore.
One popular design for decorative storage boxes is the vintage-inspired look. These boxes often feature intricate patterns, distressed finishes, and antique hardware. They add a nostalgic charm to any room and can be used to store small items like jewelry, letters, or keepsakes.
If you prefer a more modern and minimalist style, sleek and clean-lined boxes are a great choice. These boxes are often made of materials like acrylic, glass, or metal, giving them a contemporary and sophisticated look. They are perfect for organizing office supplies, gadgets, or even serving as display cases for small collectibles.
For those who love a rustic and natural vibe, wooden storage boxes are the way to go. These boxes can be crafted from reclaimed wood or have a distressed finish to achieve a weathered look. They are ideal for storing items like blankets, books, or even firewood. Wooden boxes also add warmth and character to any space.
If you are feeling creative and want to personalize your storage boxes, consider DIY options. You can decorate plain boxes with paint, fabric, or decoupage techniques. This allows you to customize the design to match your decor or express your own unique style. DIY decorative storage boxes are not only functional but also serve as a fun craft project.
No matter which design you choose, it’s important to consider the size and shape of the box. Make sure it fits well in the intended space and can accommodate the items you plan to store. Additionally, consider the durability and quality of the materials used, especially if you are storing delicate or valuable items.
Exploring various designs and choosing the right box for your decorative storage needs can elevate the overall look of your space while providing functional organization. Whether you opt for vintage, modern, rustic, or DIY designs, decorative storage boxes are a versatile and stylish solution.
2.4. Determining the purpose
Determining the purpose for Choosing the Right Box is a crucial step in the process of creating decorative storage boxes. This section will guide you in understanding the importance of selecting the appropriate box for your DIY project. When it comes to decorative storage, the purpose can vary greatly depending on your specific needs and preferences. Whether you want to organize small items, store important documents, or simply add a stylish touch to your living space, choosing the right box is essential.
When determining the purpose, consider the functionality and aesthetic appeal you desire. If you need a box for organizing small items like jewelry or craft supplies, opt for a box with multiple compartments or dividers. This will help you keep everything in order and easily accessible. On the other hand, if you’re looking to store important documents or larger items, choose a box with a sturdy construction and ample storage space.
The right box should also align with your style and complement the overall theme of your space. If you prefer a minimalist look, go for a sleek and simple box with clean lines. For a more eclectic or bohemian vibe, consider decorative boxes with vibrant patterns or intricate designs. Remember, the box you choose should not only serve its purpose but also enhance the visual appeal of your room.
In conclusion, determining the purpose for choosing the right box is essential in creating decorative storage boxes. By considering the functionality, storage capacity, and aesthetic appeal, you can select a box that perfectly suits your needs and adds a touch of style to your space.
2.5. Budget considerations
When it comes to choosing the right box for your decorative storage needs, budget considerations play a crucial role. Setting a budget beforehand can help you narrow down your options and make informed decisions. Here are some factors to consider in terms of budget:
1. Material: Different materials come at different price points. Cardboard and fabric boxes are generally more affordable compared to wooden or metal ones.
2. Size: Larger boxes tend to be more expensive than smaller ones. Assess your storage needs and choose a size that fits within your budget.
3. Quantity: If you require multiple storage boxes, consider buying in bulk or opting for sets, as it can often be more cost-effective.
4. Customization: Some decorative storage boxes may come with additional features or customization options, which can impact the overall cost. Decide if these extras are necessary for your specific needs.
5. Brand and quality: Well-known brands or higher-quality boxes may come with a higher price tag. Determine if the brand reputation and durability are worth the investment for your intended use.
By considering these budget factors, you can find the right box that meets both your storage requirements and financial constraints.
3. Step-by-Step Guide
Decorative storage boxes are a great way to add style and functionality to your space. Whether you need to organize your belongings or simply want to enhance the aesthetics of a room, DIY decorative storage boxes can be the perfect solution. In this step-by-step guide, we will explore 10 creative ideas for making your own decorative storage boxes.
1. Choose your box: Start by selecting a plain box that suits your needs. It could be a cardboard box, a wooden crate, or even a vintage suitcase.
2. Clean and prepare the box: Before you begin decorating, make sure to clean the box thoroughly and remove any dust or dirt. This will ensure that the materials you use adhere properly.
3. Decide on a theme: Determine the overall theme or style you want to achieve with your decorative storage box. This could be anything from vintage and rustic to modern and minimalist.
4. Gather materials: Next, gather all the materials you will need for your project. This may include paints, brushes, glue, fabric, decorative paper, ribbons, or any other embellishments you desire.
5. Plan your design: Sketch out a rough design or pattern that you want to create on the box. This will help you visualize the final outcome and make the process easier.
6. Paint the box: If you want to change the color of the box, start by painting it with a base coat. Let it dry completely before moving on to the next step.
7. Add decorative elements: Once the base coat is dry, you can start adding decorative elements. Use different techniques like stenciling, decoupage, or hand-painting to achieve the desired look.
8. Personalize it: Make the storage box unique by adding personal touches. You can use stencils to paint initials or names, or even attach photographs or small trinkets that hold sentimental value.
9. Seal and protect: Once you are satisfied with the design, seal the box with a clear varnish or sealant. This will protect the surface and ensure that your decorative elements stay intact.
10. Enjoy your creation: Finally, place your newly decorated storage box in the desired location and start using it to declutter and organize your space. Admire your creativity and enjoy the functional and beautiful addition to your home!
With these step-by-step instructions, you can easily create your own decorative storage boxes that reflect your personal style and add a touch of charm to any room.
3.1. Gathering necessary tools
To successfully complete the 10 creative DIY ideas for decorative storage boxes, you’ll need to gather a few necessary tools. These tools will make the process easier and ensure that your finished storage boxes are both functional and visually appealing. Here is a step-by-step guide on what tools you’ll need and how to use them:
3.2. Measuring and marking
Measuring and marking are essential steps when creating decorative storage boxes. Follow this step-by-step guide to ensure accurate measurements and precise markings for your DIY project.
1. Gather your materials: Before getting started, gather all the necessary tools and materials. This may include a measuring tape, ruler, pencil, masking tape, and the storage boxes you plan to decorate.
2. Determine the dimensions: Decide on the desired dimensions for your storage boxes. Measure the length, width, and height using a measuring tape or ruler. Write down these measurements for reference.
3. Mark the measurements: Using a pencil or masking tape, mark the measurements on each side of the storage boxes. This will serve as a guide for cutting, painting, or applying decorative elements.
4. Consider additional markings: Depending on your design, you may need to make additional markings for specific patterns, shapes, or placements of decorative elements. Use a ruler or stencil to create precise markings.
5. Double-check the measurements: Before proceeding with any modifications, double-check the measurements to ensure accuracy. Mistakes in measurements can lead to uneven or ill-fitting decorative elements.
6. Adjust as needed: If you find any errors or discrepancies, make the necessary adjustments. Use an eraser or remove the masking tape to correct any markings.
7. Start the DIY process: Once you are satisfied with the measurements and markings, you can proceed with the DIY process. This may include cutting, painting, gluing, or attaching decorative elements to the storage boxes.
By following this step-by-step guide, you can confidently measure and mark your decorative storage boxes, setting the foundation for a successful DIY project.
3.3. Cutting and assembling the box
To create a decorative storage box, cutting and assembling the box is an essential step. Follow this step-by-step guide to ensure a successful DIY project.
1. Gather the necessary materials: Start by gathering all the materials you will need for this project. This includes a sturdy cardboard or wooden box, a ruler, a pencil, a utility knife, adhesive glue, and decorative paper or fabric.
2. Measure and mark the dimensions: Use a ruler to measure the desired dimensions for your box. Mark the measurements on the cardboard or wooden surface using a pencil. Make sure to include the height, width, and length of the box.
3. Cut out the pieces: Using a utility knife, carefully cut out the marked pieces from the cardboard or wood. Take your time and ensure clean and precise cuts.
4. Assemble the box: Apply adhesive glue to the edges of the cut-out pieces and carefully assemble them together. Hold the pieces firmly in place until the glue sets. Double-check to ensure the box is sturdy and secure.
5. Decorate the box: Once the box is assembled, you can now unleash your creativity and decorate it using decorative paper or fabric. Apply adhesive glue to the surface of the box and carefully place the chosen material, smoothing out any wrinkles or bubbles.
6. Finishing touches: Allow the glue to dry completely. Trim any excess paper or fabric and neaten the edges. You can also add additional decorative elements such as ribbons, buttons, or stickers to enhance the overall look.
By following these steps, you can create beautiful and unique decorative storage boxes that not only serve a functional purpose but also add a touch of style to your home.
3.4. Sanding and smoothing the surfaces
Sanding and smoothing the surfaces:
1. Start by gathering all the necessary tools for sanding, including sandpaper (medium and fine grit), sanding block or sanding sponge, and a dust mask.
2. Before you begin sanding, make sure to clean the surface of the storage box thoroughly to remove any dirt or debris.
3. If there are any rough or uneven areas on the box, use the medium grit sandpaper to gently sand them down. Work in a circular motion to ensure even sanding.
4. After the rough areas have been smoothed out, switch to the fine grit sandpaper. Continue sanding the entire surface of the box, again using a circular motion. This will help to create a smooth and polished finish.
5. Be sure to sand the edges and corners of the box as well, paying attention to any hard-to-reach areas.
6. As you sand, periodically wipe away the dust with a clean cloth or sponge to keep the surface clean.
7. Once you are satisfied with the smoothness of the box, wipe it down one final time to remove any remaining dust.
8. Now, your storage box is ready for the next step in the DIY project!
3.5. Applying paint or decorative finishes
Applying paint or decorative finishes
When it comes to transforming regular storage boxes into decorative masterpieces, applying paint or decorative finishes is an essential step. Not only does it add a pop of color, but it also gives a personalized touch to your storage solutions. Follow this step-by-step guide to achieve stunning results:
1. Prepare the surface: Start by cleaning the storage box thoroughly to remove any dust or dirt. Sand the surface lightly to create a smooth base for the paint or finish.
2. Choose your paint or finish: Select a paint color or decorative finish that complements your overall design theme. Consider using acrylic paints, spray paints, or even decoupage techniques for a unique look.
3. Apply a primer: If you’re using a paint that requires a primer, apply a thin and even coat of primer to the entire surface of the box. This will help the paint adhere better and prevent any discoloration.
4. Paint or decorate: Once the primer is dry, start applying your chosen paint or decorative finish. Use a brush, roller, or sponge to create your desired effect. Apply multiple coats if necessary, allowing each layer to dry before adding the next.
5. Add embellishments: To enhance the decorative aspect of your storage box, consider adding embellishments like stencils, stamps, or even decoupage cutouts. This will add texture and visual interest to the finished product.
6. Seal the finish: Once you’re satisfied with the paint or decorative finish, apply a clear sealant or varnish to protect the surface and ensure durability. This will also give a polished and professional look to your storage box.
7. Let it dry: Allow the box to dry completely before using or displaying it. Follow the recommended drying time mentioned on the paint or finish product.
By following these step-by-step instructions, you can easily apply paint or decorative finishes to transform plain storage boxes into beautiful and functional decorative pieces. Get creative and experiment with different colors, techniques, and designs to make your storage solutions truly unique!
Conclusion
In conclusion, these 10 creative DIY ideas for decorative storage boxes offer a fantastic way to add style and functionality to your living space. Whether you’re looking to organize your belongings or simply enhance the aesthetics of your home, these innovative projects are sure to inspire and impress. Get ready to unleash your creativity and transform ordinary storage boxes into unique and eye-catching decor pieces!


4 Comments
Jonie Kassey
1 year agoWow, these DIY ideas for transforming storage boxes into decorative pieces are absolutely amazing! Who knew that something as simple as a storage box could turn into such a stylish and unique addition to our homes? I cant wait to try out some of these ideas and give my boring old boxes a new lease on life. Thanks for sharing this awesome inspiration! 💡✨
Margarete Siobhan
1 year agoWow, these DIY ideas for transforming storage boxes are simply amazing! I never thought ordinary boxes could be turned into such stylish and unique decorative pieces for my home. This post really got my creative juices flowing. Cant wait to try out these ideas and add a personal touch to my storage solutions. Thanks for sharing!
Jacquenette Tufts
1 year agoWow, who knew storage boxes could go from drab to fab? These DIY ideas are like the Cinderella stories of the organizing world! I can already picture myself turning those boring old boxes into glamorous home decor masterpieces. Move over, Kardashians, theres a new trendsetter in town!
Agna Schaefer
1 year agoHaha, well this post certainly got me thinking outside the cardboard box! Who knew that storage boxes could be turned into stylish home decor? I can already envision myself proudly displaying my upcycled storage box masterpiece, complete with glitter, feathers, and a few questionable paint strokes. My friends wont believe their eyes when they see my new modern art piece that doubles as a secret stash for all my embarrassing childhood photos. Thanks for the creative inspiration, now I just need to find a way to convince my significant other that these storage boxes are essential to our home decor! 😄📦