
Are you tired of cluttered spaces and disorganized belongings? Look no further than these 10 creative DIY ideas for decorative storage boxes. Whether you want to add a personal touch to your storage solutions or simply want to spruce up your home decor, these ideas will inspire you to transform ordinary boxes into stylish and functional storage solutions. From repurposing old shoeboxes to adding unique embellishments, get ready to unleash your creativity and make your storage boxes both practical and visually appealing.
- 1. Introduction
- 1.1. Benefits of DIY decorative storage boxes
- 1.2. Materials needed for DIY decorative storage boxes
- 1.3. Importance of personalizing storage solutions
- 1.4. Tips for choosing the right storage box design
- 1.5. Getting started with DIY decorative storage boxes
- 2. Step-by-Step Guide
- 2.1. 1. Planning and measuring
- 2.2. 2. Selecting suitable materials
- 2.3. 3. Cutting and assembling the box
- 2.4. 4. Sanding and smoothing the surfaces
- 2.5. 5. Applying decorative elements
- 3. Creative Ideas for Decorative Storage Boxes
1. Introduction
Decorative storage boxes are a great way to add style and organization to your home. Whether you need a place to store small items like jewelry and accessories, or you want to tidy up your shelves and countertops, these DIY ideas will inspire you to get creative. From upcycling old shoeboxes to transforming plain cardboard boxes into works of art, there’s a project for every skill level. So grab your crafting supplies and let’s dive into these 10 creative DIY ideas for decorative storage boxes!
1.1. Benefits of DIY decorative storage boxes
Decorative storage boxes are a fantastic way to bring both style and functionality into your home. With a little bit of creativity and some DIY skills, you can transform ordinary storage boxes into unique and eye-catching pieces that not only help you stay organized but also add a personalized touch to your space. Whether you’re looking to declutter your living room, organize your office, or spruce up your bedroom, DIY decorative storage boxes offer a myriad of benefits that make them a popular choice for many. In this article, we will explore some of the key advantages of using DIY decorative storage boxes in your home.
1.2. Materials needed for DIY decorative storage boxes
When it comes to organizing and decluttering your home, decorative storage boxes can be both functional and stylish. Instead of purchasing expensive storage solutions, why not try your hand at creating your own DIY decorative storage boxes? Not only will this save you money, but it will also allow you to personalize and customize your storage boxes to match your home decor.
Before you embark on this creative DIY project, there are a few materials that you’ll need to gather. These materials will vary depending on the design and style you want to achieve, but here are some common items you may need:
1. Plain cardboard boxes: You can recycle old cardboard boxes or purchase plain ones from a craft store.
2. Wrapping paper or fabric: Choose a pattern or color that complements your home decor.
3. Mod Podge or glue: This will be used to adhere the wrapping paper or fabric to the cardboard.
4. Scissors: Essential for cutting and trimming the wrapping paper or fabric.
5. Paint and paintbrushes: If you want to add some extra flair to your storage boxes, consider painting them in different colors or patterns.
6. Decorative elements: Ribbons, buttons, beads, or any other embellishments that you’d like to use to enhance the look of your storage boxes.
With these materials in hand, you’re ready to start transforming ordinary cardboard boxes into beautiful and functional storage solutions. Let your creativity flow and enjoy the process of making your own DIY decorative storage boxes!
1.3. Importance of personalizing storage solutions
Personalizing storage solutions is essential for adding a unique touch to your home decor. By customizing storage boxes, you can not only create functional storage options but also transform them into stylish decorative pieces. The importance of personalization lies in its ability to reflect your personality and taste, making your storage boxes a true reflection of your individuality. Whether you prefer a minimalistic design or a vibrant and eclectic look, personalizing storage solutions allows you to tailor them to your specific needs and preferences. This article will explore ten creative DIY ideas for decorative storage boxes, offering inspiration and guidance to help you unleash your creativity and enhance your living space.
1.4. Tips for choosing the right storage box design
When it comes to organizing and decluttering your home, decorative storage boxes can be a great solution. Not only do they serve a practical purpose by providing a designated space for your belongings, but they also add a touch of style and elegance to any room. However, choosing the right storage box design can sometimes be a daunting task. With countless options available in the market, it’s important to consider certain factors to ensure that you make the best choice. In this section, we will discuss some useful tips for selecting the perfect storage box design that suits your needs and complements your home decor.
1.5. Getting started with DIY decorative storage boxes
Decorative storage boxes are a great way to add style and functionality to your home. Whether you need a place to store your belongings or simply want to organize your space, DIY decorative storage boxes offer a creative solution. In this article, we will explore 10 creative DIY ideas for decorative storage boxes that you can easily try at home. From using paint and fabric to adding unique embellishments, these ideas will inspire you to create beautiful and personalized storage solutions. So, let’s get started with the basics of DIY decorative storage boxes!
2. Step-by-Step Guide
Decorative storage boxes are a great way to add style and functionality to your home. Whether you need extra storage for your belongings or want to organize your space in a creative way, DIY decorative storage boxes can be the perfect solution. In this step-by-step guide, we will explore 10 creative ideas for making your own decorative storage boxes.
1. Choose the Right Box: Start by selecting a box that suits your needs. It can be a simple cardboard box, a wooden crate, or even an old shoebox.
2. Prepare the Box: Clean the box thoroughly and remove any stickers or labels. If necessary, sand the surface to create a smooth base for painting or decorating.
3. Decide on a Theme: Think about the purpose of your storage box and choose a theme that complements your home decor. It could be floral, nautical, vintage, or any other theme that inspires you.
4. Gather Materials: Collect all the materials you will need for your project, such as paint, brushes, glue, fabric, ribbons, or any other decorative elements you want to use.
5. Paint or Cover the Box: Depending on the look you want to achieve, you can either paint the box or cover it with fabric or decorative paper. Use your creativity to create patterns or designs that match your chosen theme.
6. Add Decorative Elements: Enhance the box’s appearance by adding decorative elements like buttons, beads, lace, or ribbons. These embellishments will not only make your box look more attractive but also give it a personalized touch.
7. Create Compartments: If you want to use your storage box for organizing small items, consider adding compartments. You can use dividers made of cardboard or foam board to create sections inside the box.
8. Label the Box: To make it easier to find what you need, label your storage box. You can use adhesive labels, stickers, or even write directly on the box using a marker.
9. Seal and Protect: Once you are satisfied with the design of your decorative storage box, seal it with a clear varnish or a protective spray. This will ensure that your creation stays intact and lasts for a long time.
10. Enjoy Your Creation: Place your newly decorated storage box in any room of your home and enjoy the beauty and functionality it brings. Use it to store books, accessories, craft supplies, or any other items you want to keep organized.
By following this step-by-step guide, you can unleash your creativity and create unique decorative storage boxes that reflect your personal style. Have fun with your DIY project and enjoy the satisfaction of transforming a simple box into a beautiful and useful piece of decor.
2.1. 1. Planning and measuring
In order to successfully create decorative storage boxes, it is important to plan and measure your materials and space. This step-by-step guide will help you through the process.
1. Determine the Purpose: Before starting your DIY project, think about how you will use the decorative storage boxes. Will they be used for organizing items in your living room, bedroom, or office? This will help you decide on the size, materials, and design.
2. Measure the Space: Take measurements of the area where you plan to place the storage boxes. This will ensure that the boxes fit perfectly and do not occupy too much space.
3. Choose the Materials: Select the materials based on your preferences and the purpose of the storage boxes. You can use cardboard, wood, fabric, or even repurpose old boxes. Consider the durability and aesthetics of the materials.
4. Gather the Tools: Depending on the materials chosen, gather the necessary tools such as scissors, glue, paint, brushes, ruler, and a cutting mat.
5. Design and Decorate: Sketch out the design of your storage boxes. Decide on the color scheme, patterns, and any additional decorative elements. This will give you a clear vision before you start working on the boxes.
6. Cut and Assemble: Use the measurements to cut the materials into the desired shapes. Assemble the pieces using glue or other suitable methods. Follow the design you have sketched out.
7. Paint and Finish: Once the boxes are assembled, apply paint or other finishes to achieve the desired look. Use different techniques such as stenciling, decoupage, or hand-painting to add a creative touch.
8. Add Accessories: Consider adding accessories like handles, knobs, or labels to enhance the functionality and aesthetics of the storage boxes.
9. Test and Adjust: Test the functionality of the storage boxes by placing items inside. Make any necessary adjustments to ensure they serve their purpose effectively.
10. Enjoy and Maintain: Finally, place your decorative storage boxes in the designated area and enjoy the organized space. Remember to regularly maintain and clean the boxes to keep them in good condition.
2.2. 2. Selecting suitable materials
When it comes to creating decorative storage boxes, selecting the right materials is crucial. Not only do you want materials that are sturdy and durable, but you also want them to be aesthetically pleasing. Here is a step-by-step guide to help you choose the most suitable materials for your DIY project:
1. Cardboard: Cardboard is an excellent choice for creating storage boxes as it is readily available and cost-effective. Look for thick and durable cardboard that can withstand the weight of the items you plan to store.
2. Fabric: Adding fabric to your storage boxes can enhance their appearance and make them more visually appealing. Choose fabrics that complement your home decor and ensure they are sturdy enough to withstand regular use.
3. Adhesive: To assemble the storage boxes, you will need a reliable adhesive. Opt for a strong adhesive that can securely hold the materials together, such as craft glue or a hot glue gun.
4. Decorative Paper: If you want to add a touch of elegance to your storage boxes, consider using decorative paper. There are various patterns and designs available to suit your personal style.
5. Paint: Painting the storage boxes can completely transform their look. Select high-quality paint that adheres well to the chosen materials and choose colors that complement your overall decor.
6. Ribbons and Trims: To add a finishing touch to your decorative storage boxes, consider using ribbons and trims. They can be used to create borders, bows, or other decorative elements.
By carefully selecting suitable materials for your DIY decorative storage boxes, you can ensure that they not only serve their purpose but also add a stylish touch to your living space.
2.3. 3. Cutting and assembling the box
To create a decorative storage box, cutting and assembling the box is an essential step. Follow this step-by-step guide to easily make your own personalized storage solution.
1. Choose the material: Start by selecting a suitable material for your box. You can use sturdy cardboard, plywood, or even repurpose an old wooden crate.
2. Measure and mark: Determine the dimensions for your box based on your storage needs. Use a ruler or measuring tape to measure and mark the dimensions on the material.
3. Cut the pieces: Using a sharp utility knife or a saw, carefully cut out the individual pieces for the box – the bottom, sides, and lid. Make sure to follow your marked measurements accurately.
4. Sand the edges: After cutting the pieces, use sandpaper to smoothen any rough edges or corners for a neat finish.
5. Assemble the box: Apply a strong adhesive or use screws/nails to attach the sides to the bottom piece. Ensure that the pieces are aligned properly and securely fastened.
6. Attach the lid: If you want a hinged lid, attach a small hinge to one side of the lid and the corresponding side of the box. Alternatively, you can create a separate lid that can be easily lifted off.
7. Optional: Decorate the box: Once the box is assembled, you can unleash your creativity and decorate it according to your personal style. Paint it, use decoupage techniques, add fabric or wallpaper, or even apply stencils and embellishments.
8. Let it dry: If you have applied any paint or adhesive, allow the box to dry completely before using it for storage.
Voila! Your decorative storage box is now ready to be used. Repeat these steps to create multiple boxes in different sizes and designs to organize and beautify your space.
2.4. 4. Sanding and smoothing the surfaces
To achieve a professional and polished look for your decorative storage boxes, it is important to properly sand and smooth the surfaces. Follow these step-by-step instructions to ensure a smooth finish:
1. Gather the necessary materials: You will need sandpaper of various grits (starting with a coarse grit and progressing to a finer grit), a sanding block or sanding sponge, and a clean cloth.
2. Prepare the surface: Remove any existing paint, varnish, or adhesive from the storage box. Use a scraper or sandpaper to gently scrape away any stubborn residue.
3. Start with coarse grit sandpaper: Begin sanding the surfaces of the storage box using the coarsest grit sandpaper. Apply light pressure and sand in a circular motion. This will help remove any rough patches, imperfections, or raised edges.
4. Switch to a finer grit: Once you have achieved a smooth surface with the coarse grit sandpaper, switch to a finer grit. This will help refine the surface and remove any remaining scratches or roughness.
5. Use a sanding block or sanding sponge: To ensure even and consistent sanding, consider using a sanding block or sanding sponge. These tools provide a flat surface for sanding and help prevent unevenness.
6. Sand in the direction of the grain: If your storage box has a visible grain pattern, it is important to sand in the direction of the grain. This will help maintain the natural appearance and prevent any damage to the wood fibers.
7. Check for smoothness: After sanding with the finer grit, run your hand over the surfaces of the storage box to check for smoothness. If you encounter any rough spots, repeat the sanding process with the finer grit.
8. Wipe away dust: Once you are satisfied with the smoothness of the surfaces, use a clean cloth to wipe away any dust or debris.
By following these step-by-step instructions, you can ensure that your decorative storage boxes are sanded and smoothed to perfection, ready for any creative DIY project.
2.5. 5. Applying decorative elements
When it comes to adding a touch of style and organization to your home, decorative storage boxes can be a great solution. They not only provide a practical way to store your belongings but also serve as beautiful decor pieces. If you’re looking to add a personal touch to your storage boxes, here is a step-by-step guide on how to apply decorative elements.
1. Choose your storage boxes: Start by selecting the boxes you want to decorate. You can use plain cardboard boxes or repurpose old ones for a budget-friendly option.
2. Gather your materials: Depending on the design you have in mind, gather materials such as wrapping paper, fabric, paint, ribbons, or decorative paper. Make sure to have scissors, glue, and a ruler handy.
3. Measure and cut: Measure the dimensions of your storage boxes and cut the chosen material accordingly. Ensure that the pieces are large enough to cover the sides and the top of each box.
4. Apply adhesive: Use glue or double-sided tape to attach the material to the box. Start with the sides and then move on to the top. Smooth out any wrinkles or air bubbles as you go.
5. Add embellishments: To make your storage boxes even more visually appealing, consider adding embellishments such as ribbons, bows, or decorative buttons. You can also use stencils and paint to create unique designs.
6. Let it dry: Allow the adhesive to dry completely before handling the boxes. This will ensure that the decorative elements stay in place.
7. Arrange and enjoy: Once the boxes are dry, you can arrange them in your desired storage area. These decorative storage boxes will not only help you keep your belongings organized but also add a stylish touch to any room.
By following this step-by-step guide, you can easily transform plain storage boxes into beautiful decorative pieces that reflect your personal style and creativity.
3. Creative Ideas for Decorative Storage Boxes
Decorative storage boxes are a fantastic way to not only organize your belongings but also add a touch of creativity and style to your home decor. Whether you have plain cardboard boxes or old shoeboxes lying around, with a little imagination and some craft supplies, you can transform them into beautiful decorative storage solutions. Here are 10 creative DIY ideas to inspire you:
1. Decoupage Technique: Use pretty patterned paper or fabric to cover the exterior of the box. Apply a layer of decoupage glue or Mod Podge to seal it and give it a glossy finish.
2. Fabric Wrapped Boxes: Wrap the boxes with colorful fabric and secure it with glue or double-sided tape. You can mix and match different fabrics to create a unique and eclectic look.
3. Painted Designs: Get creative with paint and create your own designs on the boxes. Use stencils, stamps, or freehand painting to add patterns, flowers, or any other artwork you desire.
4. Vintage Look: Give your boxes a vintage feel by distressing them with sandpaper or using a crackle paint technique. Add some antique-looking embellishments like metal corners or vintage labels.
5. Washi Tape Magic: Jazz up your plain boxes with washi tape, which comes in various colors and patterns. You can create stripes, chevron designs, or even cover the entire box with the tape.
6. Upcycled Book Boxes: Turn old hardcover books into decorative storage boxes by hollowing out the pages. Glue the pages together and use it as a secret compartment for small treasures.
7. Rope or Twine Wrapped Boxes: Wrap thick rope or twine around your boxes, securing it with glue. This method works great for creating a rustic or nautical look.
8. Chalkboard Labels: Paint the exterior of the boxes with chalkboard paint and write labels or quotes using chalk. This way, you can easily change the labels whenever needed.
9. Faux Leather Boxes: Use faux leather or leather-like fabric to cover the boxes, giving them a luxurious and sophisticated appearance.
10. Photo Memory Boxes: Personalize your storage boxes by attaching your favorite photos to the exterior. They not only provide a unique decorative touch but also evoke sentimental memories.
These are just a few ideas to get you started on your DIY decorative storage box journey. The possibilities are endless, and you can let your creativity run wild. Remember to have fun and enjoy the process of transforming ordinary boxes into beautiful and functional pieces of decor!
3.1. 1. Vintage-inspired storage boxes
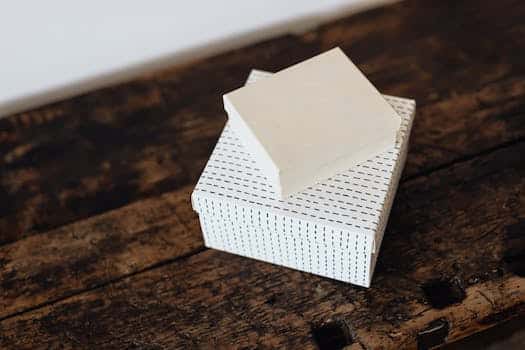
Vintage-inspired storage boxes can add a touch of nostalgia and charm to any space. These decorative storage boxes are not only practical for organizing your belongings, but they also serve as beautiful pieces of decor. Whether you want to store your trinkets, jewelry, or other small items, these vintage-inspired storage boxes will provide a stylish solution.
1. Vintage Suitcase Storage Box: Repurpose an old suitcase by transforming it into a unique storage box. You can add dividers or compartments inside to keep your items organized. This vintage-inspired storage box will not only add character to your space but also become a conversation starter.
2. Floral Decoupage Storage Box: Give your storage box a floral makeover by decoupaging it with beautiful flower prints. This DIY project is easy to do and will instantly add a touch of elegance to your room. Choose vintage-inspired floral patterns for a truly classic look.
3. Book Storage Box: If you love books, why not turn a vintage book into a storage box? Hollow out the pages of an old hardcover book and use it to store small items. This clever and creative idea is perfect for book lovers who want to add a literary touch to their storage solutions.
4. Vintage Label Storage Box: Create a vintage-inspired storage box by adding vintage labels or tags. You can use printable vintage labels or create your own using aged paper and calligraphy. Attach the labels to your storage boxes for a charming and organized look.
5. Map Covered Storage Box: Use old maps or vintage map prints to cover your storage boxes. This idea is not only practical but also adds a sense of adventure and wanderlust to your space. Choose maps from your favorite destinations or use vintage maps for a nostalgic feel.
6. Lace Covered Storage Box: Add a touch of femininity and elegance to your storage boxes by covering them with lace fabric. Choose vintage-inspired lace patterns for a romantic and delicate look. These lace-covered storage boxes will add a touch of vintage charm to any room.
7. Vintage Wallpaper Storage Box: Give your storage boxes a vintage makeover by covering them with vintage wallpaper. Choose patterns and colors that complement your room’s decor. This DIY project is a great way to repurpose old wallpaper and add a unique touch to your storage solutions.
8. Vintage Chest Storage Box: Repurpose an old chest or trunk by turning it into a storage box. You can paint or distress the chest for a vintage look. This large storage box is perfect for storing blankets, pillows, or other bulky items.
9. Fabric Covered Storage Box: Choose vintage-inspired fabrics to cover your storage boxes. You can use vintage floral prints, toile patterns, or any other fabric that matches your room’s decor. This DIY project is simple yet effective in adding a vintage touch to your storage solutions.
10. Vintage Tin Storage Box: Repurpose vintage tins or cans by transforming them into storage boxes. You can paint or decorate the tins to match your room’s decor. These unique storage boxes will add a nostalgic and rustic vibe to your space.
Incorporating vintage-inspired storage boxes into your home decor not only helps you stay organized but also adds a touch of character and charm. These creative DIY ideas for decorative storage boxes will inspire you to create unique and personalized storage solutions that reflect your style.
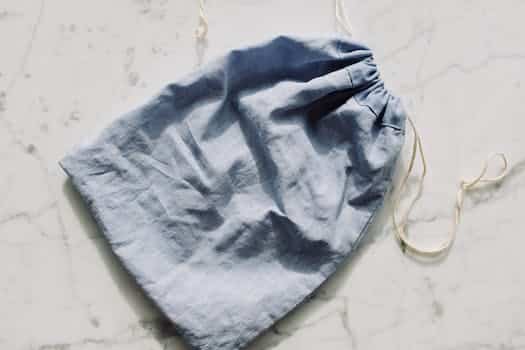
3.2. 2. Fabric-covered boxes
Fabric-covered boxes are a fantastic way to add a touch of elegance and style to your storage solutions. Not only do they provide a practical storage solution, but they also serve as beautiful decorative pieces. With a little creativity, you can transform plain storage boxes into stunning works of art.
One creative idea for fabric-covered boxes is to use different patterns and textures of fabric to create a unique and visually appealing design. You can mix and match fabrics with bold prints, delicate florals, or even metallic accents to add a pop of color and interest to your storage space.
Another idea is to embellish the fabric-covered boxes with decorative elements such as ribbons, buttons, or lace. These embellishments not only add a decorative touch but also provide a functional way to easily open and close the boxes.
If you’re feeling extra crafty, you can also consider adding personalization to the fabric-covered boxes. This can be done by using fabric paint or embroidery to add initials, names, or meaningful quotes. Personalized storage boxes not only add a personal touch but also make it easier to identify what’s inside.
Fabric-covered boxes can also be used as stylish gift boxes. Instead of using traditional wrapping paper, consider using fabric to wrap your gifts. This not only creates a unique and eco-friendly gift packaging but also allows the recipient to reuse the box for storage purposes.
In conclusion, fabric-covered boxes offer endless possibilities for creative and decorative storage solutions. Whether you’re looking to add a touch of elegance to your home decor or create unique gift packaging, fabric-covered boxes are a versatile and stylish choice.
3.3. 3. Decoupage technique for personalized boxes
Decoupage is a popular technique for personalizing storage boxes and giving them a unique, decorative touch. This technique involves decorating the surface of the box with cut-out images or patterns from paper and then sealing them with a layer of adhesive. Decoupage allows you to create beautiful designs on your storage boxes using various materials such as newspapers, magazines, or even printed images. By choosing different themes or color schemes, you can easily match the boxes to your existing home decor or create a cohesive look for a specific room. The possibilities with decoupage are endless, making it a fun and creative way to transform plain storage boxes into eye-catching pieces of functional art. So gather your materials and let your imagination run wild with decoupage!
3.4. 4. Painted and stenciled designs
Painted and stenciled designs offer a creative way to personalize decorative storage boxes. By adding some color and patterns, you can transform plain boxes into unique and eye-catching storage solutions. Here are a few ideas to inspire your creativity:
1. Geometric Patterns: Use painter’s tape to create crisp and clean lines on the box. Experiment with different shapes and sizes to achieve a modern and stylish look.
2. Floral Motifs: Paint delicate flowers or leaves on the box for a charming and feminine touch. You can use stencils or freehand paint for a more artistic effect.
3. Ombre Effect: Create a gradient effect by blending two or more colors together. Start with a light shade at the bottom and gradually transition to a darker shade at the top of the box.
4. Nature-Inspired Designs: Draw inspiration from nature by painting landscapes, animals, or plants on the box. This will add a whimsical and organic feel to your storage solution.
5. Monogrammed Boxes: Personalize the boxes by painting your initials or monogram on them. This is a great way to add a personal touch and make the boxes uniquely yours.
6. Vintage Patterns: Embrace a vintage aesthetic by using stencils or decals with retro patterns such as polka dots, stripes, or damask designs.
7. Abstract Art: Let your creativity flow and create abstract designs using bold brushstrokes, splatters, or geometric shapes. This will result in a one-of-a-kind and visually appealing storage box.
Remember, when painting or stenciling on the box, make sure to use acrylic or craft paints that adhere well to the surface. Seal the design with a clear varnish or Mod Podge to protect it from wear and tear. With these painted and stenciled designs, your storage boxes will not only keep your belongings organized but also serve as decorative pieces in your home.
3.5. 5. Upcycled and repurposed containers
Upcycling and repurposing containers can be a fun and eco-friendly way to add a unique touch to your home decor. When it comes to decorative storage boxes, the possibilities are endless. Instead of buying new ones, you can transform old containers into beautiful and functional pieces. Here are some creative ideas to get you started:
1. Vintage Suitcase Storage Box: Give an old vintage suitcase a new lease on life by using it as a storage box. Paint it in a color that matches your home decor and add some decorative accents like stickers or stencils.
2. Wooden Crate Organizer: Use old wooden crates to create a stylish and rustic storage solution. Stack them together and attach them with screws for stability. You can leave them as they are for a natural look or paint them to add a pop of color.
3. Mason Jar Storage Containers: Repurpose empty mason jars by turning them into storage containers. Fill them with small items like buttons, beads, or spices and label them for easy organization.
4. Book Box Storage: If you have old books lying around, turn them into decorative storage boxes. Hollow out the pages and use the book as a secret compartment for storing small items.
5. Wine Crate Shelves: Wine crates can be repurposed into unique storage shelves. Attach them to the wall and use them to display books, plants, or other decorative items.
These are just a few ideas to inspire you to think outside the box when it comes to decorative storage. Upcycling and repurposing not only adds character to your home, but it also helps reduce waste and promotes sustainability.
Conclusion
In conclusion, these 10 creative DIY ideas for decorative storage boxes offer a fun and personalized way to add stylish organization to any space. From repurposing old materials to incorporating unique designs, these projects are sure to inspire your creativity and enhance your home decor. Get started on transforming your storage boxes into functional and eye-catching pieces today!


11 Comments
Vanda Tekla
1 year agoWowza! Who knew storage boxes could be such fabulous works of art? 😄 These DIY ideas are like a magic spell that turns ordinary cardboard into stunning masterpieces! 🎨 From funky patterns to whimsical designs, Im ready to unleash my inner artist and transform my boring old boxes into decorative wonders! 🎉 Time to gather my paints, glitter, and maybe even some googly eyes… Let the crafting madness begin! 💫
Juieta Warfourd
1 year agoWow, these DIY ideas are absolutely mind-blowing! Who knew that ordinary storage boxes could be transformed into such stunning decorative pieces? The creativity and artistic touch behind these projects is truly inspiring. From vibrant paint patterns to intricate decoupage designs, each idea seems to bring out the personality of the box in a unique way. I can already imagine how these transformed storage boxes would add a touch of charm and elegance to any room. Time to unleash my inner artist and give my old storage boxes a magical makeover! ✨🎨
Simona Merow
1 year agoWowza, these DIY ideas are like magic spells for boring storage boxes! 💫✨ Who knew that ordinary boxes could turn into stunning pieces of art?! Its like giving them a superhero makeover! 🦸♀️🦸♂️ I can already imagine the envy on my friends faces when they see my transformed boxes. 😏💁♀️ DIY, here I come! 🎨🔨
Hailee Tildy
1 year agoThe notion of transforming ordinary storage boxes into captivating decorative pieces through do-it-yourself (DIY) approaches is indeed an intriguing concept. This post offers a valuable opportunity to explore unique and artistic methods for enhancing the visual appeal of these utilitarian objects. By delving into the creative realm of DIY, individuals can elevate the mundane nature of storage boxes, imbuing them with a sense of artistry and individuality.
The utilization of these DIY ideas can potentially revolutionize the way we perceive and utilize storage boxes in our everyday lives. Through the incorporation of various techniques, such as painting, decoupage, or even fabric wrapping, these once-ordinary containers can be transformed into stunning works of art. This not only adds aesthetic value to the objects but also allows for personalized expression and creativity to shine through.
Furthermore, the exploration of unconventional materials and textures in this post opens up a world of possibilities for those seeking to push the boundaries of traditional decor. By incorporating elements like reclaimed wood, vintage fabrics, or even metal accents, individuals can lend a distinct character to their storage boxes, turning them into focal points of admiration within any interior space.
In conclusion, this post serves as an enlightening resource for individuals aspiring to infuse their storage boxes with a touch of artistic brilliance. The showcased DIY ideas prompt us to reimagine the potential of these seemingly mundane objects, encouraging us to explore various techniques and materials to create truly unique and visually captivating decorative pieces.
Tani Cleon
1 year agoWow, these DIY ideas for transforming storage boxes into decorative pieces are truly amazing! I never thought that something as ordinary as a storage box could be turned into stunning artwork. Cant wait to try these out and add a touch of creativity to my home decor.
Darryl Koerlin
1 year agoWow, I never thought storage boxes could be turned into such beautiful decorative pieces! These DIY ideas are truly inspiring and unique. Cant wait to give them a try and add a touch of artistry to my home storage. 💡🎨
Antonietta Mungo
1 year agoThese DIY ideas to transform ordinary storage boxes into stunning decorative pieces are absolutely brilliant! I never thought that something as simple as a storage box could be turned into a work of art. The creativity and uniqueness behind these projects is truly inspiring. I cant wait to try them out and add a touch of personal style to my storage solutions. Thank you for sharing such amazing ideas!
Drucy Virg
1 year agoWow, I must say I am absolutely blown away by these DIY ideas! Who would have thought that simple storage boxes could be transformed into such breathtaking decorative pieces? Its incredible how a touch of creativity can turn something ordinary into something extraordinary. These unique and artistic concepts truly showcase the endless possibilities when it comes to crafting. I cant wait to get my hands on some storage boxes and start experimenting with these amazing ideas. Kudos to the creative minds behind these stunning transformations!
Margarette Tedie
1 year agoThese DIY ideas for transforming ordinary storage boxes into stunning decorative pieces are simply amazing! I never thought that something as simple as a storage box could be turned into a work of art. The creativity and uniqueness behind these ideas are truly inspiring. I cant wait to try them out and add a touch of artistic flair to my home. Thank you for sharing these fantastic ideas!
Rebe Belen
1 year agoThese DIY ideas provide a creative and inspiring approach to elevate the aesthetic appeal of storage boxes. By incorporating unique and artistic elements, one can effortlessly transform these ordinary containers into captivating decorative pieces. This post serves as an excellent resource for individuals seeking to add a touch of personality and style to their storage solutions.
Glynnis Rochell
1 year agoThank you for sharing these innovative DIY ideas! Im always on the lookout for creative ways to transform everyday items into beautiful decorative pieces. These unique storage box transformations are truly artistic and inspiring. Cant wait to try them out and add a touch of elegance to my living space. Well done!