
Decorating your walls with vinyl records is a unique and creative way to add a touch of personality to your home. With a little bit of DIY creativity, you can transform old records into stunning pieces of art that will make a statement in any room. In this article, we will explore 10 creative DIY wall art ideas using vinyl records that are sure to inspire your inner artist.
- 1. Introduction
- 1.1. What is DIY wall art?
- 1.2. Why use vinyl records?
- 1.3. Benefits of DIY wall art using vinyl records
- 1.4. Materials needed
- 1.5. Step-by-step process
- 2. Preparing the vinyl records
- 2.1. Cleaning the records
- 2.2. Removing the labels
- 2.3. Cutting the records
- 2.4. Sanding the edges
- 2.5. Painting the records
- 3. Designing the wall art
- 3.1. Choosing a design
- 3.2. Sketching the design
- 3.3. Cutting the design
- 3.4. Arranging the pieces
- 3.5. Gluing the pieces
- 4. Displaying the wall art
1. Introduction
Vinyl records have been a popular medium for music lovers for decades. But did you know that they can also be used as a creative and unique way to decorate your walls? With a little bit of imagination and some DIY skills, you can turn old vinyl records into one-of-a-kind pieces of art that will add a touch of vintage charm to any room. In this article, we’ll explore 10 creative DIY wall art ideas using vinyl records that are sure to inspire your inner artist.
1.1. What is DIY wall art?
DIY wall art refers to creating unique and personalized pieces of art for your walls using materials and tools that are readily available. It is a fun and creative way to add a personal touch to your home decor and showcase your artistic skills. With the use of vinyl records, you can create beautiful, one-of-a-kind wall art pieces that are sure to impress. In this article, we will explore 10 creative DIY wall art ideas using vinyl records that you can try out at home.
1.2. Why use vinyl records?
Vinyl records have been around for decades and have remained a popular form of music listening despite the emergence of digital music. There are several reasons why people still use vinyl records. For one, the sound quality is often considered superior to digital formats. Vinyl records also offer a sense of nostalgia and a unique physicality that digital music lacks. Additionally, some collectors appreciate the artwork and packaging of vinyl records. Overall, there are many reasons why vinyl records continue to be a beloved format for music lovers.
1.3. Benefits of DIY wall art using vinyl records
DIY wall art has become a popular trend for those looking to add a personal touch to their home decor. One creative way to achieve this is by using vinyl records. Not only is it an affordable option, but it also allows for endless customization. Vinyl records come in various colors and sizes, making it easy to create a unique piece of wall art that complements your style. In this article, we will explore the benefits of using vinyl records for DIY wall art and provide 10 creative ideas to inspire your next project.
1.4. Materials needed
Are you looking for a unique and creative way to decorate your walls? Using vinyl records is an excellent idea! Not only is it an affordable way to add some personality to your home, but it also gives you the opportunity to repurpose old records that might otherwise end up in the trash. In this article, we will give you 10 creative DIY wall art ideas using vinyl records. But before we get started, let’s take a look at the materials you will need to complete these projects.
1.5. Step-by-step process
Vinyl records have made a comeback in recent years, not just as a beloved music format but also as a unique and creative material for DIY projects. One of the most popular uses for vinyl records is as wall art. With a little creativity and some basic crafting supplies, you can transform old vinyl records into stunning pieces of art that add personality and charm to any room in your home. In this article, we’ll show you step-by-step how to create 10 different DIY wall art ideas using vinyl records. From simple designs to more intricate patterns, there’s something for everyone on this list. So, grab your old vinyl records and let’s get started!
2. Preparing the vinyl records
Before starting any DIY project using vinyl records, it is important to properly prepare them. First, make sure the records are clean and free of any dust or debris. Use a soft cloth or microfiber towel to gently wipe them down. Avoid using harsh chemicals or solvents, as these can damage the vinyl. Next, decide if you want to keep the record intact or if you plan to cut it into pieces. If you’re keeping it intact, ensure that the label is facing outwards and is not obstructed by any hanging hardware. If you plan to cut the record, use a steady hand and a sharp pair of scissors or a craft knife. Remember to always prioritize safety and wear gloves when handling sharp objects. By properly preparing your vinyl records, you’ll ensure that your DIY wall art looks its best and lasts for years to come.
2.1. Cleaning the records
Before you start creating your DIY wall art using vinyl records, it’s important to make sure that your records are clean. Dust and debris can affect the quality of sound and also make it difficult to paint or decorate the records. To clean your records, use a soft, lint-free cloth and a gentle cleaning solution. Avoid using harsh chemicals or abrasive materials, as these can damage the vinyl. Once your records are clean and dry, you can start preparing them for your wall art project.
2.2. Removing the labels
Before you can start transforming your vinyl records into creative wall art, you need to prepare them. One important step is to remove the labels from the records. This can be done by soaking the record in warm water for about 10 minutes. After soaking, the label should peel off easily. If there is any remaining adhesive residue, you can use a solution of equal parts water and rubbing alcohol to remove it. Once the label is removed, make sure to dry the record thoroughly before using it for your DIY project.
2.3. Cutting the records
Preparing the vinyl records is an important step in creating DIY wall art. Start by cleaning the records with a soft cloth to remove any dust or dirt. Next, use a heat gun or hair dryer to soften the vinyl so it can be molded into different shapes. Be careful not to overheat the record or it could warp. Once the vinyl is pliable, use scissors or a craft knife to cut the record into the desired shape. You can also use a heated metal cookie cutter to cut out specific shapes. Experiment with different shapes and sizes to create unique and eye-catching wall art.
2.4. Sanding the edges
Before starting any DIY project using vinyl records, it is important to prepare them properly. One crucial step is to sand the edges of the record. This can be done using a fine grit sandpaper or a sanding block. Gently rub the edges of the record until they are smooth and free of any jagged or rough edges. This will not only make the record safer to handle, but it will also ensure a clean and polished look for your finished project.
2.5. Painting the records
Before you start creating your DIY wall art using vinyl records, it’s important to properly prepare them. The first step is to clean the records with a soft cloth to remove any dust or dirt. Next, you’ll want to remove the paper label from the center of the record. You can do this by using a hair dryer to warm up the label and then gently peeling it off. It’s important to be careful during this step to avoid damaging the record. Finally, you can paint the record with your desired colors and designs using acrylic paint. Allow the paint to fully dry before hanging the record on your wall as a unique and creative piece of art!
3. Designing the wall art
One of the easiest ways to create unique and creative wall art is by repurposing old vinyl records. Not only is this a budget-friendly option, but it also adds a touch of nostalgia to any space. Here are 10 DIY wall art ideas using vinyl records that you can easily create at home:
3.1. Choosing a design
When it comes to designing the wall art for your DIY vinyl record project, there are a few things to consider. First, think about the overall theme or aesthetic you want to achieve. Are you going for a retro vibe with bold colors and graphic designs? Or maybe a more minimalist look with simple shapes and neutral tones. Once you have a general idea of the style you want, start browsing through different vinyl record designs to see what catches your eye. You can find inspiration online or at local thrift stores and record shops. Don’t be afraid to mix and match different designs to create a unique and personalized piece of wall art. Another option is to create your own design using vinyl stickers or stencils. This allows you to have complete control over the final product and ensures that it will match your existing decor. Whatever design you choose, make sure it complements the room and reflects your personal style.
3.2. Sketching the design
To begin creating your DIY vinyl record wall art, start by sketching out your design. This will help you visualize the layout and make any necessary adjustments before you start hanging the records on the wall. Consider using different sized records and arranging them in a pattern or random placement. You can also mix and match colors and styles for added visual interest. Don’t be afraid to get creative and experiment with different ideas until you find a design you love.
3.3. Cutting the design
Cutting the design is a crucial step when designing wall art with vinyl records. First, choose the design you want to create and print it out on a piece of paper. Then, place the vinyl record on a cutting mat and use a craft knife or scissors to carefully cut out the design. Take your time and be precise to ensure the design is cut out cleanly and accurately. Once the design is cut, you can then use it as a stencil to paint or decorate the vinyl record and create a unique piece of wall art.
3.4. Arranging the pieces
When it comes to designing wall art using vinyl records, there are a few key pieces you’ll need to arrange to achieve the desired look. First, you’ll need to select the records you want to use. Consider the color and design of the record labels, as well as the condition of the vinyl itself. Next, you’ll need to decide on a layout for the records. Will you be arranging them in a specific pattern or randomly? Will you be using frames or simply attaching the records directly to the wall? Finally, you’ll need to consider any additional elements you want to add to the display, such as lighting or other decorative accents. By carefully arranging all of these pieces, you can create a stunning and unique piece of wall art that showcases your love of music and creativity.
3.5. Gluing the pieces
Once you have collected your vinyl records, it’s time to start designing your wall art. Begin by laying out the records on a flat surface and experimenting with different arrangements until you find a design that you like. Once you have your design, it’s time to start gluing the pieces together. You can use a strong adhesive like E6000 to glue the records together, or you can use a hot glue gun. Be sure to let the glue dry completely before hanging your new wall art.
4. Displaying the wall art
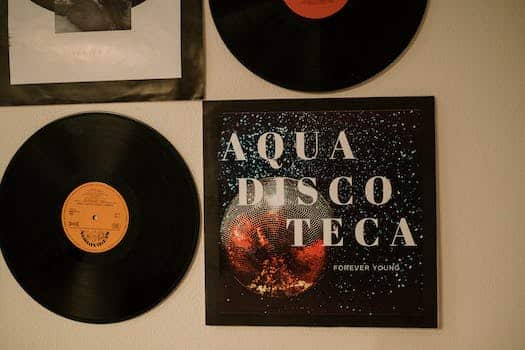
When it comes to displaying your DIY vinyl record wall art, the possibilities are endless. You can create a gallery wall by combining different record designs and sizes, or you can focus on one statement piece as the focal point. Hang them above a couch or bed, or even in a hallway for a pop of color and personality. You can also mix and match with other wall art pieces, such as photographs or paintings, to create an eclectic look. The key is to have fun and let your creativity shine!
4.1. Choosing a location
When it comes to creating DIY wall art using vinyl records, choosing the right location to display your creation is key. Consider the size of the artwork and the space where you want to hang it. A larger piece may work best as a focal point above a couch or bed, while smaller pieces can be grouped together on a gallery wall. Additionally, think about the overall aesthetic of the room and choose a location that complements the style and color scheme. By carefully selecting the right spot to showcase your vinyl record art, you can create a truly stunning and unique feature in your home.
4.2. Hanging the wall art
When it comes to displaying wall art, one of the most important considerations is how to hang it. Whether you’re using vinyl records or any other medium, there are a few key tips to keep in mind. First, be sure to choose the right hardware for the weight and size of your artwork. This may include picture hangers, nails, or screws. Second, consider the placement of your art in relation to other elements in the room. You’ll want to ensure that it’s at the right height and that it complements the surrounding decor. Finally, don’t be afraid to experiment with different arrangements and groupings. With a little creativity, you can turn your wall art into a stunning focal point.
4.3. Using lighting to enhance the display
To enhance the display of your DIY vinyl record wall art, consider using lighting. Proper lighting can draw attention to the details of the artwork and create a more dynamic visual experience. There are a variety of lighting options to choose from, including LED strip lights, track lighting, and spotlights. Experiment with different placement and angles to find the best way to highlight your artwork. Consider using warm-toned lights to create a cozy atmosphere, or cool-toned lights for a more modern look. Whatever you choose, adding lighting to your vinyl record wall art can take your DIY project to the next level.
4.4. Maintaining the wall art
Maintaining the wall art is essential to ensure that it remains in good condition and lasts for a long time. Here are some tips to help you keep your vinyl record wall art looking great:
1. Dust the vinyl records regularly with a soft, dry cloth to prevent dirt and grime from building up on the surface.
2. Avoid touching the vinyl records with your bare hands as the oils from your skin can cause damage to the surface over time.
3. Keep the vinyl records out of direct sunlight as this can cause fading and discoloration over time.
4. If you need to clean the vinyl records, use a mild detergent mixed with water and a soft cloth to gently wipe the surface.
5. Finally, be sure to handle the vinyl records with care when hanging them on the wall to avoid any accidental damage or scratches.
4.5. Updating the wall art
Updating the wall art in your home can breathe new life into any room. One way to do this is by incorporating vinyl records into your decor. There are so many creative DIY ideas you can try that will add a unique touch to your walls. In this article, we’ll explore 10 of the best ideas for using vinyl records to create beautiful and personalized wall art.
Conclusion
In conclusion, using vinyl records to create DIY wall art is a fun and creative way to decorate your home. With these 10 ideas, you can easily transform your space into a unique and stylish haven that reflects your personality and individuality.


These 10 innovative and imaginative DIY home decor ideas from [object Object] provide a refreshing approach to enhancing ones living…