

Are you tired of your outdated furniture? Do you want to transform your home without breaking the bank? Look no further than these 10 creative furniture makeovers. With a little bit of creativity and some DIY skills, you can give your furniture a whole new life and bring a fresh look to your home. From painting and staining to reupholstering and decoupaging, these ideas will inspire you to get creative and transform your home.
- 1. Introduction
- 1.1. Why furniture makeovers?
- 1.2. Benefits of creative furniture makeovers
- 1.3. Tools and materials needed
- 2. DIY Painted Furniture Makeovers
- 2.1. Prepping the furniture
- 2.2. Choosing the right paint
- 2.3. Painting techniques
- 2.4. Adding patterns and designs
- 2.5. Finishing touches
- 3. Upcycling Furniture with Fabric
- 3.1. Selecting the right fabric
- 3.2. Preparing the furniture
- 3.3. Upholstering techniques
- 3.4. Adding trim and details
- 3.5. Finishing touches
- 4. Refurbishing Furniture with Decoupage
1. Introduction
Are you tired of looking at the same old furniture in your home? Do you want to give your living space a fresh and unique look? Look no further! In this article, we will be showcasing 10 creative furniture makeovers that will transform your home. These makeovers are budget-friendly and easy to DIY, so whether you’re a seasoned crafter or just starting out, there’s something for everyone. Get ready to be inspired and let’s get started!
1.1. Why furniture makeovers?
Furniture makeovers are a great way to transform your home without breaking the bank. By taking existing pieces of furniture and giving them a fresh new look, you can create a unique and personalized space that reflects your style and personality. Whether you’re looking to update an old piece of furniture or simply want to add some flair to your home decor, a furniture makeover can be the perfect solution. In this article, we’ll explore 10 creative furniture makeovers that will inspire you to get creative and transform your home.
1.2. Benefits of creative furniture makeovers
Creative furniture makeovers offer a unique way to transform your home without breaking the bank. By repurposing and updating old furniture pieces, you can give your space a fresh new look that reflects your personal style. Not only is this a cost-effective solution, but it’s also an environmentally friendly one. Upcycling furniture reduces waste and helps to conserve natural resources. Additionally, creative furniture makeovers can be a fun and rewarding DIY project that allows you to express your creativity and showcase your craftsmanship. Overall, the benefits of creative furniture makeovers are numerous and can greatly enhance the aesthetic and functionality of your home.
1.3. Tools and materials needed
Before embarking on a furniture makeover project, it is important to gather all the necessary tools and materials. Some of the essential tools include sandpaper, paintbrushes, paint rollers, a paint sprayer, a drill, a screwdriver, and a hammer. Additionally, you will need paint or stain, primer, varnish, upholstery fabric, and any decorative elements such as knobs or handles. Having these items on hand will ensure that your furniture makeover goes smoothly and is completed to your satisfaction.
2. DIY Painted Furniture Makeovers
Transforming your home doesn’t have to break the bank. With a little creativity and some elbow grease, you can give your furniture new life with a fresh coat of paint. DIY painted furniture makeovers are a great way to add personality and style to your space. Whether you’re a seasoned DIYer or just starting out, these 10 creative furniture makeovers are sure to inspire you to get painting!
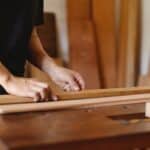
2.1. Prepping the furniture
Prepping the furniture is a crucial step in any furniture makeover project. This involves cleaning the piece thoroughly, sanding down any rough spots or previous finishes, and applying a primer if necessary. By taking the time to properly prep the furniture, you can ensure that your DIY painted furniture makeover will look professional and last for years to come.
2.2. Choosing the right paint
When it comes to DIY painted furniture makeovers, choosing the right paint is crucial for achieving the desired result. There are different types of paint to choose from, including chalk paint, milk paint, acrylic paint, and latex paint. Each type of paint has its own unique properties and advantages, so it’s important to consider your specific needs and preferences. For example, chalk paint is great for creating a vintage, shabby-chic look, while milk paint has a more natural, organic finish. Acrylic paint is versatile and easy to use, while latex paint is durable and long-lasting. Ultimately, the choice of paint will depend on factors such as the type of furniture, the desired style, and the level of durability required. By selecting the right paint, you can transform your furniture into a stunning masterpiece that adds personality and charm to your home.
2.3. Painting techniques
Painting furniture can be a great way to give your old pieces a new and updated look. There are many different techniques you can use to achieve the desired effect. One popular technique is using chalk paint, which can create a distressed and vintage look. Another technique is using a spray paint or paint sprayer, which can create a smooth and even finish. Stenciling and decoupage are also popular techniques for adding a unique touch to your furniture. No matter which technique you choose, be sure to properly prepare your furniture and use high-quality paint for the best results.
2.4. Adding patterns and designs
Adding patterns and designs is a great way to transform old furniture into unique and personalized pieces. Whether you prefer bold geometric shapes or delicate floral motifs, there are endless possibilities for adding a touch of creativity to your painted furniture makeovers. Some popular techniques for adding patterns include using stencils, decals, or freehand painting. Consider adding a pop of color or metallic accents to really make your design stand out. With a little bit of patience and creativity, you can turn any old piece of furniture into a beautiful and functional work of art.
2.5. Finishing touches
Once you have completed the painting process, it’s time to add those finishing touches that will really make your furniture stand out. Consider adding new hardware, such as knobs or handles, that complement the color and style of the piece. You can also distress the furniture using sandpaper to give it a vintage, shabby-chic look. Finally, don’t forget to seal the piece with a protective coat of wax or polyurethane to ensure it lasts for years to come. These small details can really elevate your DIY furniture makeover to the next level.
3. Upcycling Furniture with Fabric
Upcycling furniture with fabric is a great way to transform old, worn-out pieces into something new and beautiful. Whether you’re working with an old chair, sofa, or table, adding fabric can completely change the look and feel of the piece. Plus, it’s an eco-friendly way to give new life to furniture that might otherwise end up in a landfill. There are so many different fabrics to choose from – bold prints, subtle patterns, and rich textures – so you’re sure to find something that fits your style. With a little creativity and some basic sewing skills, you can create a one-of-a-kind piece that will add character and charm to your home.
3.1. Selecting the right fabric
When upcycling furniture with fabric, selecting the right fabric is key to achieving a beautiful and durable finished product. Consider the function of the piece and the amount of wear and tear it will receive. For example, a chair that will be used frequently will require a more durable fabric than a decorative pillow. Additionally, consider the style and color scheme of the room the piece will be used in to ensure the fabric complements the overall decor. Don’t be afraid to mix and match fabrics for a unique and personalized look.
3.2. Preparing the furniture
Before beginning the upcycling process, it is important to properly prepare the furniture. This includes cleaning the surface, sanding it down if necessary, and removing any hardware or fixtures that may get in the way. It is also important to decide on the type of fabric that will be used for the upcycling process, as this will affect the preparation process. For example, if using a lightweight fabric, it may be necessary to apply a coat of adhesive to the surface to help it adhere properly.
3.3. Upholstering techniques
Upholstering is a great way to upcycle furniture with fabric. It not only gives a new look to old furniture, but also adds comfort and durability. Here are some techniques to follow for a successful upholstery project:
1. Measure the Furniture: Before you start upholstering, take accurate measurements of the furniture to determine how much fabric you will need.
2. Remove Old Fabric: Remove any old fabric, staples, or tacks from the furniture. Make sure to keep the original fabric intact so you can use it as a pattern for the new fabric.
3. Cut the New Fabric: Lay out the new fabric and use the old fabric as a pattern to cut the new fabric to size.
4. Attach the New Fabric: Starting at one end, attach the new fabric to the furniture using a staple gun. Make sure to pull the fabric tight and smooth out any wrinkles as you go.
5. Finish with Trim: Once the new fabric is attached, finish the edges with trim or piping for a professional look.
3.4. Adding trim and details
Adding trim and details can add a unique touch to upcycled furniture pieces. Consider using fabric to create a custom look. Adding piping or tassels can bring a pop of color to a plain piece. You can also use fabric to create a patterned accent on drawer fronts or table tops. The possibilities are endless when it comes to adding trim and details!
3.5. Finishing touches
To add the finishing touches to your upcycled furniture piece, consider adding some fabric accents. You can use fabric to upholster a chair or cushion, or even create a unique patchwork design on a dresser or table. Look for fabric that complements the colors and style of your piece, and don’t be afraid to mix and match patterns for a fun and eclectic look. Just be sure to use a strong adhesive or sewing techniques to ensure that your fabric accents stay in place for years to come.
4. Refurbishing Furniture with Decoupage
Refurbishing furniture with decoupage is a great way to give new life to old, worn-out pieces. Decoupage involves using adhesive to attach paper or fabric to a surface, creating a unique and personalized design. This technique can be used on a variety of furniture items, from dressers and desks to chairs and tables. By choosing the right materials and design, you can transform an outdated piece into a stunning focal point for any room in your home.
4.1. Selecting the right paper or fabric
When it comes to refurbishing furniture with decoupage, selecting the right paper or fabric is crucial for achieving a professional and polished look. For paper, choose a high-quality, thin and flexible option that won’t wrinkle or tear easily. Look for designs that complement the style of your furniture and the overall aesthetic of your space. For fabric, opt for a lightweight and durable material that can be easily manipulated and glued onto the surface of your furniture. Consider using patterned fabric to add texture and interest to plain or solid-colored pieces. Taking the time to choose the right materials will ensure that your decoupage project turns out beautifully and lasts for years to come.
4.2. Preparing the furniture
Before beginning the process of refurbishing furniture with decoupage, it is important to properly prepare the piece. This includes cleaning the furniture thoroughly, removing any peeling or chipped paint, and sanding down any rough patches. It is also recommended to prime the furniture before applying any decoupage materials. By taking the time to properly prepare the furniture, you can ensure a smooth and long-lasting finish.
4.3. Decoupaging techniques
Decoupage is a popular technique used to refurbish old furniture. It involves cutting out images from paper or fabric and then gluing them onto a surface to create a decorative effect. There are many different decoupaging techniques you can use to transform your furniture, from simple paper cutouts to more intricate designs using multiple layers of materials. With a little bit of creativity and some patience, you can create beautiful and unique pieces of furniture that will add character and charm to your home.
4.4. Adding texture and depth
Adding texture and depth to your furniture can give it an entirely new look and feel. One way to do this is by using the decoupage technique. Decoupage involves gluing paper or fabric onto a surface and then sealing it with a protective coating. This method can be used to create intricate designs or add a pop of color to a piece of furniture. By layering different materials, you can create a unique texture that adds depth and dimension to your furniture. Whether you choose to decoupage an entire piece or just add a few accents, this technique is a great way to refurbish your furniture and give it a fresh, modern look.
4.5. Finishing touches
To give your refurbished furniture a polished look, consider adding some finishing touches with decoupage. Decoupage involves applying paper cutouts or fabric to the surface of the furniture, then sealing it with a clear coat of glue. This technique can add texture, color, and interest to your piece. You can use decoupage to create a vintage or shabby-chic look, or to add a pop of color to a neutral piece. Experiment with different patterns and textures to create a unique look that reflects your style.
Conclusion
Incorporating creative furniture makeovers into your home décor can transform your living space into a stylish and unique haven. From repurposing old pieces to adding a fresh coat of paint, these DIY projects are a cost-effective way to elevate your home design.


These 10 innovative and imaginative DIY home decor ideas from [object Object] provide a refreshing approach to enhancing ones living…