

Looking to add a personal touch to your living space? Get ready to unleash your creativity with these 10 creative homemade DIY home decor ideas. Whether you’re a seasoned DIY enthusiast or just starting out, these ideas will inspire you to transform your home into a unique and stylish haven. From repurposing old items to crafting new ones from scratch, these DIY projects will not only save you money but also add a touch of charm and personality to your home. Let’s dive in and explore the endless possibilities of DIY home decor!
- 1. Introduction
- 1.1. Why choose homemade DIY home decor?
- 1.2. Benefits of homemade DIY home decor
- 1.3. Tools and materials needed for DIY home decor
- 2. Creative DIY Wall Decor Ideas
- 2.1. Abstract canvas art
- 2.2. Upcycled photo frames
- 2.3. Wall-mounted planters
- 2.4. Gallery wall with personal touch
- 2.5. Geometric wall stencils
- 3. Innovative DIY Lighting Ideas
- 3.1. Mason jar pendant lights
- 3.2. Wine bottle chandeliers
- 3.3. Rustic wooden candle holders
- 3.4. LED strip light accents
- 3.5. Fairy light curtains
- 4. Easy DIY Furniture Makeovers
1. Introduction
Are you ready to add a touch of creativity and personal style to your home decor? Look no further! In this article, we will explore 10 amazing DIY home decor ideas that will transform your living space into a unique and inviting haven. From repurposing everyday items to creating beautiful crafts from scratch, these ideas are not only budget-friendly but also fun and rewarding. So, roll up your sleeves and let’s dive into the world of creative homemaking!
1.1. Why choose homemade DIY home decor?
When it comes to decorating your home, there are countless options available. However, choosing homemade DIY home decor has its own unique charm and benefits. Creating your own decorations allows you to add a personal touch to your living space and showcase your creativity. Not only that, but it also provides a cost-effective alternative to buying expensive home decor items. DIY projects are not only fun and fulfilling but also give you the opportunity to repurpose and upcycle materials, making them environmentally friendly. Furthermore, homemade DIY home decor allows you to customize your decorations according to your preferences and style, ensuring that your home reflects your individuality. In this article, we will explore ten creative homemade DIY home decor ideas to inspire you to embark on your own decorating journey.
1.2. Benefits of homemade DIY home decor
Homemade DIY home decor can be a great way to add a personal touch to your living space. Not only is it a fun and creative activity, but it also has several benefits. One of the main advantages of making your own home decor is that it allows you to customize your space according to your preferences and style. You have complete control over the design, colors, and materials used, ensuring that your decor reflects your unique personality and taste.
Another benefit of homemade DIY home decor is the cost-effectiveness. Purchasing ready-made home decor items from stores can be quite expensive, especially if you are looking for high-quality and unique pieces. By creating your own decor, you can save money and still achieve the same desired look. DIY projects often involve using inexpensive materials or repurposing old items, making it a budget-friendly option.
Furthermore, engaging in DIY home decor projects can be a therapeutic and stress-relieving activity. It allows you to channel your creativity and focus on a task that is both enjoyable and productive. The process of transforming ordinary materials into beautiful decor can be highly satisfying and rewarding. It also provides a sense of accomplishment and pride when you see the finished product displayed in your home.
In addition to these benefits, homemade DIY home decor is also environmentally friendly. By repurposing items or using sustainable materials, you can contribute to reducing waste and promoting a more sustainable lifestyle. It’s a great way to upcycle old furniture or decorations, giving them a new life and purpose.
Overall, homemade DIY home decor offers numerous advantages, including personalization, cost-effectiveness, stress relief, and environmental consciousness. It allows you to create a unique and stylish living space while also enjoying the process of crafting and decorating.
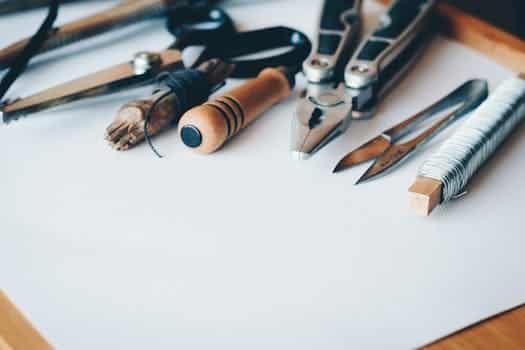
1.3. Tools and materials needed for DIY home decor
When it comes to DIY home decor, having the right tools and materials is essential. Whether you’re a novice or an experienced DIY enthusiast, having the necessary supplies will make your projects easier and more successful. Here are some of the essential tools and materials you’ll need for your creative homemade DIY home decor ideas:
1. Measuring Tape: A measuring tape is crucial for accurate measurements when planning and executing your DIY projects.
2. Screwdriver Set: A set of screwdrivers with various sizes and types will come in handy for assembling and disassembling furniture or fixing small items.
3. Paintbrushes: Different sizes of paintbrushes will allow you to create various textures and effects on your walls, furniture, or other decorative items.
4. Glue Gun: A glue gun is a versatile tool for attaching different materials together, such as fabric, paper, or plastic.
5. Hammer: A hammer is essential for any DIY project that involves nails, whether you’re hanging artwork or building custom furniture.
6. Pliers: Pliers are useful for bending wires, holding small objects, or removing nails and staples.
7. Sandpaper: Sandpaper is necessary for smoothing rough surfaces, preparing wood for painting, or distressing furniture for a vintage look.
8. Craft Knife: A craft knife is ideal for precision cutting, trimming, and shaping materials such as paper, foam, or fabric.
9. Paint and Primer: Depending on your project, you’ll need paint and primer in various colors and finishes to achieve the desired look.
10. Decorative Materials: Get creative with materials like fabric, ribbons, beads, buttons, or scrapbooking paper to add unique touches to your DIY home decor.
Remember, having the right tools and materials will not only make your DIY projects easier but also ensure the best results. Now that you’re equipped with the essentials, let’s explore some creative homemade DIY home decor ideas!
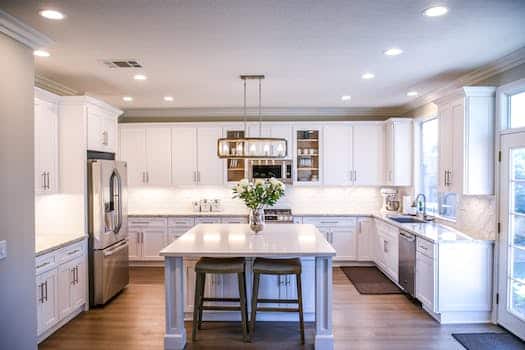
2. Creative DIY Wall Decor Ideas
Decorating your home with DIY wall decor can add a personal touch and bring a unique charm to any room. Whether you’re looking to revamp your living room, bedroom, or even your kitchen, these creative DIY wall decor ideas will inspire you to get crafty and create something beautiful. From simple and budget-friendly projects to more intricate designs, there’s something for everyone.
2.1. Abstract canvas art
Abstract canvas art is a popular choice for adding a touch of creativity and style to your home decor. With its vibrant colors, unique patterns, and modern appeal, abstract canvas art can instantly transform any space. Whether you’re an art enthusiast or simply looking for a way to spruce up your walls, incorporating abstract canvas art into your home decor is a great idea.
There are endless possibilities when it comes to creating your own abstract canvas art. You can experiment with different painting techniques, use a variety of colors, and even incorporate different textures and materials. The beauty of DIY abstract canvas art is that you can customize it to match your personal style and the overall theme of your home.
Not only does abstract canvas art add visual interest to your walls, but it also serves as a conversation starter. Guests will be intrigued by the unique and eye-catching designs, and you can proudly share the story behind each piece of artwork. Whether you choose to create a single large canvas or a gallery wall with multiple smaller pieces, abstract canvas art is sure to make a statement in your home.
In addition to being a cost-effective home decor solution, DIY abstract canvas art allows you to tap into your creative side and unleash your imagination. It’s a fun and rewarding project that can be enjoyed by people of all ages and skill levels. So why not give it a try and see how abstract canvas art can enhance the look and feel of your living space?
2.2. Upcycled photo frames
Upcycled photo frames are a fantastic way to add a unique and personal touch to your wall decor. By repurposing old frames, you can create beautiful and one-of-a-kind pieces that will make a statement in any room.
One idea for upcycled photo frames is to use vintage or antique frames and give them a fresh new look. You can paint them in bold colors or even distress them for a shabby chic effect. Another option is to add embellishments such as beads, buttons, or ribbons to add some extra flair.
If you’re feeling crafty, you can also create a collage of smaller frames to display multiple photos or artwork. This collage can be arranged in a symmetrical or asymmetrical pattern, depending on your personal style.
Upcycled photo frames not only add visual interest to your walls but also contribute to sustainable living by repurposing old materials. So why not get creative and start upcycling your old frames today?
2.3. Wall-mounted planters
Wall-mounted planters are a great way to incorporate greenery into your home decor while also saving space. These creative DIY wall decor ideas will inspire you to create unique and stylish planters that can be easily mounted on any wall. Whether you have a small apartment or a spacious house, wall-mounted planters can add a refreshing touch to any room. From repurposing old materials to using unconventional objects, there are endless possibilities for creating one-of-a-kind planters. Let your creativity flow and bring nature indoors with these creative homemade DIY home decor ideas.
2.4. Gallery wall with personal touch
A gallery wall with a personal touch is a great way to add character and style to any room. It allows you to showcase your creativity and display your favorite photos, artwork, and mementos. Creating a gallery wall is a fun and easy DIY project that can be customized to suit your taste and the overall theme of your home decor.
To start, gather a collection of frames in different sizes, shapes, and finishes. You can use both new and old frames to create an eclectic look. Next, choose the artwork or photos you want to display. Consider using a mix of family photos, vintage prints, and inspirational quotes.
Arrange the frames on the floor or a large table to experiment with different layouts. Play around with the arrangement until you find a configuration that you like. Once you’re satisfied with the layout, take a picture or make a note of the arrangement so you can easily recreate it on the wall.
Before hanging the frames, consider adding a personal touch. You can paint the frames in different colors or add decorative elements like washi tape, ribbons, or stickers. You can also include small objects or souvenirs that hold sentimental value.
When it’s time to hang the frames, start by measuring and marking the wall where you want the gallery to be. Use a level to ensure the frames are straight. Begin hanging the frames from the center and work your way outwards. Use appropriate hanging hardware for each frame to ensure they are secure and won’t damage the wall.
Once all the frames are hung, step back and admire your personalized gallery wall. It’s a beautiful and meaningful addition to your home decor that reflects your style and memories. Don’t be afraid to switch out or add new pieces over time to keep it fresh and interesting.
2.5. Geometric wall stencils
Geometric wall stencils are a fantastic way to add a touch of style and creativity to your home decor. With these stencils, you can easily create unique patterns and designs on your walls. Whether you want to add a geometric accent wall or create a bold statement piece, these stencils offer endless possibilities.
One of the best things about using geometric wall stencils is that they are DIY-friendly. You don’t need to be an expert artist or have advanced painting skills to achieve stunning results. These stencils come with easy-to-follow instructions, making it a fun and accessible project for everyone.
The great thing about incorporating geometric designs into your wall decor is that they can complement any interior style. Whether you have a modern, minimalist space or a bohemian-inspired room, geometric patterns can add a contemporary and visually appealing touch.
Moreover, using stencils allows you to personalize your decor. You can choose the colors and sizes that suit your taste and match your existing furniture and accessories. By experimenting with different patterns and color combinations, you can create a truly customized look.
Additionally, geometric wall stencils are not limited to walls only. You can also use them on furniture, such as dressers, cabinets, or even tabletops, to give them a fresh and modern makeover. This versatility opens up a wide range of possibilities for transforming your entire living space.
In conclusion, if you’re looking for a creative and cost-effective way to enhance your home decor, consider using geometric wall stencils. They offer an easy and enjoyable DIY project that can instantly elevate the style of any room. So, grab some stencils, pick your favorite design, and get ready to transform your walls into stunning works of art!
3. Innovative DIY Lighting Ideas
Whether you’re looking to add a touch of uniqueness to your home or want to save some money on lighting fixtures, DIY lighting ideas are the way to go. With a little creativity and resourcefulness, you can create stunning homemade lighting that will instantly elevate your home decor. Here are 10 innovative DIY lighting ideas that are easy to make and will add a wow factor to any room.
1. Mason Jar Chandeliers: Transform ordinary mason jars into beautiful chandeliers by adding pendant light kits and hanging them from the ceiling. This rustic and charming lighting option is perfect for farmhouse-style decor.
2. Wine Bottle Lamps: Upcycle empty wine bottles by turning them into stylish lamps. Simply insert a lamp kit into the bottle, add a lampshade, and voila! You have a unique lighting piece that will surely impress your guests.
3. Geometric Pendant Lights: Create modern and eye-catching pendant lights using geometric shapes. Whether you opt for wooden frames or metal wires, these geometric pendants will add a contemporary touch to your home.
4. Rope Lights: Add a warm and cozy atmosphere to any space with rope lights. You can wrap them around stair railings, hang them from the ceiling, or even create unique shapes on the wall. The possibilities are endless!
5. Paper Lanterns: Bring a touch of elegance to your home with handmade paper lanterns. Use colored paper, ribbons, and LED lights to create stunning lanterns that will illuminate your space beautifully.
6. Edison Bulb Sconces: For a vintage and industrial look, create sconces using Edison bulbs. Attach the bulbs to wooden boards or metal pipes and mount them on the wall. This DIY lighting idea will add a unique charm to any room.
7. Twig Chandelier: If you’re a nature enthusiast, this DIY lighting idea is perfect for you. Gather twigs of various lengths and sizes, and create a rustic chandelier by attaching them to a wire frame. It will bring a touch of the outdoors inside your home.
8. Fairy Light Photo Display: Combine lighting and memories by creating a fairy light photo display. Hang fairy lights on a string and use clothespins to attach your favorite photos. This personalized lighting idea will add a sentimental touch to any room.
9. Bottle Cap Lampshade: Save those bottle caps and turn them into a unique lampshade. Glue the caps together in your desired shape and attach them to a lamp base. This DIY lighting idea is not only eco-friendly but also a great conversation starter.
10. Mason Jar Solar Lights: Harness the power of the sun by creating solar lights using mason jars. Insert solar-powered LED lights into the jars and place them in your garden or patio for a beautiful and eco-friendly lighting solution.
These innovative DIY lighting ideas will not only brighten up your home but also showcase your creativity. So, grab your tools and get ready to transform your space with these homemade lighting masterpieces!
3.1. Mason jar pendant lights
Mason jar pendant lights are a fantastic way to add a touch of rustic charm to your home decor. These innovative DIY lighting fixtures are not only easy to make, but they also provide a unique and stylish lighting solution. With just a few simple materials and some creativity, you can create stunning pendant lights that will instantly become a focal point in any room.
To make your own mason jar pendant lights, you will need a few basic supplies. Start by selecting the desired size and style of mason jars. You can choose clear jars for a more modern look or opt for vintage-colored jars for a nostalgic feel. Next, you will need pendant light kits, which include the necessary hardware and wiring.
Begin the process by drilling a hole in the center of the mason jar lid. This hole should be large enough to accommodate the pendant light kit’s socket. Once drilled, carefully thread the wiring through the hole, ensuring it is securely attached to the lid. Follow the instructions provided with the pendant light kit to properly connect the socket and wiring.
Once the wiring is complete, you can add your preferred light bulb to the socket. LED bulbs are a popular choice for mason jar pendant lights as they are energy-efficient and emit a warm, inviting glow. Screw the lid tightly onto the jar, and your homemade pendant light is ready to be hung!
These charming mason jar pendant lights can be showcased in various ways throughout your home. Hang them individually in a cluster over a dining table or kitchen island for a striking visual impact. Alternatively, you can suspend them in a row above a hallway or use them as bedside table lamps for a cozy ambiance.
In conclusion, mason jar pendant lights offer a creative and affordable way to illuminate your living space. By incorporating these innovative DIY lighting fixtures into your home decor, you can achieve a unique and personalized atmosphere that reflects your style and personality.
3.2. Wine bottle chandeliers
Wine bottle chandeliers are a unique and stunning way to add a touch of elegance to your home decor. These innovative DIY lighting fixtures are not only environmentally friendly but also a great way to repurpose old wine bottles. With just a few simple steps, you can transform empty wine bottles into beautiful chandeliers that will become the focal point of any room.
To create a wine bottle chandelier, you will need a few supplies such as wine bottles, a chandelier frame, and some basic electrical wiring. Start by cleaning and removing the labels from the wine bottles. You can use hot soapy water or a label remover solution to make this process easier.
Next, you will need to cut a hole in the bottom of each wine bottle. This is where the light bulb will be inserted. There are various tools available for this, such as glass cutting tools or a diamond-tipped drill bit. Be sure to wear protective gloves and goggles when cutting the glass.
Once the holes are made, you can attach the wine bottles to the chandelier frame. You can use wire or metal brackets to secure the bottles in place. Make sure to arrange them in a visually appealing pattern, such as a spiral or cascading design.
After securing the bottles, you will need to wire the chandelier for electricity. This step may require some basic electrical knowledge or the assistance of a professional. It’s important to follow safety guidelines and ensure that the wiring is done correctly to prevent any accidents.
Once the wiring is complete, you can hang your wine bottle chandelier in the desired location. It’s recommended to use a sturdy ceiling hook or hire a professional to ensure proper installation. Once hung, turn on the lights and admire the beautiful glow emitted by your homemade wine bottle chandelier.
Overall, wine bottle chandeliers are a creative and cost-effective way to add a touch of charm to your home. Whether you’re a wine enthusiast or simply looking for a unique lighting fixture, this DIY project is sure to impress your guests and enhance the ambiance of any space.
3.3. Rustic wooden candle holders
Rustic wooden candle holders are a charming addition to any home decor. These innovative DIY lighting ideas can add a touch of warmth and coziness to your living space. With just a few simple materials and some creativity, you can create unique candle holders that will impress your guests.
To make rustic wooden candle holders, start by collecting a few small pieces of reclaimed wood. Look for wood with interesting textures and grains to add character to your candle holders. Next, measure and cut the wood into desired lengths, keeping in mind the size of your candles.
Once you have the wood pieces ready, you can begin the fun part – decorating! Consider adding some personal touches like carving initials or painting designs on the wood. You can also experiment with different finishes such as staining or distressing to achieve the rustic look.
To hold the candles, you can either drill holes into the wood or use metal candle cups. If you choose to drill holes, make sure they are the right size to securely hold the candles. Alternatively, you can attach metal candle cups onto the wood using adhesive.
Once your rustic wooden candle holders are complete, place them strategically around your home to create a cozy and inviting atmosphere. They are perfect for adding a touch of warmth to your living room, bedroom, or even outdoor spaces.
In conclusion, rustic wooden candle holders are a creative and innovative way to incorporate DIY lighting into your home decor. By making your own candle holders, you can personalize them to match your style and create a unique ambiance in your living space.
3.4. LED strip light accents
LED strip light accents are a popular choice for adding a touch of innovation to DIY lighting projects. These versatile light strips can be easily incorporated into various home decor ideas to create a stunning visual impact. Whether you want to highlight specific areas, add a soft glow, or create an ambiance, LED strip lights offer endless possibilities.
One creative way to use LED strip lights is by accentuating architectural features in your home. You can install them along the edges of shelves, cabinets, or even staircases to create a dramatic effect. The gentle illumination provided by the LED strips not only enhances the overall aesthetics but also adds a sense of warmth and sophistication.
Another fantastic idea is to create a mesmerizing lighting display by placing LED strip lights behind mirrors or artwork. This technique not only adds depth and dimension to the space but also acts as a focal point. The gentle backlighting creates a soft and inviting atmosphere, perfect for relaxation or entertaining guests.
Furthermore, you can use LED strip lights to illuminate dark corners or alcoves in your home. By strategically placing these lights, you can transform neglected areas into cozy nooks. Consider installing LED strips under kitchen cabinets, along the underside of furniture, or even behind TV screens for a modern and sleek look.
In conclusion, LED strip light accents provide an innovative and cost-effective solution for DIY home decor projects. With their flexibility and ease of installation, they offer endless opportunities to enhance the overall ambiance of your living space. So, don’t hesitate to unleash your creativity and explore the world of LED strip lights in your next DIY lighting endeavor.
3.5. Fairy light curtains
Fairy light curtains are a brilliant addition to any home decor, instantly adding a touch of magic and charm. These innovative DIY lighting ideas are perfect for creating a cozy and inviting atmosphere in your living spaces. With just a few simple materials and a little creativity, you can transform your space into a whimsical wonderland.
To create fairy light curtains, start by gathering a string of twinkling fairy lights. Choose lights that have a soft, warm glow to create a soothing ambiance. Next, measure the area where you want to hang the curtains and determine how many lights you’ll need. It’s best to have a few extra lights on hand, just in case.
Once you have your lights, it’s time to get creative with the curtain design. You can use a sheer fabric, such as tulle or organza, to create a dreamy and ethereal look. Simply drape the fabric over a curtain rod or tension wire and attach the fairy lights along the top edge. You can also add some decorative elements, such as flowers or ribbons, to enhance the visual appeal.
When it comes to hanging the curtains, there are several options. If you have a canopy bed, you can attach the lights to the frame for a romantic and enchanting effect. Alternatively, you can hang them in a doorway or window to create a beautiful entrance or focal point. For a more whimsical touch, consider hanging the curtains from the ceiling to create a magical canopy.
Fairy light curtains are not only stunning but also versatile. They can be used for various occasions, such as weddings, parties, or simply as everyday decor. The soft glow of the lights adds a cozy and warm ambiance to any space, making it inviting and relaxing.
In conclusion, fairy light curtains are an innovative DIY lighting idea that can transform your home decor. With their enchanting glow and whimsical charm, they create a magical atmosphere that is sure to impress. So why not give it a try and add a touch of fairy tale magic to your living spaces?
4. Easy DIY Furniture Makeovers
Are you looking to spruce up your home decor without breaking the bank? Look no further! In this article, we will share 10 creative homemade DIY home decor ideas that are not only budget-friendly but also easy to do. One of the simplest ways to transform the look of your home is by giving your furniture a makeover. With a little creativity and some basic tools, you can easily turn old, worn-out furniture into stunning pieces that will make a statement in your home. Here are some easy DIY furniture makeovers that you can try:
1. Painted Dresser
Give your old dresser a fresh new look by painting it in a bold color. Choose a paint that complements the color scheme of your room and apply a couple of coats for a smooth finish. You can also add some decorative knobs or handles to complete the transformation.
2. Upholstered Chair
If you have a worn-out chair that has seen better days, consider giving it a new lease of life by reupholstering it. Choose a fabric that matches your room decor and carefully remove the old upholstery. Use a staple gun to attach the new fabric, making sure to stretch it tightly for a professional finish.
3. Decoupage Table
Turn an old table into a unique piece of art by using the decoupage technique. Cut out pictures or patterns from magazines or wrapping paper and glue them onto the table’s surface using decoupage glue. Seal the design with several coats of varnish for a durable finish.
4. Stenciled Bookshelf
Add a touch of whimsy to a plain bookshelf by stenciling a design onto the back panel. Choose a stencil pattern that matches your room’s theme and use acrylic paint to carefully fill in the design. Allow the paint to dry before placing your books and decorative items on the shelves.
5. Distressed Coffee Table
Create a rustic, shabby-chic look by distressing a coffee table. Sand down the table’s surface to remove any existing finish, then use a hammer, chains, or other tools to create dents, scratches, and imperfections. Apply a coat of stain or paint, then lightly sand again to reveal some of the natural wood underneath.
6. Ombre Dresser
Add a trendy touch to your bedroom with an ombre dresser. Choose three shades of the same color and apply them in a gradient effect, starting with the darkest shade at the bottom and gradually getting lighter towards the top. Blend the colors together using a brush or a sponge for a seamless transition.
7. Repurposed Headboard Bench
Transform an old headboard into a charming bench for your entryway or garden. Remove the legs from the headboard and attach them to a wooden or metal frame to create the seat. Paint or stain the bench in a color of your choice, and add some cushions or pillows for extra comfort.
8. Wallpapered Cabinet
Give a plain cabinet a stylish makeover by covering it with patterned wallpaper. Measure the cabinet’s surfaces and cut the wallpaper accordingly. Apply wallpaper paste to the back of the paper and carefully smooth it onto the cabinet. Use a squeegee to remove any air bubbles and trim off the excess paper for a neat finish.
9. Rope-Wrapped Side Table
Add a coastal touch to your living room with a rope-wrapped side table. Start by applying a layer of adhesive to the table’s surface, then tightly wrap the rope around it, securing it with more adhesive as you go. Continue until the entire table is covered, then trim off any excess rope.
10. Chalkboard Door
Turn an old door into a functional and fun chalkboard for your kitchen or home office. Remove any hardware from the door and sand it down to create a smooth surface. Apply several coats of chalkboard paint, allowing each coat to dry before applying the next. Once dry, your chalkboard door is ready to use!
These easy DIY furniture makeovers are a great way to add a personal touch to your home decor. Whether you’re a seasoned DIYer or just starting out, these projects are sure to inspire you to get creative and transform your space without spending a fortune.
4.1. Repurposed pallet coffee table
Repurposed pallet coffee table: One easy DIY furniture makeover idea is to repurpose a pallet into a stylish coffee table. Pallets are versatile and can be easily transformed into unique pieces of furniture. To create a repurposed pallet coffee table, start by thoroughly cleaning and sanding the pallet. Then, paint or stain it in a color of your choice. Add legs or wheels to the bottom for added stability and mobility. Finally, accessorize the table with decorative items like books, candles, or a small indoor plant to complete the look. This repurposed pallet coffee table will not only add a rustic touch to your living room but also showcase your creativity and DIY skills.
4.2. Chalk-painted dressers
Chalk-painted dressers are a fantastic way to transform old and outdated furniture into stylish and unique pieces. This easy DIY furniture makeover technique has gained popularity in recent years due to its simplicity and versatility. With just a few supplies and a little bit of patience, you can achieve a beautiful chalk-painted finish that will breathe new life into your dresser.
To start, you’ll need a dresser that is in good condition. If there are any major structural issues or damage, it’s best to address those before beginning the painting process. Once you have a solid piece to work with, gather your supplies: chalk paint in your desired color, a paintbrush or roller, sandpaper, and wax or sealant.
Before applying the chalk paint, make sure to clean the dresser thoroughly and remove any hardware or knobs. Sanding the surface lightly will help the paint adhere better. Now, it’s time to start painting! Apply thin coats of chalk paint, allowing each coat to dry completely before adding another layer. This will ensure a smooth and even finish.
Once you’re satisfied with the color and coverage, you can distress the dresser if desired. Use sandpaper to lightly sand the edges and corners, revealing some of the original wood or paint layers underneath. This will give the dresser a charming, vintage look.
To protect the chalk-painted finish, apply a layer of wax or sealant. This will help to prevent chipping and make the dresser more durable. Finally, reattach the hardware or add new knobs for a finishing touch.
Chalk-painted dressers can be a stunning addition to any room. Whether you prefer a shabby chic look or a more modern aesthetic, this DIY furniture makeover idea offers endless possibilities. Give it a try and see how you can transform your old dresser into a beautiful and unique piece of home decor!
4.3. Bookshelf makeover with wallpaper
Bookshelf makeover with wallpaper: One easy and creative way to give your old bookshelf a fresh look is by using wallpaper. Start by cleaning the surface of the bookshelf and removing any existing wallpaper or paint. Measure the dimensions of the shelves and cut the wallpaper accordingly. Apply wallpaper adhesive to the back of the wallpaper and carefully stick it onto the shelves, smoothing out any air bubbles or wrinkles. Trim off any excess wallpaper using a sharp knife or scissors. Allow the adhesive to dry completely before placing your books and decorative items back on the shelves. This simple DIY project can instantly transform your bookshelf into a stylish and personalized piece of furniture.
4.4. Reupholstered dining chairs
Reupholstered dining chairs can instantly transform the look and feel of your dining room. Whether you have old, worn-out chairs or simply want to update the style, reupholstering them is a great DIY project. With just a few materials and some basic sewing skills, you can give your dining chairs a fresh new look that matches your personal taste and complements your home decor. From choosing the right fabric to removing the old upholstery and attaching the new one, reupholstering dining chairs is a rewarding and budget-friendly way to revitalize your dining space.
4.5. Vintage suitcase side table
A vintage suitcase side table is a charming and unique addition to any home decor. With a little creativity and some basic DIY skills, you can easily transform an old suitcase into a functional and stylish piece of furniture. Start by finding a vintage suitcase that matches your desired aesthetic. Clean it thoroughly and remove any stickers or labels. Next, reinforce the suitcase by adding wooden panels or legs to create a stable base. You can also add a glass or wooden top to make it more functional as a table. Finally, personalize your side table by painting it in a color that complements your existing decor or by adding decorative elements like stencils or decals. This easy DIY project not only adds character to your space but also gives a new life to an old item.
Conclusion
In conclusion, these 10 creative homemade DIY home decor ideas offer a fun and unique way to personalize your living space. From repurposing old items to creating one-of-a-kind pieces, you can add your personal touch and style to every corner of your home. Get inspired and start transforming your space with these DIY projects today!


13 Comments
Gusella Ziwot
1 year agoHey there! I stumbled upon this post and wow, its got some cool DIY home decor ideas! Im all about adding a personalized touch to my living space without breaking the bank, so these budget-friendly suggestions are right up my alley. Cant wait to give them a try and see how they transform my home! Thanks for sharing.
Adelaida Deering
1 year agoWow, I must say that stumbling upon this post was a stroke of luck! As a fellow DIY enthusiast and lover of all things creative, Im always on the lookout for unique and budget-friendly home decor ideas. Its fantastic to come across a compilation of 10 such ideas that promise to add a personalized touch to my living space.
The mere thought of transforming my humble abode with DIY projects fills me with excitement and anticipation. I can already envision the burst of colors, textures, and patterns that will breathe new life into every nook and cranny. From repurposing everyday items to creating stunning wall art, these ideas seem like the perfect blend of simplicity and creativity.
One concept that particularly caught my eye was using old mason jars as charming candle holders. Not only would they exude a rustic and cozy vibe, but they would also infuse a warm ambiance into my evenings. And the best part? It wont break the bank! Who knew something as simple as a mason jar could instantly elevate the mood of a room?
Another idea that instantly sparked my imagination was creating a gallery wall using mismatched frames. The eclectic mix of shapes, sizes, and colors would not only showcase my cherished memories but also add an artistic flair to my living room. Its like curating my own mini art exhibition!
And lets not forget about the power of plants! The suggestion to repurpose vintage teacups as adorable planters is a stroke of genius. These delightful little vessels will not only breathe life into my space but also inject a sense of whimsy and charm. Its like bringing a touch of nature indoors, all while adding a personal touch.
Im truly grateful for stumbling upon these DIY home decor ideas. They have ignited a creative spark within me and made me realize that adding a personalized touch to my living space doesnt have to come with a hefty price tag. With a little creativity, resourcefulness, and a dash of imagination, Im confident I can transform my home into a haven that reflects my unique personality and style.
Thank you for sharing these wonderful ideas! I cant wait to embark on this DIY adventure and witness the magic unfold in my own living space.
Ofelia Butcher
1 year agoThese DIY home decor ideas are just what I needed to jazz up my living space without breaking the bank! Cant wait to get my hands dirty and give my home a personalized touch. 💪😄
Yolane Nannie
1 year agoThese 10 unique and budget-friendly DIY home decor ideas are an excellent way to add a personalized touch to your living space. With a little creativity and some simple materials, you can transform your home into a stylish and inviting sanctuary. These ideas not only allow you to showcase your individuality but also provide a sense of accomplishment as you create something beautiful with your own hands. From repurposing old items to creating handmade artwork, there is something for everyones taste and skill level. So, why not embark on a journey of creativity and make your home truly one-of-a-kind?
Beckie Boeke
1 year agoThese 10 unique and budget-friendly DIY home decor ideas showcased in this post are truly inspiring. They offer a wonderful opportunity to add a personalized touch to ones living space without breaking the bank. Each idea is thoughtfully presented, providing clear instructions and materials needed, making it easy for anyone to recreate these charming decor accents. From repurposing old furniture to creating customized wall art, these DIY projects are not only cost-effective but also allow for a creative expression of ones personal style. Whether you are a novice or an experienced DIY enthusiast, these ideas are sure to ignite your imagination and make your home truly feel like your own.
Seana Lontson
1 year agoThese DIY home decor ideas are absolutely fantastic! Not only are they budget-friendly, but they also allow you to infuse your own personal touch into your living space. Im always on the lookout for creative ways to spruce up my home without breaking the bank, so this article is a real gem. Cant wait to try out these unique ideas and transform my living space into a cozy haven! 💫✨
Sheeree Herold
1 year agoAs a normal human visitor, I would like to express my interest in the post discussing 10 unique and budget-friendly DIY home decor ideas. It is fascinating to explore ways in which individuals can add a personalized touch to their living space without breaking the bank. The concept of do-it-yourself projects opens up a realm of creativity and individual expression, allowing homeowners to design their surroundings according to their unique tastes and preferences. I look forward to delving into the article and discovering innovative ways to enhance my living environment through cost-effective and personalized decor ideas.
Rozelle Lauter
1 year agoThese 10 unique and budget-friendly DIY home decor ideas featured in the post are invaluable for anyone looking to bring a personalized touch to their living space. With a plethora of options to choose from, these ideas will surely inspire creativity and help transform any room into a charming haven. From repurposing old furniture to creating stunning wall art, each suggestion offers a cost-effective way to enhance the aesthetic appeal of your home. Whether you are a DIY enthusiast or just starting to explore the world of home decor, these ideas are definitely worth considering.
Harrie Skipton
1 year agoThank you for sharing this insightful post on DIY home decor ideas. It is always exciting to explore creative and budget-friendly ways to add a personalized touch to our living spaces. The 10 unique ideas you have presented seem promising, and I am eager to delve deeper into each one. By incorporating these DIY techniques, not only can we showcase our individuality and style, but also create a warm and welcoming atmosphere within our homes. I appreciate the effort put into compiling these ideas and look forward to implementing them in my own living space.
Alyda Griffy
1 year agoThese DIY home decor ideas are truly worth exploring! Its remarkable how small, personal touches can completely transform the ambiance of our living space. By incorporating budget-friendly techniques, we not only infuse our homes with individuality but also exercise our creativity. The pride that comes from crafting something unique cannot be understated. So, lets roll up our sleeves and embark on this creative journey to enhance our living spaces with a touch of personalization.
Edithe Pettifer
1 year ago[
{
id: 1,
title: DIY Floating Shelves,
description: Create stylish and functional storage solutions by building your own floating shelves. These shelves not only provide a personalized touch to your living space, but also help optimize space utilization. Utilize materials such as plywood, brackets, screws, and a drill to assemble the shelves. Follow a step-by-step guide to ensure proper installation and achieve a professional finish.
},
{
id: 2,
title: Repurpose Old Mason Jars,
description: Transform your ordinary mason jars into unique decorative pieces. Start by cleaning the jars thoroughly and removing any labels. Apply a coat of paint or spray to match your desired color scheme. These repurposed mason jars can be used as flower vases, candle holders, or even as storage containers for small items. Get creative and add embellishments like ribbons or twine for an extra touch of personalization.
},
{
id: 3,
title: DIY Pallet Coffee Table,
description: Give your living room a rustic and eco-friendly touch by building your own coffee table using wooden pallets. Begin by dismantling the pallets and sanding them down to ensure a smooth surface. Use nails or screws to reassemble the pallets into a sturdy table frame. Add a glass or wooden top for a finished look. This DIY project not only adds a unique element to your decor but also saves money on buying a new coffee table.
},
{
id: 4,
title: Create Your Own Wall Art,
description: Express your creativity by making your own wall art. Start with a blank canvas or repurpose an old painting by painting over it. Use acrylic or watercolor paints to create your desired design or abstract patterns. Alternatively, you can create a collage using magazine cutouts or scrapbook paper. Frame your artwork or simply hang it as a canvas. This DIY decor idea allows you to showcase your individual style and adds a personal touch to your walls.
},
{
id: 5,
title: DIY Macrame Hanging Planters,
description: Bring a bohemian vibe into your living space by crafting your own macrame hanging planters. Begin by learning basic macrame knots and techniques. Use sturdy ropes or cords to create intricate patterns and hanging structures for your plants. Incorporate different sizes and types of pots or containers for a varied and visually appealing display. Hang these planters near windows or from the ceiling to add a touch of green and natural beauty to your home.
},
{
id: 6,
title: Upcycle Wooden Crates,
description: Turn old wooden crates into stylish storage solutions or decorative accents. Start by cleaning and sanding the crates to remove any rough edges or splinters. Apply a fresh coat of paint or varnish to match your decor style. Stack multiple crates together to create a unique bookshelf or use them individually as side tables or storage containers. These upcycled wooden crates offer versatility and a budget-friendly way to add a rustic touch to your home.
},
{
id: 7,
title: DIY Rope Coasters,
description: Protect your furniture while adding a nautical touch with DIY rope coasters. Start by coiling rope into a compact shape and securing it with hot glue. Use a combination of thicker and thinner ropes to create interesting patterns and textures. These handmade coasters not only serve a practical purpose but also add a touch of uniqueness to your coffee table or dining area. Experiment with different rope colors and sizes to match your desired aesthetic.
},
{
id: 8,
title: Repaint Old Furniture,
description: Revitalize worn-out furniture pieces by giving them a fresh coat of paint. Start by cleaning the furniture thoroughly and sanding it to create a smooth surface. Choose a high-quality paint suitable for the material of your furniture. Apply multiple coats for a solid and even finish. Consider using stencils or painters tape to add patterns or create a distressed look. Repainting old furniture allows you to breathe new life into your decor while staying on a budget.
},
{
id: 9,
title: DIY Photo Collage,
description: Display your cherished memories by creating a DIY photo collage. Start by selecting a wall or a specific area where you want to showcase your photos. Choose a theme or color scheme for your collage, such as family vacations or black and white photos. Print and cut out your selected pictures in various sizes and arrange them on the wall using adhesive putty or washi tape. This personalized decor idea adds a sentimental touch to your living space.
},
{
id: 10,
title: Handmade Pillow Covers,
description: Add a cozy and personal touch to your living room or bedroom by making your own pillow covers. Select fabric that complements your decor style and measurements that fit your pillows. Cut the fabric to size and sew the edges together, leaving an opening for inserting the pillow. Use a sewing machine or hand stitch for a clean and secure finish. Experiment with different fabrics, patterns, and textures to create unique pillow covers that reflect your taste.
}
]
Diahann Oram
1 year agoThank you for sharing these fantastic DIY home decor ideas! They are not only budget-friendly but also provide a wonderful opportunity to infuse our living spaces with a personalized touch. Looking forward to trying them out and transforming my home into a cozy and unique haven!
Luci Mae
1 year agoWow, who knew DIY home decor could be so budget-friendly? I mean, Ive spent a fortune on those fancy store-bought items that are probably mass-produced anyway. But now I can unleash my inner artist without emptying my wallet! Time to turn my living space into a personalized masterpiece. Watch out, Picasso!