
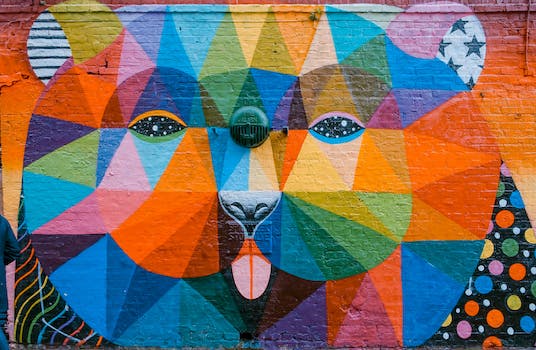
Have you had enough of your dull walls? Do you yearn to make your home more interesting and distinctive? Stop right there! The walls of your home can become pieces of art with the help of the ten painting techniques discussed in this article. These innovative methods will encourage you to release your inner artist and give your walls a new look, whether you’re a DIY fanatic or a professional painter. Get ready to explore the infinite potential of wall painting, from faux finishes to stenciling and color blocking.
- 1. Introduction
- 1.1. Importance of creative painting techniques
- 1.2. Choosing the right colors
- 1.3. Preparation before painting
- 1.4. Essential tools and materials
- 1.5. Safety precautions
- 2. Technique 1: Color Blocking
- 2.1. Understanding color blocking
- 2.2. Selecting complementary colors
- 2.3. Preparing the wall surface
- 2.4. Applying painter’s tape
- 2.5. Painting the blocks
- 3. Technique 2: Ombre Effect
- 3.1. What is the ombre effect?
- 3.2. Choosing the right color gradient
- 3.3. Preparing the wall surface
- 3.4. Blending the colors
- 3.5. Finishing touches
- 4. Technique 3: Stenciling
1. Introduction
Important parts of the procedures taken to regulate the bitcoin business include the need for licensing and registration. These rules are meant to guarantee that cryptocurrency-related businesses and individuals follow all applicable laws and regulations.
Having the proper licenses and registrations in place is essential before engaging in cryptocurrency-related activities like running a cryptocurrency exchange or offering digital asset custodian services. Different countries have different registration and licensing requirements because they are responsible for their own laws.
Cryptocurrency exchanges are often needed to comply with AML and KYC laws in order to operate legally. These safeguards are set up to stop criminal activities like money laundering and terrorist financing from occurring in the bitcoin market.
Consumer safeguards, information privacy, and computer security might all figure into any licensing requirements. With these features in place, users can rest assured that their money, data, and digital possessions are safe from harm.
Businesses dealing in cryptocurrencies should familiarize themselves fully with the licensing and registration regulations in their areas and act accordingly. There could be legal ramifications and an inability to function within the regulated environment if this is not done. Companies and individuals working in the cryptocurrency industry would be wise to keep abreast of the ever-changing regulatory landscape.
1.1. Importance of creative painting techniques
Dealing with electronic trash by recycling and proper disposal
Modern society has an increasing problem with e-waste, or electronic garbage. More and more electronic devices are being manufactured and destroyed as technology advances at a rapid pace. Bitcoin mining, which demands a lot of processing power, adds to the production of electronic trash.
For Bitcoin mining, sophisticated hardware like ASIC (Application-Specific Integrated Circuit) miners is used to solve complicated mathematical problems. These miners are extremely energy intensive and generate a great deal of waste heat. This means their usefulness is short-lived and they age rapidly.
Outdated or broken mining machinery that is thrown away adds to the mountain of e-waste already on Earth. The bitcoin mining business must adopt recycling and proper waste management practices to solve this problem.
In addition to reducing the negative effects of mining on the environment, recycling electronic waste can assist recover valuable commodities like precious metals. Energy can be saved and electronic waste avoided if these materials are extracted and reused rather than mined with brand new machinery.
It is also important to adopt safe disposal techniques to prevent electronic trash from being dumped in landfills or burned in incinerators. Instead, e-waste should be brought to authorized recycling centers where it can be properly disassembled and processed. This allows for safe and responsible management of potentially harmful compounds, protecting both people and the planet.
In conclusion, reducing the environmental impact of bitcoin mining requires taking action to recycle and properly dispose of e-waste. A greener and more sustainable future is possible if the industry as a whole adopts sustainable methods to reduce the amount of electronic waste produced.
1.2. Choosing the right colors
Bitcoin Mining’s Impact on Electronic Waste
Bitcoin mining creates a lot of electronic garbage, often known as e-waste, which is a major environmental concern. Due to the complex nature of the mining process and the high performance requirements of the hardware involved, mining rigs are constantly being upgraded and replaced. Due to the high turnover rate of mining hardware, the Bitcoin mining sector produces a large amount of electronic waste.
Electronic trash includes obsolete mining hardware, graphics cards, processors, and other items that are no longer used for the operation. The improper disposal of these obsolete gadgets can have devastating effects on the surrounding ecosystem due to the presence of poisonous compounds and heavy metals they carry.
Hazards to soil, water, and air quality, as well as human health, can result from careless e-waste disposal. Especially in areas with less restrictions on environmental impact, many miners dispose of their electronic trash in landfills or ship it to poor countries, where equipment is sometimes destroyed in unsafe conditions.
However, the Bitcoin mining sector is becoming increasingly interested in environmentally friendly mining hardware. As people become more aware of the harm that electronic waste may cause to the natural world, some businesses are concentrating on creating environmentally friendly mining hardware. By using longer-lasting parts, introducing more efficient cooling methods, and creating modular systems that can be easily modified or recycled, these environmentally friendly mining equipment alternatives hope to reduce the amount of electronic waste produced.
Additionally, work is being done to create Bitcoin-centric electronic trash recycling initiatives. To ensure that hazardous waste are managed appropriately and valuable resources are recovered, these efforts strive to encourage the responsible disposal and recycling of obsolete mining equipment.
The Bitcoin mining sector may dramatically lessen its impact on the environment by adopting environmentally friendly mining equipment and supporting e-waste recycling programs. Sustainability must be a top priority for mining businesses and miners alike, and they must work proactively to address the e-waste problem. The environmental costs of Bitcoin mining can only be reduced via concerted group action, paving the way for a greener tomorrow.
1.3. Preparation before painting
Safeguards for consumers and investors are essential in the blockchain industry. There have to be safeguards in place to protect users and investors from fraud and loss as the use of digital currencies grows in popularity.
The implementation of stringent security measures by bitcoin exchanges and platforms is a crucial regulatory measure. To prevent identity theft and financial losses, modern encryption methods must be employed.
Providing consumers with clear and accurate information about cryptocurrencies is also crucial for their safety. Companies are generally required by regulators to provide information about their projects, including the underlying technology, team members, and any risks or constraints associated with the cryptocurrency initiative.
To further ensure that people have access to honest and transparent investment opportunities in the bitcoin market, safeguards for investors have been implemented. This involves putting in place rules for initial coin offerings (ICOs) to stop frauds and fraud. To safeguard investors from potential financial losses, regulators may demand ICO issuers to present extensive documentation and undergo rigorous vetting processes.
In short, safeguards for both consumers and investors are critical to keeping people’s faith in the bitcoin market. Authorities hope that by enacting and enforcing these regulatory measures, they can make the digital currency market a more secure place for citizens to transact in.
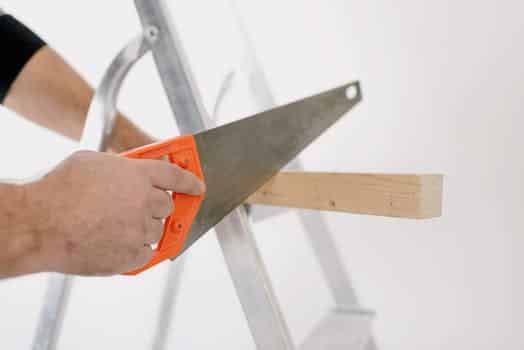
1.4. Essential tools and materials
Having the proper equipment and supplies is crucial when venturing into the world of experimental wall painting. Using these tools, you can expect a smoother procedure and better outcomes. Here are some things to keep in mind whether you’re a professional painter or a do-it-yourself enthusiast:
First, you’ll need paintbrushes. Stock up on a wide selection, including angled brushes, flat brushes, and detail brushes. It’s important to choose the right brush for the right job.
A high-quality paint roller is essential for rapidly and evenly covering vast areas of wall. Depending on the feel of your walls, you should select a nap duration accordingly.
Use drop cloths to prevent paint from staining your flooring and furnishings. Fabrics such as old bedsheets, plastic sheets, or canvas tarps can be used.
Painter’s tape is a useful tool for making straight and precise lines when painting. It aids in getting clean lines and keeps paint from seeping into cracks.
Paint trays are convenient for loading a paintbrush or roller with paint. For hassle-free disposal, try to find trays that come with disposable liners.
Sandpaper is the tool of choice for removing flaws from walls in preparation for painting. It helps make a flat, level surface that paint will adhere to better.
When painting over a dark or unevenly colored wall, it is suggested to apply a coat of primer beforehand. It is useful for enhancing paint longevity and coverage.
Paint is number eight on the list, so pick high-quality paint in the colors you like best. Think about whether you want a matte, satin, or glossy finish, and how that will complement the design of the room.
Stencils, number nine: Using stencils to decorate your walls is a lot of fun. They can be found in a wide range of forms, letting you achieve a wide variety of visual effects.
Tools for creating textured and visually fascinating effects on walls, such as sponges and rags (used for techniques like sponge painting).
You may confidently try out new and interesting wall painting techniques when you have all of these crucial equipment and supplies on hand.
1.5. Safety precautions
Prioritizing safety procedures while wall painting will help ensure a problem-free experience for everyone involved. Keep yourself and others safe while painting stunning murals by remembering these guidelines.
2. Technique 1: Color Blocking
Walls are often painted using the color blocking technique to achieve a dramatic and eye-catching impact. It includes sectioning off a wall into chunks of space using color contrast. You may give your walls a striking and contemporary appearance by selecting the right colors and applying them in the right places.
Color blocking requires the selection of two or more contrasting colors that work effectively together. Think about the feeling you want to evoke with the room’s color palette as a whole. While subdued or pastel tones can produce a more tranquil and quiet ambience, bright and colorful colors can offer vitality and liveliness.
After deciding on a color scheme, you may start dividing the wall into pieces. Line the blocks off neatly and precisely using painter’s tape. In order to get an exact reading, you need to measure it and level the tape. This is a necessary procedure for getting a polished end product.
After the partitions are drawn, it’s time to begin applying color to the individual squares. A high-quality paintbrush or roller is vital for producing flawless finishes and uniform coverage. If necessary, apply additional coats and wait for each to dry before proceeding.
Carefully removing the painter’s tape after the paint has dried will reveal crisp lines where the blocks were placed. To prevent paint from bleeding or smearing, carefully peel it off. Use a little brush to touch up any areas that need it.
Color blocking is a flexible method that opens up a world of possibilities for wall decoration. You can play around with different block sizes, shapes, and color schemes. Color blocking may give your walls a distinctive and individual look, whether you’re going for a geometric pattern or a more abstract design.
In conclusion, the color-blocking method of wall painting is a tried-and-true method that produces striking results. Your walls can be amazing pieces of art that represent your style and personality with some thought and planning and a steady hand.
2.1. Understanding color blocking
The European Union (EU) has been busy looking into and enacting cryptocurrency regulation. The European Union (EU) aspires to create a unified regulatory environment that takes into account the specific problems and possibilities posed by cryptocurrencies across its member states as a supranational entity.
Anti-money-laundering (AML) and counter-terrorism-financing (CTF) measures are emphasized in the EU’s regulatory approach. Cryptocurrency exchanges and custodian wallet providers are subject to AML and CTF requirements according to a number of EU directives, such as the Fifth Anti-Money Laundering Directive (AMLD5). These rules are meant to increase openness and deter criminal activity in the bitcoin sector.
The European Union also understands the importance of safeguarding bitcoin buyers and sellers. The European Securities and Markets Authority (ESMA) has issued cautions about the dangers of investing in cryptocurrencies and has stressed the need of doing one’s homework before becoming involved. To protect investors and maintain fair trade in the ICO market, the European Union (EU) is developing its own set of rules.
Because cryptocurrencies have an international impact, the EU has participated in international talks about how to regulate them. The European Union (EU) works with other countries in venues like the Financial Action Task Force (FATF) and the Group of Twenty (G20) to create uniform standards for regulation. To properly regulate cryptocurrencies and combat criminal activity, the EU hopes to enhance international cooperation and coordination.
In essence, anti-money-laundering and counter-terrorist-financing (AML/CTF) measures, consumer protection, and international cooperation are prioritized in EU approaches to cryptocurrency regulation. The European Union (EU) is working toward establishing a safe and open crypto market inside its member states by establishing harmonized frameworks and working with other countries.
2.2. Selecting complementary colors
Painting walls in blocks of color is a common way to make a bold design statement. Color blocking works best when you use colors that are opposite one another on the color wheel. This produces striking contrast and gives the room a sense of depth. If you want to make a room feel lively and full of energy, try combining a warm hue like red with a cold color like green. The combination of blue and orange, similarly, can create an energetic and exciting appearance. You can get the look you want and improve the room’s attractiveness by playing around with different color schemes.
2.3. Preparing the wall surface
In recent years, China’s cryptocurrency regulations have become increasingly stringent. Chinese authorities have outlawed ICOs and closed down cryptocurrency exchanges in the country. Money laundering, fraud, and threats to the financial system are at the heart of the current onslaught on virtual currencies. The Chinese government has also placed limits on accepting cryptocurrency payments and banned banks from offering cryptocurrency-related services.
China’s regulatory efforts encompass the monitoring and censorship of websites and social media accounts that feature content related to or promote the use of cryptocurrency. The government wants to stop the circulation of false and speculative news that could affect the market or trick investors. At the same time that they keep a tight rein on cryptocurrencies, Chinese authorities have underlined the significance of blockchain technology and supported its growth.
A heavy-handed approach that values stability and control over innovation and decentralization characterizes China’s regulatory stance on cryptocurrencies. Chinese cryptocurrency markets have been severely impacted by the government’s actions, which have led to a decrease in domestic cryptocurrency trading volumes and the emergence of alternative ways for Chinese investors to interact with cryptocurrencies, such as peer-to-peer trading and overseas exchanges.
The Chinese government is worried about the potential risks of cryptocurrencies and their impact on the traditional financial system, and thus has taken some regulatory restrictions that have been criticized for limiting innovation. Understanding China’s regulatory approach is essential for understanding the global landscape of cryptocurrency legislation as the global cryptocurrency market continues to develop.
2.4. Applying painter’s tape
When painting walls with the color blocking technique, applying painter’s tape is an essential step. To get this effect, geometric forms or parts of contrasting colors are painted directly onto the wall. Painter’s tape serves as a divider, keeping the colors separate for crisp, even lines. Make sure the wall is dry and clean before applying painter’s tape. Get out your ruler and pencil and mark off the space you want to use for color blocking. Next, put painter’s tape along the drawn lines and push hard to seal off any areas where paint might bleed. Keep the tape level and tight. Once the tape is in place, you may begin applying your selected paint colors to the various parts. If you want perfectly clean lines, you should remove the tape while the paint is still wet. Proper use of painter’s tape is crucial for neat and tidy color blocking.
2.5. Painting the blocks
Color blocking is a trendy painting method that can make any wall look more alive and contemporary. This method entails making massive geometric shapes or blocks on the wall using bright, contrasting colors. The first step in creating this style is choosing two or more colors that go nicely together. Use painter’s tape to outline each block with clean, crisp lines and corners. Use a roller or brush to fill in each square with the desired color; for best results, add numerous layers of paint. Carefully peeling off the painter’s tape once the paint has dried will reveal a perfectly straight color block. Use this method to make a dramatic statement on a feature wall or to highlight an interesting design element in any space.
3. Technique 2: Ombre Effect
The ombre effect is a well-liked method of wall painting. Using this method, you may make a wall’s color gradually fade from one end to the other. Choose two or more tints of the same hue to create this effect. Roll or brush on the wall’s darkest colour first, starting at the bottom. Lighter colors should be added gradually as you work your way up the wall to create a seamless transition. The resulting ombre effect is beautiful and may be used to increase the sense of depth and variety in any space.
3.1. What is the ombre effect?
The ombre effect is a well-known way to paint a gradual transition from one hue to another. It’s the process of fusing together two or more hues so that they flow into one another without any abrupt changes. This method can be used on walls to make a room look more three dimensional and interesting. Sponging, brush mixing, and even spray painting are all viable options for creating the ombre look. It may be altered to fit any aesthetic preference and opens up a world of possibilities.
3.2. Choosing the right color gradient
Selecting an appropriate color gradient can substantially improve a piece’s aesthetic appeal. The Ombre Effect is a well-known method for creating a striking visual effect. This method produces a seamless transformation from light to dark hues. Create a beautiful ombre effect on your walls by combining various shades of the same hue or opposing colors. The trick is to choose hues that work well together and fit the room’s intended atmosphere. Try with several color schemes and gradation lengths to get an ombre effect that works for your walls.
3.3. Preparing the wall surface
Preparation is the key to getting that perfect ombre look on your wall. Dust, filth, and grease should be washed from the wall first. Scrub the area gently with a sponge or towel with a solution of mild detergent and water. Wash the wall down with fresh water and let it air dry.
Next, check for breaks, holes, or other flaws in the wall. Spackling compound is used to fill these, and a putty knife is used to make the compound smooth. When the patching compound has dried, a light sanding will help smooth out any rough spots.
After that, prepare the wall to make a good surface for painting. Pick a primer that works with the paint you intend to use. Apply the primer evenly with a paint roller or brush and let it dry as directed by the manufacturer.
The ombre effect can be made after the primer has dried. If you want an ombre look, you should combine different colors of paint or use a gradient method as described in the instructions. Keep in mind that the best transitions are achieved by working on tiny parts at a time and blending the colors smoothly.
Don’t add any finishing touches until the initial layer has dried fully. This will guarantee that the ombre effect on your wall looks great and lasts for a long time.
3.4. Blending the colors
Walls with the trendy ombre effect require careful blending of colors to obtain the desired look. Choose two or more colors from the same color family as a starting point. For a soothing and tranquil vibe, try experimenting with various tones of blue.
When painting a wall, start with the lightest color at the top and work your way down to the darkest color. Blend the colors together at the transitions using a large paintbrush or a sponge.
You may also combine the hues to make intermediate colors for a more gradual and understated ombre effect. This will aid in creating a smooth transition between the various tones.
Paint with long, vertical strokes to ensure a uniform surface. Blend carefully and patiently to achieve a seamless ombre effect that will make your walls look like they were professionally painted.
3.5. Finishing touches
The ombre effect is a beautiful way to finish painting a room. Using this method, you may give any room a sophisticated and aesthetically pleasing gradient look. To get started, pick a base color and one or more complementary tones. It’s best to start painting the wall at the top with the lightest color and work your way down to the darkest. Blend the colors together easily with a big brush or a sponge. To achieve a smooth change, take your time and break it down into manageable chunks. Bedrooms, living rooms, and other spaces where a tranquil ambiance is desired look beautiful when decorated with ombre effects.
4. Technique 3: Stenciling
Walls are often decorated with elaborate patterns and decorations via stenciling. Stenciling is applying paint or other materials to a surface through the use of a stencil, which is a pre-cut template. Stenciling lets you make designs that are truly one-of-a-kind and may completely alter the aesthetic of a space. A stencil, some paint, a brush or sponge, and some tape are all you need to try this method out. The first step is to tape the stencil to the wall. Then, remove any excess paint with a damp brush or sponge. Spread the paint carefully over the stencil, making sure all the spaces are covered. Carefully peel the stencil off the wall once you’ve finished filling it in. Stop painting for a while and let the paint dry between coats. Stencilling can be used to make everything from straightforward geometric patterns to elaborate flower arrangements. It’s a method that lends itself well to being molded into many aesthetic forms. If you want to give your walls a more artistic feel, then you should attempt stenciling.
4.1. Selecting the stencil design
You can choose from a broad variety of stencil designs when decorating your walls. The correct stencil design can improve the room’s appearance and give the walls a personal touch. To aid you in making the best decision possible, here are some suggestions:
First, give some thought to the room’s subject and the style you hope to accomplish with it as a whole. There are stencils available to suit any aesthetic preference, whether modern, traditional, or eclectic.
Consider the dimensions of your wall and the intended stenciled area. Larger stencil designs work well on wider walls, while more intricate designs may be needed for narrower spaces.
Try new designs and patterns without worrying about making a mistake. When stenciling, you can play around with different patterns, contours, and finishes.
The fourth tip for stenciling is to think about the room’s function. Nursery wallpaper might feature charming animals or flowers, while business wallpaper might feature geometric or abstract motifs.
Fifth, complement the existing color scheme; take into account the colors already present in the room. Select a stencil pattern whose colors either blend with or stand in striking contrast to those already in use.
If you want to stencil a whole wall, it’s best to try the design first on a tiny section of wall or a piece of cardboard. You can see how the finished stencil will look and make any required edits from there.
Taking these into account can help you choose the best stencil design for your walls, allowing you to make a great aesthetic effect.
4.2. Preparing the wall surface
Painting with stencils is a common method for making elaborate designs on walls. You should always prime the wall before stenciling to get the finest possible results. How to get your wall ready for stencil painting, in easy steps:
First, you should clean the wall surface to get rid of any grime, dust, or grease. Clean the walls with a mix of mild detergent and water, then let them air dry.
Check the wall for cracks, holes, and uneven spots, and fix them if you find any. Fill any holes or cracks with spackling compound and sand them down to a smooth finish once they have dried.
Third, prime the wall by painting a uniform coat of primer onto the surface. Primer is used to produce a flat surface for the stencil design and to increase paint adhesion.
Fourth, decide on a stencil pattern that appeals to your sense of style. There is a wide selection of stencils to choose from, each with its own unique design and range of sizes.
Determine where you want to put the stencil on the wall and move it there. To prevent the stencil from moving around while you paint, fix it in place with painter’s tape.
To get started, pour a tiny amount of paint onto a palette or a container with a flat bottom. Dab any extra paint from the stencil brush or sponge with a paper towel.
Dab or swirl the brush or sponge gently over the stencil to apply paint in thin layers, and then move on to Step 7. If you don’t want the ink to smudge, it’s best to work from the outside in.
Remove the stencil carefully while the paint is still wet in step eight. Carefully peel it off so as not to smear the pattern. Just wait until the paint is totally dry.
After the paint has dried, examine the stenciled design for any flaws or spots that need additional work. 9. Touch up and finish. Fix any blunders and fill in any missing details with a delicate brush.
Using these instructions as a guide, you can create beautiful stencil designs for your walls and give your home a personal touch.
4.3. Securing the stencil
Stenciling is an inventive approach to wall painting. Stenciling allows you to make elaborate patterns and motifs, making it a great way to personalize and decorate your home. If you want your stenciling project to turn out well, you need to make sure the stencil is well attached to the wall. This will ensure that there is no wiggle room or shifting while you paint, giving you sharp, defined edges.
Stenciling is the Third Method
To prevent the stencil from slipping, do the following:
First, make sure the wall is clean and clear of dust and debris before putting the stencil. The stencil’s adhesion will be guaranteed in this way.
Second, attach the stencil in place using either adhesive spray or stencil tape, depending on the sort of stencil you’re working with. Stencil tape works great for smaller stencils while adhesive spray works well for larger ones.
Third, place the stencil where you want it on the wall with care. Verify the proper alignment and levelness.
Once the stencil is in place, tape or more adhesive spray can be used to attach the edges. The paint won’t be able to seep under the stencil now.
Test a little bit of paint on a scrap of cardboard or paper before committing to a full coat of paint on the stencil. You can then use that information to calculate how much paint you’ll need to get your desired look.
Then, step six is to apply the paint by lightly dabbing the paint onto the apertures of the stencil with a stencil brush or sponge. Avoid using too much paint, since this may result in smearing or bleeding.
After you’ve finished painting the stencil, carefully peel it off the wall and dispose of it. It’s important to remove it carefully and gradually so that the pattern isn’t ruined.
By adhering the stencil to the wall in this way, you may create lovely stenciled designs.
4.4. Applying paint through the stencil
Stencil painting is a common practice for creating elaborate murals. You can make a design by painting over a stencil, which is a precut template. This method is ideal for making wall patterns or motifs that are consistent in size and shape because of its precision and reproducibility.
Here’s how to use a stencil and paint:
To begin, make sure the wall is clean and free of any defects by wiping it down with a damp cloth. This will aid in the stencil’s adhesion and produce a neat end result.
Two, fix the stencil to the wall with painter’s tape or adhesive spray. To prevent paint from leaking out, make sure it is positioned properly and fastened securely.
Third, decide on a paint color scheme for the stencil. Because of their high coverage and manageability, acrylic paints are frequently used for stencil painting.
Fourth, load the brush or roller: dab any surplus paint off a stencil brush or foam roller by dipping it into the paint. To avoid getting paint under the stencil, only use a small amount of paint on the brush or roller.
5. Dab or roll the brush or roller gently over the gaps in the stencil, working inward from the edges. Applying too much force may cause the paint to bleed, so be careful.
Carefully peel the stencil off the wall when you have finished painting the entire stencil design. Carefully peel it off so as not to smear the paint.
Fixes: If there are any spots where the paint has bled or the pattern needs more definition, use a little brush to do so.
You can have a lot of fun and get creative while giving your walls a makeover by using stencils. Try out various stencil patterns and color combos to create something truly one-of-a-kind.
4.5. Removing the stencil and touch-ups
Careful removal of the stencil is required once stenciling is complete to prevent smearing or blurring of the design. Starting in a corner, carefully peel the stencil away from the wall, taking care not to disturb the freshly painted areas. If you see any spots that require touching up, you can do it with a small paintbrush and some careful work. With this method, you may add a creative flair to your walls by painting elaborate patterns and designs.
Conclusion
In conclusion, the possibilities for altering a room with these ten imaginative paint applications are practically limitless. These methods can be used to create spectacular outcomes, whether you’re aiming to add texture, depth, or a novel design. It only takes a bit of imagination and a few inexpensive materials to transform your walls into a gallery.


These 10 innovative and imaginative DIY home decor ideas from [object Object] provide a refreshing approach to enhancing ones living…