
You may give your walls a special look without breaking the bank by using stencils. Stenciling is a simple way to give any room a new look and feel with minimal effort and maximum impact. In this article, we will go over 10 unique wall stenciling ideas that will help you design a one-of-a-kind room.
- 1. Introduction
- 2. Preparing Your Wall
- 2.1. Cleaning the wall
- 2.2. Choosing the right paint
- 2.3. Marking out the design
- 2.4. Protecting the surrounding area
- 2.5. Getting the stencil ready
- 3. Stenciling Techniques
- 3.1. Roller stenciling
- 3.2. Spray painting with a stencil
- 3.3. Pouncing with a brush
- 3.4. Blending colors with stencils
- 3.5. Layering stencils for a unique look
- 4. Stenciling Ideas
- 4.1. Geometric designs
- 4.2. Floral patterns
- 4.3. Typography and quotes
- 4.4. Animal prints
- 4.5. Abstract art
- 5. Finishing Touches
1. Introduction
Stenciling is a great and simple technique to give your walls personality. You can make any space look like a museum with just a little bit of imagination and some inexpensive materials. Stenciling is a versatile technique that can be used to create a wide range of effects, from a striking statement to a subtle accent. This post will provide you with 10 unique wall stenciling ideas that you may use in your next do-it-yourself endeavor.
1.1. What is stenciling?
Stenciling is a form of ornamental painting in which a premade stencil is used to transfer an image onto a surface. Paper, plastic, and metal are just some of the materials that can be used to create stencils, and they are just some of the surfaces that can benefit from their use. Stenciling is a fun and easy way to customize your home decor or do-it-yourself projects to reflect your unique taste.
1.2. Why use stenciling for wall decor?
You can give your walls a lot more character and style by using stencils. Using stencils, you may make elaborate patterns and motifs that would be impossible to make with regular paint or wallpaper. Stenciling also allows you to personalize your wall decoration to fit your style and needs. Stenciling is an easy and inexpensive way to make a dramatic statement or add subtle texture to your walls. Starting with why you should consider stenciling for your wall decor needs, this article will cover 10 unique stenciling ideas for walls.
1.3. Choosing the right stencil
You can give your walls a unique look by stenciling. It lets you make a one-of-a-kind, personalized design that speaks for you. However, it might be difficult to narrow down your options when there are so many different stencil patterns out there. In this article, we’ll look at how to pick the perfect stencil for your walls.
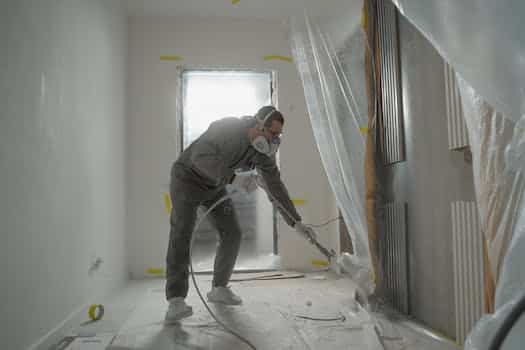
2. Preparing Your Wall
It’s necessary to get the walls ready for stenciling before you begin. Remove any filth, dust, or grease from the walls as a first step. Put spackle over the wall’s imperfections and smooth it out. Walls that are too shiny should be lightly sanded so that the paint can properly adhere. In the end, prime the walls so that the paint stays in and the stenciled design stands out clearly.
2.1. Cleaning the wall
Make sure the walls are clean and smooth before beginning to stencil the pattern. To begin, remove any loose debris or dust from the surface by wiping it down with a moist cloth. Scrubbing with a solution of mild soap and water can remove even the most stubborn stains. Don’t move on until the walls are entirely dry. Your stencil will stick perfectly and your pattern will be clear and crisp if you follow these steps.
2.2. Choosing the right paint
The quality and longevity of the paint you use to coat your walls can greatly affect how they turn out. Choose a paint finish that works with the room’s style, lighting, and surface. While a glossy finish holds up well in high-use spaces like kitchens and bathrooms, the more subtle sheen of matte paint is ideal for hiding wall flaws. Think about the paint brand and shade you want to use. Try to get long-lasting, low-maintenance paints.
Getting the walls ready for painting is essential for a professional-looking result. Cleaning the walls, patching any holes or cracks, and smoothing off any rough patches are all part of this process. Painting without first priming the walls is not recommended, especially if you plan on covering an existing dark color.
2.3. Marking out the design
It’s necessary to get the walls ready for stenciling before you begin. Make sure the walls are dry, dust-free, and completely smooth. In order to get a smooth surface for stenciling on previously painted walls, you may need to sand them lightly. A base coat of paint in a color that will go well with your stencil pattern is also a good idea. Assuming your wall is prepared, you can begin marking out your stencil pattern using a pencil and level. Make sure the stencil pattern is positioned and spaced correctly by taking your time with this step.
2.4. Protecting the surrounding area
Always cover the floor and any nearby furniture to avoid getting paint on them before you begin stenciling your walls. Drop cloth the floor and tape off the sections you don’t want painted, such as the baseboards and crown molding. Using a primer on the walls before stenciling can help the paint stick better and achieve better coverage. After you’ve prepared and covered your walls, you may begin stenciling.
2.5. Getting the stencil ready
Make sure the wall is clean and smooth before you begin stenciling on it. Dust and debris can be wiped away with a moist cloth, and holes and cracks can be filled using spackle. As soon as the wall is dry and level, you can start prepping the stencil. Make sure there is no leftover paint on a reusable stencil before using it. If you’re going to make your own stencil, it’s best to use something durable like cardboard or plastic so it won’t rip while you’re painting. Use a craft knife to carefully cut off the shapes you’ve drawn or traced onto the stencil material.
3. Stenciling Techniques
Stenciling is an inexpensive way to give your walls a unique look and feel. Here are 10 unique wall stencil designs to try:
Ombre stenciling allows you to easily make a stunning gradient effect. Use a dark color towards the floor and fade to a lighter one near the ceiling.
Use stencils to make exciting and pronounced geometric patterns on your walls using geometric stenciling. If you have a boring wall, this is the perfect solution.
Third, flower stenciling can provide a touch of femininity to your walls. You can achieve a subtle effect with just one stencil, or you can create a more complex design by layering several stencils.
Fourth, you can use stenciling to transform any wall into a chalkboard. Create a border with a huge stencil, then use smaller ones to add some whimsical designs.
Stenciling your walls in a Moroccan design is a great way to add a touch of exoticism to your home. Create a one-of-a-kind masterpiece with the help of detailed stencils.
Animal print stenciling is a great way to give your walls a dash of wild flair. You may make a zebra, cheetah, or leopard print with stencils.
Nautical stenciling is a great way to add a touch of the beach to any room. Make a sailboat, anchor, or other seaworthy object with the help of stencils.
Stenciling is a great way to give your child’s room a one-of-a-kind look and feel. Add in some of their favorite cartoons or come up with a wacky pattern using stencils.
Put some glitz into your walls with metallic stenciling, which is our ninth suggestion. Create a shimmering look with metallic paint.
Stenciling is a great way to make anything look special and textured. Make a 3D wall mural with texture paste and a stencil.
3.1. Roller stenciling
Walls decorated with roller stencils are sure to draw attention. You can get this effect by using a roller stencil, some paint, and a roller brush. Before rolling the stencil onto the wall, paint the roller stencil. Iterate until the required space is completely covered. This method is perfect for making a flawless mural or wall design.
3.2. Spray painting with a stencil
You may create one-of-a-kind motifs and patterns on your walls by spray painting with a stencil. This is the procedure: Get some painter’s tape and a stencil you like, then tape it to the wall. The next step is to hold the spray paint can 6-8 inches away from the wall and give it a good shake. Carefully spray the paint over the stencil so that no one region gets a disproportionate amount of paint. Let the paint dry for a few minutes before carefully peeling off the stencil. To make a truly unique mural, simply repeat the steps with a variety of stencils and paint colors.
3.3. Pouncing with a brush
Pouncing with a brush is a method of applying paint to a wall using a stencil brush. The brush is dipped into the paint very briefly before being tapped on a scrap of paper or cloth to remove any excess. Then, while pressing the stencil firmly against the wall, carefully dab the brush over the stencil. Using this method, you can give your stenciled design a subtle, textured look that will make it stand out from the crowd.
3.4. Blending colors with stencils
You may give your walls more depth and character by using stencils and blending colors. Pick a base palette of two or three complementary colors. The next step is to position your stencil on the wall and paint the base color onto it using a sponge or stencil brush. After the first coat of paint has dried, you can add the second by shifting the stencil slightly. Keep going until your stenciled design is completely covering the wall. Try out various color schemes to find one that works best for your room.
3.5. Layering stencils for a unique look
By applying multiple stencils at once, you can give your walls a truly one-of-a-kind design. First, paint the walls a solid color and let it cure completely. Next, decide on a stencil’s layout on the wall. Cover the base coat with the stencil and a second coat of paint in a contrasting hue. When the first coat of paint is dry, you can add a second coat of paint in a complementary color over a second stencil design. Create a layered and textured look by repeating this technique with as many stencils and colors as you choose.
4. Stenciling Ideas
Stenciling is an excellent method for decorating walls with unique patterns and themes. To help you get started, here are ten suggestions:
Create a trendy geometric wall pattern with stencils and geometric shapes. To create a one-of-a-kind style, try combining various forms and hues.
To add a touch of femininity to your walls, stencil some flowers and foliage. Create a sensual ambiance by decorating with soft, warm colors like pink, yellow, and green.
Third, Moroccan tiles: use stencils to make the appearance of elaborate Moroccan tiles. Add some life to your walls by painting them with vibrant hues like blue, red, and gold.
Animal prints: Stencil some animal prints onto your walls for a touch of the wild. Achieve maximum impact by donning zebra or leopard print.
Damask stenciling: Give your walls a sophisticated makeover with stenciled damask designs. Add a shimmering metallic finish using paint.
Nautical stencils: use anchors, seashells, and starfish to produce a coastal mood. Complete the effect with some white and blue paint.
Bohemian tribal patterns on the walls are easy to achieve with stencils. To achieve a rustic feel, stick to browns, oranges, and greens.
Stenciled polka dots on the walls are a fun way to add a whimsical accent. If you’re going for a happy vibe, reach for pink, blue, and yellow.
Stencil paisley patterns onto your walls for a cool, dated vibe. Make a statement with bright, edgy hues like purple, green, and orange.
You can use stencils to add significant inscriptions or quotes to your walls. For a timeless aesthetic, stick to black and white paint.
4.1. Geometric designs
Stenciling walls with geometric patterns is a common practice. They are a great way to update the look of any space. Triangular, diamond, hexagonal, and circular stencils are all common and well-liked. These patterns can be utilized to create a striking focal wall or a more understated design scheme. Think about the scale of the room and your preferred aesthetic when deciding on a geometric stencil pattern. It’s possible that a huge, dramatic pattern will look too busy in a compact area, while a smaller pattern won’t make much of an impression in a spacious one.
4.2. Floral patterns
Stenciling walls with floral designs is a common practice. They have the ability to make any space feel more refined and feminine. Roses, peonies, and daisies are just a few examples of well-liked flower stencil designs. It’s crucial to use a color scheme that works well with flowery stencil designs. To get a subdued appearance, choose pastels and muted tones, while vibrant colors might grab attention. Another suggestion is to add depth and visual interest to the wall by varying the size and positioning of the floral stencils.
4.3. Typography and quotes
Stenciling text may give a project a certain flair. Create a one-of-a-kind wall quotation or message by experimenting with different fonts and sizes. The typography can be placed in several ways, such as bordering an item or wrapping around it. Don’t be shy about letting your imagination go wild.
Stenciling a favorite saying is usually a good idea. Stenciling quotes into your walls, whether they be inspirational sayings or lyrics from your favorite songs, is a great way to give your home a unique and personal touch. Stenciling a family motto over the hearth or building a feature wall around a meaningful statement are two one-of-a-kind suggestions. The potential is enormous.
4.4. Animal prints
Finding your own voice and aesthetic is essential for successful fashion blogging. There is a wide range of styles available today, from the traditional to the experimental. Invest some time in discovering new aesthetics and approaches that speak to you. Try new things and don’t be scared to break the rules by taking cues from the latest trends and your favorite fashion stars and influencers. Discovering your own style and voice will help you produce content that stands out from the crowd and connects with your target demographic.
4.5. Abstract art
The freedom to explore one’s own unique perspective and style is what makes abstract art so appealing to so many people. It may be used to generate a broad variety of visual effects and is distinguished by the use of bright colors, strong lines, and geometric shapes. Here we’ll look at some of the fundamentals of abstract art, and how you may apply them to stenciling to make striking visual effects on your walls.
5. Finishing Touches
You might want to add some finishing touches to the wall design after you’ve stenciled it. A little paintbrush can be used to highlight or shade specific portions of the design. Metallic paint or glitter are two further options for embellishment. Applying a coating of glitter or metallic foil over an adhesive stencil is another way to achieve a textured look. Finally, a clear varnish or sealant may be applied on your design to prevent damage over time.
5.1. Removing the stencil
Reviews and suggestions of items and services in your fashion sector are a terrific approach to keep your visitors interested and provide them with useful information. Reviews should reflect the author’s genuine opinion on the product. Be sure to describe the product’s benefits, quality, and ease of use. In order to offer your readers a better concept of what the product looks like, you should definitely include images of it. It’s also a good idea to suggest additional resources that your audience could find useful. By consistently contributing insightful content, you may earn your readers’ respect and become an industry leader.
5.2. Touching up any mistakes
It’s crucial to take a step back and assess the overall appearance of your stenciling job once you’ve finished. Check for any smudges or faults that need fixing. Carefully touch up any flaws with a little brush and paint of the same hue. If you want your stenciling to be straight and even, using a level is an excellent idea. This last stage is crucial to the success of your project, so take your time with it.
5.3. Adding accents or embellishments
You can put the finishing touches on your stenciled wall by adding accents or embellishments. Add glitz with glitter or metallic paints, or go for a bright hue to make a statement. Alternatively, you may use stencils to add a decorative theme to the four corners of the room, or as a border or frame around your stenciled artwork. Any of these options can greatly improve the aesthetic value of your stenciled wall.
5.4. Sealing the design
The wall stenciling is done, but now it’s time to add the final touches to make the design stand out. Adding a gold or silver border is just one example of how metallic paint may be used to draw attention to specific parts of a design. Alternatively, you may try making a two-tone effect by painting the stencil’s background a different color. Lightly dabbing paint over the stenciled area with a sponge or rag might also give texture. Last but not least, think about using a deeper color to lend depth to specific spots. Add these details to your stenciled wall, and it will go from plain to magnificent in no time.
5.5. Taking care of your stenciled wall
Take good care of your stenciled wall and it will look great for years to come. Avoid using anything that might scratch the stencil or paint, such as strong solvents or abrasive cleaning instruments. Use a gentle cleaning solution and a gentle cloth or sponge instead. Maintaining the beauty of your stenciled wall just requires regular cleaning and a gentle wipe down. Don’t hang anything too heavy on the wall either, as this could damage the stencil or chip the paint. Your stenciled wall will remain an eye-catching design feature of your home with only a little maintenance on your part.
Conclusion
Finally, stenciling is an original and artistic approach to putting your stamp on a space. Using these 10 tips, you may create wall displays that are unique to your personality.


These 10 innovative and imaginative DIY home decor ideas from [object Object] provide a refreshing approach to enhancing ones living…