
Putting together a kid’s dream bedroom is a creative and entertaining endeavor, but it can also be rather costly. Luckily, it’s not hard to produce your own wall art to put your stamp on the room. Here are some Do-It-Yourself wall art ideas that are ideal for kid’s bedroom. These DIY ideas, ranging from vibrant canvases to whimsical pom-pom garlands, are perfect for giving a child’s bedroom a more carefree and creative vibe.
- 1. DIY Wall Art Ideas for Kids’ Rooms
- 1.1. Introduction
- 1.2. 1. Painted Canvas Art
- 1.3. 2. Button Monogram Art
- 1.4. 3. Paper Flower Wall Art
- 1.5. 4. Personalized Name Art
- 1.6. 5. Washi Tape Wall Art
- 2. Introduction
- 2.1. Why DIY Wall Art?
- 2.2. Choosing the Right Materials
- 2.3. Getting Your Kids Involved
- 2.4. Creating a Cohesive Look
- 2.5. Safety Considerations
- 3. 1. Painted Canvas Art
- 3.1. Painting Techniques
- 3.2. Stenciling and Stamp Art
- 3.3. Using Tape and Stickers
- 3.4. Adding Textures and Layers
- 3.5. Sealing and Protecting Your Art
- 4. 2. Button Monogram Art
- 4.1. Gathering Your Materials
- 4.2. Designing Your Monogram
- 4.3. Gluing and Layering Buttons
- 4.4. Adding Embellishments
- 4.5. Hanging Your Finished Art
- 5. 3. Paper Flower Wall Art
- 5.1. Choosing Your Flowers
- 5.2. Creating Your Petals and Stems
- 5.3. Assembling Your Flowers
- 5.4. Arranging Your Flowers
- 5.5. Adding Finishing Touches
- 6. 4. Personalized Name Art
- 6.1. Choosing Your Style and Font
- 6.2. Designing Your Layout
- 6.3. Cutting Out Your Letters
- 6.4. Painting or Decorating Your Letters
- 6.5. Hanging Your Finished Art
- 7. 5. Washi Tape Wall Art
1. DIY Wall Art Ideas for Kids’ Rooms
Decorating a child’s room, especially the walls, can be a lot of joy and a lot of work. A room can be transformed from dull to vibrant and fun with the help of carefully selected wall art. We have you covered if you need some inspiration for kid-friendly wall decor. These concepts are simple to implement and inexpensive.
1.1. Introduction
The process of decorating a child’s room can be a lot of fun, but it can also end up costing a lot of money. DIY wall art is a great way to put your stamp on a room without spending a fortune. It will be cost-effective and provide scope for individualization and innovation. Here are some DIY wall art ideas for kids’ rooms that are simple to make and will give any room its own special flair.
1.2. 1. Painted Canvas Art
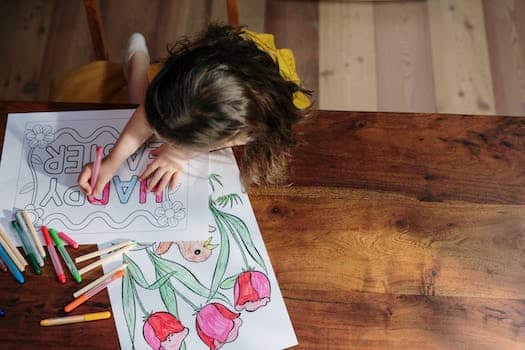
Paintings on canvas are a unique and imaginative way to adorn a child’s room. This do-it-yourself activity is simple and can be tailored to any kid’s interests. To get started, head to the nearest arts and crafts shop and pick up some blank canvases and acrylic paint. Then, sit back and watch as your kid creates works of art that are truly one-of-a-kind. The completed works of art can be displayed on the walls to liven up the space.
1.4. 3. Paper Flower Wall Art
A gorgeous and easy DIY project, Paper Flower Wall Art can liven up any child’s bedroom or playroom. You’ll need some colored tissue paper, some scissors, and some floral wire to make this DIY wall decoration. Make an accordion out of the tissue paper by cutting it into squares, stacking them, and folding them back and forth. Wrap the floral wire around the folded paper’s middle and cut it into a petal shape using scissors. To make a complete bloom, carefully draw each layer of tissue paper towards the center. Make a bouquet of paper flowers by following the steps above using several sheets of tissue paper in various colors. Use removable adhesive strips or tacks to affix the flowers on the wall, adding a whimsical and colorful touch to any child’s bedroom.
1.5. 4. Personalized Name Art
Add a special touch to your kid’s bedroom with some personalized name art. Wood, canvas, and paper are just a few of the materials you can use to make your own unique name art. You can make it special for your kid by using his or her favorite colors and fonts. Alternatively, you could use letter stickers to spell out your child’s name on the wall and then surround it with bright and cheery wall art and other decorations. It’s a cheap and easy method to make your kid’s room feel more like his or her own.
1.6. 5. Washi Tape Wall Art
Washi tape is a simple and fun way to decorate your walls in a variety of ways. Using various colors of washi tape, you can easily make geometric shapes and patterns on a white canvas or on the wall. Washi tape can also be used to make a decorative frame for a prized photo or piece of artwork. Making a mural out of strips of washi tape, like a landscape or metropolis, is an intermediate to difficult craft project. This inexpensive and entertaining DIY material can be used in countless ways.
2. Introduction
Decorating your kid’s room doesn’t have to break the bank, but it should be done with care and attention to detail. Making your own wall art is a great way to put your stamp on a room. It’s budget-friendly, and you can tailor it to your kid’s hobbies and personality. Here are 10 easy-to-make wall art suggestions for kid’s quarters. There’s a wide variety of tasks available, from the elementary to the advanced. Okay, so let’s begin!
2.1. Why DIY Wall Art?
Crafting their own wall art is a great way to encourage their imagination while also giving their area a more personalized feel. If you want to make a special decoration for your kid’s room but don’t want to spend a lot of money, consider making it together. It’s inexpensive, provides an opportunity to spend quality time together, and highlights your kid’s creative side. Here are 10 easy-to-make wall art suggestions for kid’s quarters.
2.2. Choosing the Right Materials
Including wall art in a child’s room’s design is a terrific way to inject the area with character and vibrancy. Making your own wall art is a great way to bond with your child while saving money. To guarantee their security and longevity, nevertheless, these endeavors require careful consideration when selecting materials. In this piece, we’ll have a look at some of the best DIY wall art ideas for kids’ rooms and the resources you can use to make them.
2.3. Getting Your Kids Involved
Adding some homemade wall art is a great way to make a child’s room more special and one-of-a-kind while decorating. It’s a fun way to get your kids involved in the decorating process, and it’ll brighten up the room with color and originality. You may inspire their imagination and give them pride in their surroundings by having them take part in making their own artwork. Here are ten do-it-yourself wall art projects that you and your kids may work on together to give their space personality.
2.4. Creating a Cohesive Look
Decorating a child’s room can be a thrilling adventure, but it can also feel like a lot of work. Creating a unified style is a crucial step in interior design since it unifies the room’s disparate elements. Color, pattern, and subject matter can all be used to this end. In this post, we’ll look at 10 different types of DIY wall art that may be used to decorate your kid’s room and give it a more polished feel.
2.5. Safety Considerations
Always keep your child’s safety in mind when making decorations for their bedroom. Take care to avoid any potential dangers when decorating your child’s room, whether you’re using store-bought wall art or making your own DIY pieces. In this piece, we’ll go over some of the most important things to remember about your child’s safety when making their own DIY wall art.
3. 1. Painted Canvas Art
Canvas paintings are a fun and easy way to give a kid’s room a splash of color and unique style. Your kid can make something truly special with some paint and a canvas. Your child can have input on the color scheme and design, or you can make something to complement the existing furnishings. Canvas paintings are a great way to add some color to a child’s room, and they can be made quickly and easily at home.
3.1. Painting Techniques
Canvas paintings are an excellent outlet for young artists and a fun way to decorate bedroom walls. Canvas paintings can be made utilizing a wide variety of methods, such as stenciling, splattering, and the application of painter’s tape to form geometric designs. Inspire your kid to make a work of art they can be proud of by letting them try out new approaches and materials.
3.2. Stenciling and Stamp Art
In addition to painting, stenciling and stamp art are fun and creative ways to give your child’s room a special touch. Stenciling is the process of applying paint to a surface many times through the use of a stencil. Creating a design or pattern on canvas or paper with stamps is an example of stamp art. Both methods are easy to modify to meet your kid’s preferences, making them a pleasant family activity.
3.3. Using Tape and Stickers
Making personalized wall decor for your kid’s room is as simple as grabbing some tape and stickers. Both masking tape and washi tape can be used to make decorative shapes and patterns on the wall. Stickers are another excellent choice because they can be found in many different designs and hues. Stickers can be arranged in a mural’s pattern or design, or they can be placed randomly for a more carefree, whimsical effect. The great thing about utilizing tape and stickers is that they can be removed without leaving any permanent marks on the walls.
3.4. Adding Textures and Layers
The appearance of painted canvas paintings can be greatly improved by the addition of textures and layers. Fabric, paper, sand, and other materials can all be used to create interesting textures on a canvas. Adding depth and visual appeal can also be achieved by layering various colors and forms. Try out new mediums and approaches to create one-of-a-kind decorative accents for your kid’s space.
3.5. Sealing and Protecting Your Art
If you want your artwork to last for generations, you must take the necessary precautions to seal and safeguard it. This is especially important to remember when caring for paintings on canvas. Here are some ways to preserve your hard work on canvas:
To protect your painted canvas from the elements, use a clear acrylic varnish. The paint will be preserved from drying out, flaking, and cracking thanks to this.
Varnish should be applied in thin, even coats, with ample drying time between applications.
Varnish should be applied with a gentle brush, and too much pressure could cause the paint to smear.
– You need to paint all the way to the edges of the canvas.
Do not hang or store the painting until the varnish has dried fully.
If you take these precautions, your painted canvas artwork should retain its original color and beauty for many years to come.
4.1. Gathering Your Materials
It’s crucial to get your button monogram art supplies together before you get started. A wooden frame, buttons, glue, and a letter stencil are all you need to get started. Use buttons of varying sizes and hues to make a work of art that stands out. Beads or sequins are some examples of little decorations that can be added to a project to give it more depth and texture. You may begin making your own Button Monogram Art for your kid’s room as soon as you gather the necessary supplies.
4.2. Designing Your Monogram
Making a monogram is a fun and creative way to add a unique touch to your kid’s bedroom decor. To get started, pick a font that reflects your child’s style and the decor of the area. Choose a monogram size and pick where to put it. What kind of a statement will it make? Once you’ve worked out the specifics, you can experiment with colors and materials. Don’t be hesitant to personalize it for your child in imaginative ways.
4.4. Adding Embellishments
DIY wall art can be made more special and individual by including embellishments. Making button monogram art is a simple and entertaining option. Select a letter in the alphabet that stands for your child’s name, and then collect buttons in various bright colors. Attach the buttons on a canvas or cardboard cut into the letter’s shape using a hot glue gun. When you’re done, you may hang it up on the wall to brighten up your kid’s space.
4.5. Hanging Your Finished Art
Displaying your finished DIY wall art is one of the last phases in the creative process. There are a few things to take in mind while hanging completed works of art. Before hanging anything, think about how much it will weigh and pick hardware like picture hangers or wall anchors accordingly. Second, consider the height and location of the artwork. Make sure it’s centered and at eye level on the wall. Finally, before hanging many items, arrange them on the floor to get a feel for how they all work together.
To hang your finished Button Monogram Art, we suggest using a thin, lightweight frame with a wire or sawtooth hanger. With this, mounting to the wall is simple and secure. If you want the frame to stay put and not wobble about, you can use hooks or sticky strips to secure it.
5. 3. Paper Flower Wall Art
A child’s room might benefit from the addition of color and texture provided by paper flower wall art. These blossoms are simple to create and can be altered to fit any style. Tissue paper, pipe cleaners, and scissors are all you need to create beautiful paper flowers. Start by stacking and accordion-folding numerous sheets of tissue paper. Then, twist the end of a pipe cleaner around the middle of the folded tissue paper. After that, you’ll need to use a pair of scissors to round off the tissue paper’s edges, and then carefully tear apart each layer to reveal the petals. To make a rainbow bouquet, simply repeat the above steps using tissue paper of various colors. Finally, arrange the flowers on the wall in any way you like using double-sided tape or adhesive dots. Your kid will be overjoyed with the new accessory to their bedroom!
5.1. Choosing Your Flowers
Using the appropriate flowers is essential when making your own paper flower wall art. Choose floral arrangements that either blend in with or stand out from the room’s existing color palette. You can make a more interesting arrangement by combining various flower varieties and sizes. Try out various sizes, colors, and materials without worry. When it comes to paper flower wall decor, the options are limitless.
5.2. Creating Your Petals and Stems
The first step in making paper flower wall art is to select your colors and cut out the forms of the petals and leaves from the paper of your choice. Make your own, or use one of the many available templates. The next step is to use your scissors to make fine slits around the edges of your flowers and leaves. Wrapping floral wire or pipe cleaners in green paper or tape will give them the look of stems for your arrangements. Assemble your flowers by stacking the petals and fastening them with glue or tape once all your materials are prepared. Paper flower wall art can be easily customized by adding a few stems to the back of the flowers and hanging them in a pleasing arrangement.
5.3. Assembling Your Flowers
Making paper flower wall art may be a rewarding and imaginative hobby. Make sure to have a wide range of sizes and colors when setting out your paper flowers and leaves. Next, plan out how you want the flowers to be arranged on the wall. You can arrange them systematically or randomly. Use double-sided tape or sticky dots to secure the flowers to the wall once you’ve settled on a pattern. Don’t forget to take a step back and assess your progress so you may make any necessary adjustments as you go along. Your paper flower wall art will be a lovely addition to any child’s room if you take your time and think outside the box.
5.4. Arranging Your Flowers
Choosing a color scheme and the types of flowers you want to use are the first steps in making lovely paper flower wall art for your kid’s room. Create colorful paper flowers by cutting out individual petals and leaves and adhering them together with glue or tape. Put the flowers on a larger sheet of paper or canvas and play around with different arrangements to see what you like most. After you have the flowers arranged the way you want them, you can glue or tape them in place and hang the finished piece on your kid’s wall to give their room some much-needed color and charm.
5.5. Adding Finishing Touches
You may embellish your paper flower wall art with things like glitter, sequins, or even tiny beads to make it stand out from the crowd. You can use adhesive to attach them to flower petals or flower centers for a touch of shimmer and brightness. You may make your design stand out by playing around with various paper colors and patterns. Finally, if you want your paper flower wall art to look more finished and sophisticated, consider framing it. A picture frame is an inexpensive way to make a homemade creation for your kid’s room look more polished and professional.
6. 4. Personalized Name Art
Add a special touch to your kid’s bedroom with some personalized name art. You can make a collage out of various shapes and letters and display it on a canvas, or use wooden letters. Your child’s interests or favorite colors can be incorporated into this do-it-yourself project. It’s a great opportunity to get creative while helping your kiddo feel more at home in his or her own room.
6.1. Choosing Your Style and Font
Choosing the proper style and font is essential when designing custom wall decor with your child’s name for their bedroom. Determine whether your youngster would prefer a daring and lively look or a more refined and classy one. You may also make a statement with the font you use, which might range from a fun script to a sleek sans-serif. If you want to locate the right personalized name art for your kid’s room, you should take your time trying out numerous options.
6.2. Designing Your Layout
Personalized wall art featuring your child’s name is a wonderful way to brighten up their space. Paint, paper, and even fabric can all be used to make one-of-a-kind works of art using a person’s name. Using wooden letters to spell out your kid’s name and decorating them with paint, glitter, or stickers is a simple yet effective concept. Another option is to put together a photo collage in the shape of your child’s name. Use pictures of your kid or things that fascinate him or her to do this. When it comes to decorating your kid’s room with custom name art, the sky’s the limit.
6.3. Cutting Out Your Letters
A child’s name or a favorite word cut out of construction paper can be a creative and unique way to decorate their room. Make a mural by using stencils or tracing the letters onto bright paper or fabric, cutting them out, and gluing them onto a canvas or the wall. A Cricut machine, or another cutting tool, can be used to create intricate and detailed patterns. Your kid will be thrilled to see their name displayed prominently in their room, and this do-it-yourself project offers countless opportunities for personalization and expression.
6.4. Painting or Decorating Your Letters
Personalized name painting is a wonderful option for giving your kid’s room a special look and feel. Adding your child’s unique flair to their room design is as easy as painting or decorating the letters in their name. Paint, glitter, stickers, fabric, and other materials can all be used to adorn the letters. To further emphasize the name, you might utilize contrasting fonts and hues. Display the completed letters on a wall or prop them up on a bookshelf. Your kid will be thrilled to find their name in their very own personalized room!
6.5. Hanging Your Finished Art
The final step in making your child’s name art come to life is to display it proudly in their bedroom. Several options exist for accomplishing this, each tailored to the specifics of the artwork in question. The artwork might be framed and then hung on the wall using nails or picture hangers. If you want not to damage the walls, you can also use hooks or sticky strips to hang the artwork. No matter what you decide, the artwork should be displayed at a level where your youngster can see and appreciate it.
7. 5. Washi Tape Wall Art
Making washi tape wall art for your kid’s room is a simple and inexpensive way to inject some life and character into their space. Washi tape of various colors and a blank wall are all that’s required. To begin, use a pencil to sketch out a pattern or design on the wall. Then, proceed to fill in the design with washi tape. You can make whatever kind of pattern you like, from simple lines to complex geometries, or even an entertaining picture. The potential is enormous. The nicest aspect is that you can just remove the tape and begin over if you make a mistake. Your kid will cherish this one-of-a-kind decor addition to their room.
7.1. Creating Simple Shapes and Patterns
Using washi tape to make basic shapes and patterns is a creative and entertaining way to infuse your child’s bedroom with color and character. Depending on what your kid likes, you can make anything from simple geometric shapes to complex abstract patterns. Imagination and a variety of widths and colors of washi tape are all that are required to get started. The first step in making a design with washi tape is settling on a design concept. You can frame the space with it or use it to highlight a specific wall. The options are practically limitless, and the best part is that you can always make a new design just by tearing off the washi tape and beginning over.
7.2. Layering and Mixing Tape Colors
If you want to make washi tape wall art that stands out, try layering and blending tape colors. To begin, pick a foundational color of tape and arrange it in a layered chevron or diagonal pattern. Then, apply a second color of tape in a contrasting or complementary design. To obtain the desired effect, continue this technique with other colors. Don’t be scared to try out new tape widths and patterns to make an original creation!
7.3. Using Tape to Create Words or Images
Washi tape is a simple and enjoyable way to decorate your child’s bedroom wall with text or pictures. Washi tape is an adhesive tape that may be used for decoration and is available in a wide variety of colors and designs. You can make any form you choose by cutting the tape and sticking it to the wall. If you want to make something truly one-of-a-kind, you can play around with colors and patterns. Washi tape can be removed without leaving any residue, making it a fantastic choice for renters or people who like to switch up their decor periodically.
7.4. Using Tape as a Border or Frame
Tape can be used as a border or frame for a cheap and easy approach to spice up your kid’s bedroom walls. Particularly recommended is washi tape, which can be found in an array of colors and designs and can be removed without leaving any marks on the wall. Fun geometric designs, stripes, and even frames for your kid’s artwork can be made with washi tape. The options are practically limitless, and you can have a lot of fun decorating your kid’s room together.
7.5. Experimenting with Different Tape Types
Examining the Effects of Various Tapes
It’s important to use high-quality tape while making Washi Tape Wall Art. While classic Washi Tape is always a safe bet, don’t be afraid to branch out and try something new, like glitter tape or patterned duct tape. Create a one-of-a-kind, eye-catching design by combining different kinds of tape in unexpected ways.
Conclusion
DIY wall art is a great way to give your kid’s room a unique look while also encouraging creativity. With these 10 tips, you may make something very special that your kid will treasure forever. There are countless ways to personalize their space, from making use of recyclable materials to including their favorite colors and animals.


These 10 innovative and imaginative DIY home decor ideas from [object Object] provide a refreshing approach to enhancing ones living…