
Wall painting is a fun and creative way to personalize your living space. However, if you are a beginner, the thought of painting a whole room can be daunting. That’s why we have compiled a list of 10 easy wall painting designs for beginners that will help you unleash your creativity and bring some color to your walls.
- 1. Introduction
- 1.1. Why learn wall painting?
- 1.2. What are the benefits of wall painting?
- 1.3. What are the basics of wall painting?
- 2. Choosing the right tools and materials
- 2.1. What tools do you need for wall painting?
- 2.2. What materials do you need for wall painting?
- 2.3. How to prepare your workspace for wall painting
- 2.4. How to protect your furniture and floors during wall painting
- 2.5. Tips for buying the best quality tools and materials
- 3. Different types of wall painting designs
- 3.1. Geometric wall painting designs
- 3.2. Striped wall painting designs
- 3.3. Stenciled wall painting designs
- 3.4. Mural wall painting designs
- 3.5. Abstract wall painting designs
- 4. Step-by-step guide to create wall painting designs for beginners
- 4.1. Choosing the right color scheme
- 4.2. Preparing the wall surface for painting
- 4.3. Sketching the design on the wall
- 4.4. Painting the base coat
- 4.5. Adding details and finishing touches
- 5. Tips and tricks for successful wall painting designs
1. Introduction
Wall painting is a great way to add a personal touch to your home decor. It can transform a dull and boring wall into a beautiful and eye-catching masterpiece. However, if you are a beginner, it can be overwhelming to choose a design that is easy to execute. That’s why we have compiled a list of 10 easy wall painting designs for beginners that will help you get started on your artistic journey. These designs are simple, yet stunning, and will give your walls a fresh new look.
1.1. Why learn wall painting?
Learning wall painting can be a fulfilling and rewarding experience. Not only does it give you the opportunity to express your creativity, but it also allows you to transform the look and feel of your home. Whether you are a beginner or an experienced painter, there are many reasons why you should consider learning wall painting. In this article, we will explore some of the benefits of learning this skill and provide you with 10 easy wall painting designs for beginners to try out.
1.2. What are the benefits of wall painting?
Wall painting is an effective and easy way to transform the look and feel of any space. Whether you’re looking to create a focal point, add some color, or simply refresh a room, a fresh coat of paint can do wonders. But the benefits of wall painting go beyond just aesthetics. Painting your walls can also improve the value of your home, protect your walls from damage, and even boost your mood. In this article, we will explore the many benefits of wall painting and provide some easy designs for beginners to try.
1.3. What are the basics of wall painting?
Wall painting is a great way to add a personal touch to any room in your home. Whether you’re an experienced painter or a beginner, there are some basics you need to know before you get started. Here are some tips to help you get started with your wall painting project:
2. Choosing the right tools and materials
Choosing the right tools and materials is crucial to the success of any painting project, especially for beginners. Here are some basic items you will need for these 10 easy wall painting designs:
1. Paintbrushes – Choose a variety of sizes and shapes to achieve different effects.
2. Paint rollers – Use these for larger areas to save time and effort.
3. Painter’s tape – This will help you create clean lines and prevent paint from bleeding.
4. Drop cloths – Protect your floors and furniture from paint splatters.
5. Paint trays – Pour your paint into these to make it easier to dip your brush or roller.
6. Primer – This is essential for covering up old paint or preparing a new surface for paint.
7. Paint – Choose the colors you want to use for your designs.
8. Stencils – These can be helpful for creating intricate designs or patterns.
9. Sponges – Use these for dabbing paint onto the wall for a textured effect.
10. Rags or paper towels – Keep these on hand for wiping up mistakes or spills.
2.1. What tools do you need for wall painting?
When it comes to painting your walls, having the right tools is just as important as choosing the right paint color. Here are some essential tools you’ll need for your next wall painting project:
– Paint brushes (in various sizes)
– Paint rollers (with appropriate nap)
– Paint tray
– Painter’s tape
– Drop cloths
– Sandpaper
– Putty knife/spackle
– Paint scraper
– Extension pole (for hard-to-reach areas)
Investing in quality tools will not only make the job easier, but it will also ensure a more professional-looking finish.
2.2. What materials do you need for wall painting?
Before you start your wall painting project, you will need to gather the necessary tools and materials. Here are the basic materials you will need:
1. Paint – Choose the color and finish that you want for your wall.
2. Primer – This is optional, but it can help the paint adhere better to the wall.
3. Paintbrushes – You will need a few different sizes depending on the size of the project.
4. Rollers – These are great for larger areas and can make the job go faster.
5. Paint tray – This is where you will pour your paint and load your roller.
6. Painter’s tape – Use this to protect areas that you don’t want to get paint on.
7. Drop cloth – This will protect your floors and furniture from drips and spills.
By having the right tools and materials, you can ensure that your wall painting project goes smoothly and that you achieve the look that you want.
2.3. How to prepare your workspace for wall painting
Before diving into the actual painting process, it’s important to properly prepare your workspace. This will not only make the job easier, but it will also result in a more professional-looking finish. Here are some tips for preparing your workspace for wall painting:
1. Clear the room: Remove all furniture, decorations, and other items from the room. If something cannot be moved, cover it with a drop cloth.
2. Clean the walls: Use a damp cloth to wipe down the walls and remove any dirt or dust. This will help the paint adhere better.
3. Fill in any holes or cracks: Use spackle to fill in any holes or cracks in the wall. Sand it down once it’s dry.
4. Tape off the edges: Use painter’s tape to protect the edges of the walls, ceiling, and any trim or molding.
5. Lay down drop cloths: Cover the floor with drop cloths or old sheets to protect it from paint drips.
By taking these steps to prepare your workspace, you’ll be able to paint with ease and achieve a flawless finish.
2.4. How to protect your furniture and floors during wall painting
When it comes to painting walls, protecting your furniture and floors should be a top priority. Here are some tips to help you keep your home clean and tidy while you transform your walls.
1. Cover your furniture with plastic sheets or drop cloths. This will prevent any paint drips or spills from damaging your upholstery or wood finishes.
2. Remove any small or fragile items from the room that you are painting. This will prevent them from getting covered in paint or knocked over during the process.
3. Use painter’s tape to protect your baseboards, crown molding, and door frames. Make sure to apply the tape carefully and press it down firmly to ensure that it stays in place.
4. Lay down a drop cloth or old sheet on the floor to catch any drips or spills. This will also make it easier to clean up any messes.
By taking these simple steps, you can protect your furniture and floors and ensure that your painting project goes smoothly.
2.5. Tips for buying the best quality tools and materials
When it comes to wall painting, having the right tools and materials is crucial for achieving a high-quality finish. Here are some tips to help you choose the best quality tools and materials:
1. Paintbrushes: Look for brushes with synthetic bristles as they are durable, easy to clean and produce a smooth finish.
2. Rollers: Choose rollers with a medium nap for smooth surfaces and a longer nap for textured surfaces.
3. Paint: Invest in high-quality paint that is durable and has good coverage. Look for paints with low VOCs (volatile organic compounds) to minimize health risks.
4. Primer: Use a high-quality primer to prepare the surface for painting. This will help the paint adhere better and last longer.
5. Sandpaper: Use sandpaper to smooth out any rough surfaces before painting. Choose a fine-grit sandpaper for a smooth finish.
6. Drop cloths: Protect your floors and furniture with drop cloths. Look for cloths made from canvas or plastic as they are durable and easy to clean.
7. Painter’s tape: Use painter’s tape to mask off areas you don’t want to paint. Look for tape that is easy to remove and doesn’t leave residue.
8. Stir sticks: Use stir sticks to mix the paint thoroughly before using it. This will ensure an even color and consistency.
9. Paint tray: Use a paint tray to hold the paint and make it easier to use with a roller or brush.
10. Cleaning supplies: Have cleaning supplies on hand to clean up any spills or drips as you work. This will help you avoid any mess and keep your workspace clean.
3. Different types of wall painting designs
Wall painting can instantly transform the look and feel of a room. If you’re a beginner, it’s best to start with simple designs that don’t require any special techniques or tools. Here are 10 easy wall painting designs that you can try:
1. Stripes
2. Polka dots
3. Stenciled patterns
4. Ombre
5. Chevron
6. Geometric shapes
7. Abstract designs
8. Sponge painting
9. Color blocking
10. Freehand doodles
Experiment with different colors and combinations to create a unique look that reflects your personal style.
3.1. Geometric wall painting designs
Geometric wall painting designs are a popular choice for those who want to add a touch of modernity to their homes. These designs usually involve the use of straight lines and angles to create patterns that are both visually appealing and unique. Some popular geometric wall painting designs include chevron stripes, diamond patterns, and hexagon shapes. These designs can be painted in a variety of colors, allowing you to create a customized look that matches your personal style. Whether you’re looking to add a pop of color to your living room or create a statement wall in your bedroom, geometric wall painting designs are a great choice.
3.2. Striped wall painting designs
One popular trend in wall painting designs is the use of stripes. Striped walls can add a bold, modern look to any room. There are many different types of striped wall designs, including horizontal, vertical, diagonal, and chevron patterns. You can use a single color for your stripes, or experiment with different colors and widths to create a unique look. When painting stripes, it’s important to use painter’s tape to ensure clean, straight lines. With a little practice, anyone can master the art of striped wall painting!
3.3. Stenciled wall painting designs
Stenciled wall painting designs are a popular choice for adding a unique touch to your walls. There are endless possibilities when it comes to stenciling, from elegant floral patterns to quirky geometric shapes. One of the best things about stenciling is that it’s a beginner-friendly technique that requires minimal skill or experience. With a little bit of creativity and patience, you can create stunning stenciled designs that will transform any room in your home.
3.4. Mural wall painting designs
Mural wall painting designs are an excellent way to add a unique touch to any room in your home. With the right design, you can transform a plain wall into a beautiful work of art. There are many different types of mural wall painting designs to choose from, ranging from simple patterns to intricate scenes. In this section, we will explore some of the most popular types of wall painting designs that you can use to create your own beautiful murals.
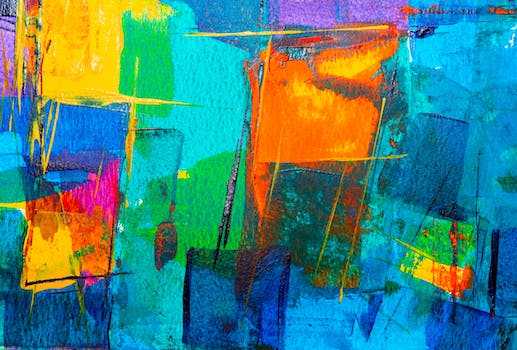
3.5. Abstract wall painting designs
Abstract wall painting designs are a great way to add a unique touch to any room. These designs can be as simple or complex as you want them to be, and can be created with a variety of techniques and materials. Some popular abstract wall painting designs include geometric shapes, bold lines, and vibrant colors. Whether you are looking to create a statement piece or simply add some color to your walls, abstract wall painting designs are a great option to consider.
4. Step-by-step guide to create wall painting designs for beginners
Wall painting can be a great way to add some personality and style to your home. If you’re a beginner, it can be intimidating to start, but with a little guidance, you can create stunning designs in no time. Here is a step-by-step guide to help you create wall painting designs for beginners:
1. Choose your design: Consider the style and theme of your room, and select a design that complements it. You can either freehand a design or use stencils to create a more precise look.
2. Gather your supplies: You’ll need paint, brushes, rollers, painter’s tape, and drop cloths to protect your floors and furniture.
3. Prep your walls: Clean the surface of your walls and make any necessary repairs. Apply a base coat of paint if needed and let it dry completely.
4. Use painter’s tape: Use painter’s tape to create clean lines and prevent any paint from bleeding onto other areas.
5. Paint your design: Start with the background color and work your way to the foreground. Be patient and let each layer dry completely before moving onto the next.
6. Remove painter’s tape: Once your design is complete, carefully remove the painter’s tape to reveal your clean lines.
7. Touch up any mistakes: Use a small brush to touch up any mistakes or uneven areas.
8. Let it dry: Allow your design to dry completely before adding any additional coats or decorations.
With these simple steps, you can create beautiful wall painting designs for beginners that will impress anyone who enters your home.
4.1. Choosing the right color scheme
Choosing the right color scheme is an essential part of creating a visually appealing wall painting design. The colors you choose will affect the overall mood and ambiance of the room. To begin, consider the purpose and function of the room. Is it a bedroom, living room, or dining room? Different colors can evoke different emotions and moods. For example, blue is calming and relaxing, while red is energizing and passionate. Once you have a general idea of the mood you want to create, you can start selecting specific colors. Look for colors that complement each other and create a cohesive look. You can use color wheel tools or online resources to help you choose complementary colors. Remember, you don’t have to stick to just one or two colors. Experiment with different shades and tones to create depth and interest.
4.2. Preparing the wall surface for painting
Before diving into creating your wall painting design, it’s important to properly prepare the surface you will be painting on. This will ensure that your design looks its best and lasts as long as possible.
First, clean the wall surface thoroughly to remove any dirt, dust, or grime. You can use a damp cloth or sponge and a mild cleaning solution for this.
Next, inspect the wall for any cracks or holes. If you find any, fill them in with spackling or putty and allow it to dry completely.
Then, sand the entire wall surface lightly with sandpaper to create a slightly rough texture. This will help the paint adhere better.
Finally, apply a coat of primer to the wall surface to create a smooth, even base for your paint. Allow the primer to dry completely before beginning your design.
4.3. Sketching the design on the wall
Before diving into painting, it’s always a good idea to sketch out your design on the wall first. This will help you visualize the final product and make any necessary adjustments before you start painting. To sketch your design, use a pencil and lightly draw out your shapes and lines. Don’t worry about making mistakes, as you can easily erase and start over. Once you’re happy with your sketch, you can start painting your design with confidence!
4.4. Painting the base coat
Painting the base coat is an essential step in any wall painting project. It provides a smooth surface for the design to be painted on and ensures that the colors will appear vibrant and true. To begin, select a base color for your wall. This can be a neutral color like white or beige, or a bold color that complements your design. Once you have your base color, use a roller or brush to apply a coat of paint to your entire wall. Make sure to fill in any gaps or uneven areas, and allow the paint to dry completely before moving on to the next step.
4.5. Adding details and finishing touches
Once you have completed the steps outlined in the previous section, it’s time to add some finishing touches to your wall painting design. This is where you can really get creative and make your design unique. Here are a few ideas:
– Use a stencil to add a pattern or design to your painted wall. You can find stencils at most craft stores or online.
– Add some texture to your wall by using a sponge or rag to dab on a second color. This technique is called sponging or ragging.
– Use painter’s tape to create clean, straight lines between two colors. This is called color blocking and is a great way to add some interest to a wall without having to create a complicated design.
– Finally, consider adding some accessories to your wall, such as picture frames or wall decals. These can really help to tie the room together and make your wall painting design stand out.
5. Tips and tricks for successful wall painting designs
To achieve successful wall painting designs, beginners should consider the following tips and tricks:
1. Choose the right paint: Select paint that is durable, easy to clean, and fits the room’s purpose.
2. Use painter’s tape: Apply painter’s tape to protect areas where you don’t want paint.
3. Prepare the surface: Clean and prime the wall before painting for better adhesion.
4. Plan the design: Sketch out the design beforehand and use a grid system for accuracy.
5. Use stencils: Stencils can help with intricate designs and make painting easier.
6. Experiment with color: Don’t be afraid to mix and match colors to create a unique look.
7. Create an accent wall: Painting one wall a different color or design can add interest to a room.
8. Add texture: Experiment with different painting techniques, such as sponging or rag rolling, to add texture to the walls.
9. Take your time: Rushed painting can lead to mistakes, so take your time and enjoy the process.
10. Practice makes perfect: Don’t get discouraged if your first attempt isn’t perfect. Keep practicing and experimenting to improve your skills.
5.1. Practice on a small area first
Before embarking on a large wall painting project, it’s always a good idea to practice on a small area first. This will help you get a feel for the paint and brush strokes, and allow you to experiment with different techniques and colors. You can also use this practice area to test out different design ideas and see what works best before committing to a larger project. Taking the time to practice on a small area first can save you a lot of time and frustration in the long run.
5.2. Use painter’s tape to create straight lines
Using painter’s tape to create straight lines is a great technique for achieving clean, crisp edges in your wall painting designs. Simply apply the tape along the edge where you want the color to stop, making sure to press it down firmly to prevent any bleeding. Paint up to the edge of the tape, let it dry, and then carefully remove the tape to reveal a perfectly straight line. This method can be used for creating stripes, geometric shapes, and even intricate patterns with multiple colors.
5.3. Mix and match different colors and textures
Mixing and matching different colors and textures is a great way to create a unique and eye-catching wall painting design. Experiment with complementary colors or try layering different shades of the same color to add depth and dimension to your walls. You can also incorporate different textures, such as stripes, polka dots, or stenciled designs, to add interest and personality to your space.
5.4. Experiment with different painting techniques
Experimenting with different painting techniques can give your walls a unique and personalized touch. Some popular techniques include color washing, stippling, sponging, and rag rolling. Color washing involves applying a diluted paint mixture over a base coat to create a soft, textured look. Stippling involves using a stippling brush to create a pattern of dots on the wall. Sponging involves applying paint with a sponge to create a mottled effect. Rag rolling involves rolling a rag over wet paint to create a textured effect. Try out different techniques on a small section of your wall before committing to a larger area. Have fun and get creative with your wall painting designs!
5.5. Don’t be afraid to make mistakes
Don’t be afraid to make mistakes when starting your wall painting project. Even the most experienced painters make mistakes, and it’s all part of the learning process. Embrace your mistakes and use them as an opportunity to learn and improve. Remember, you can always paint over any mistakes and start again. So, don’t let the fear of making mistakes hold you back from creating a beautiful and unique wall painting design.
Conclusion
In conclusion, these 10 easy wall painting designs for beginners are a great way to add a personal touch to any room in your home. With a little time and patience, you can create a beautiful and unique look that reflects your style and personality. So why not give it a try and see what you can create?


These 10 innovative and imaginative DIY home decor ideas from [object Object] provide a refreshing approach to enhancing ones living…