
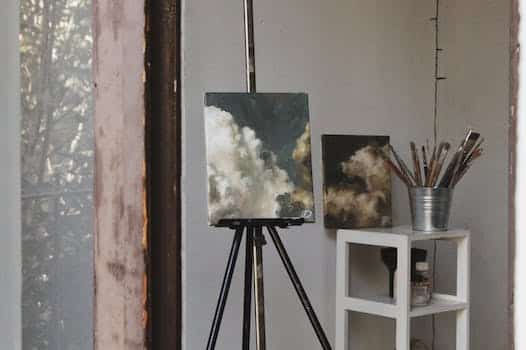
Are you looking for easy wall painting designs for beginners? Look no further! In this article, we will showcase 10 simple and stylish wall painting ideas that anyone can master. Whether you’re looking to add a pop of color to your living room or create a unique accent wall in your bedroom, these designs are sure to inspire your inner artist. So, grab a paintbrush and let’s get started!
- 1. Introduction
- 1.1. Why wall painting is a great hobby for beginners
- 1.2. Benefits of painting for mental health
- 1.3. Materials needed for wall painting
- 2. Choosing a Design and Color Scheme
- 2.1. How to choose a design that suits your style
- 2.2. Tips for selecting the right color scheme
- 2.3. Understanding color theory
- 3. Preparing the Wall
- 3.1. Cleaning the wall surface
- 3.2. Filling in cracks and holes
- 3.3. Priming the wall
- 4. Tools and Techniques
- 4.1. Types of brushes and rollers to use
- 4.2. Different techniques for creating texture and patterns
- 4.3. Using stencils and tape to create clean lines
- 5. Step-by-Step Guide to Painting Your Wall
1. Introduction
Wall painting can be a fun and easy way to add a pop of color and personality to any room in your home. However, if you’re new to painting, it can be overwhelming to know where to start. That’s why we’ve put together a list of 10 easy wall painting designs for beginners. Whether you’re looking for something simple and understated or bold and eye-catching, there’s sure to be a design on this list that you’ll love. So grab your paintbrushes and let’s get started!
1.1. Why wall painting is a great hobby for beginners
Wall painting can be a great hobby for beginners because it is a fun and creative way to express yourself. Not only can you create beautiful pieces of art to decorate your home, but you can also use it as a form of relaxation and stress relief. With just a few basic supplies and some simple techniques, anyone can learn how to paint and create their own unique designs. In this article, we will explore 10 easy wall painting designs for beginners that will inspire you to get started on your own painting journey.
1.2. Benefits of painting for mental health
Painting is an excellent way to express oneself creatively, but did you know that it also has numerous mental health benefits? Painting can help reduce stress, anxiety, and depression by providing a relaxing and meditative outlet. It can also improve cognitive function, memory, and problem-solving skills. Additionally, painting has been shown to increase self-esteem and confidence, as well as promote mindfulness and emotional healing. Overall, painting can be a powerful tool for improving mental health and well-being.
1.3. Materials needed for wall painting
To start with wall painting, you need to have the right materials. Here are some of the essential items you will need:
1. Paint – Choose the color you want and buy enough for your project.
2. Brushes – Different brush sizes will help you achieve different effects.
3. Roller – A roller is great for covering large areas quickly and evenly.
4. Paint Tray – This is where you pour your paint for easy access.
5. Painter’s Tape – Use tape to protect areas you don’t want to paint.
6. Sandpaper – Sandpaper will help you smooth out rough surfaces.
7. Drop Cloth – Cover your floors and furniture with a cloth to protect them from paint spills.
8. Putty Knife – Use a putty knife to fill in cracks and holes in the wall before painting.
9. Primer – Applying primer before painting will help the paint adhere better to the wall.
10. Cleaning Supplies – Have cleaning supplies on hand to clean up any messes during or after the painting process.
2. Choosing a Design and Color Scheme
Choosing a design and color scheme can be a daunting task for beginners who are just starting out with wall painting. However, there are a few things to keep in mind that can make the process easier. First, consider the purpose of the room and the mood you want to create. For example, if you want a calming and relaxing atmosphere, you may want to choose soft, muted colors. On the other hand, if you want a more energetic and vibrant feel, you may want to opt for bold and bright colors. Additionally, consider the size and shape of the room. Lighter colors tend to make a space look larger, while darker colors can make the room feel more cozy and intimate. Once you have a general idea of the mood and style you want to achieve, you can start looking for design inspiration. Browse through magazines, websites, and social media for ideas on patterns, textures, and color combinations. Don’t be afraid to mix and match different styles and colors to create a unique look that reflects your personality and style.
2.1. How to choose a design that suits your style
When choosing a design for your wall painting project, it’s important to consider your personal style and taste. Do you prefer bold and vibrant colors or more muted tones? Are you drawn to abstract shapes or more traditional patterns? Take some time to browse through different design options and color schemes to find something that speaks to you. Remember, this is your personal space, so choose a design that you’ll enjoy seeing every day.
2.2. Tips for selecting the right color scheme
When it comes to painting walls, choosing the right color scheme can make all the difference in achieving the desired look and feel of a room. Here are some tips to help you select the perfect color scheme:
1. Consider the purpose of the room: The color scheme you choose should match the function of the room. For example, a calming blue or green would be ideal for a bedroom, while a vibrant yellow or orange would be more suited for a living room.
2. Look for inspiration: Look at magazines, websites, and home décor stores for inspiration. Take note of color combinations that catch your eye and try to replicate them in your own space.
3. Choose a dominant color: Start with a dominant color and then choose complementary colors to create a cohesive look. You can use a color wheel to help you select complementary colors.
4. Consider the lighting: The lighting in a room can affect how a color appears. Be sure to test your color scheme in different lighting conditions before committing.
5. Don’t be afraid to experiment: Painting is a low-cost way to update a room, so don’t be afraid to try out different color combinations until you find the one that works best for you.
2.3. Understanding color theory
Understanding color theory is crucial for choosing a design and color scheme for your wall painting project. Color theory is the study of how colors interact with each other and how they can be combined to create pleasing and harmonious compositions. It involves understanding the color wheel, which is a tool used to organize colors and their relationships to one another. By using color theory, you can create a balanced and visually appealing design for your wall painting project. You can choose colors that complement each other or colors that create contrast, depending on the mood and atmosphere you want to create in your space. Understanding color theory can help you make informed decisions when choosing a color scheme for your wall painting project.
3. Preparing the Wall
Before beginning any painting project, it’s important to prepare the wall surface properly. This includes cleaning the wall of any dirt, dust, or grease and smoothing out any bumps or imperfections. It’s also important to apply a primer to the wall before painting to ensure proper adhesion and coverage. Taking the time to properly prepare the wall will result in a more professional-looking finished product.
3.1. Cleaning the wall surface
Before you start painting your walls, it’s important to prepare the surface properly. One crucial step is to clean the wall surface thoroughly. This will ensure that any dirt, dust, or grease is removed, allowing the paint to adhere properly. To clean the wall, use a mild detergent and warm water. You can also use a sponge or a soft cloth to scrub away any stubborn stains. Make sure to let the wall dry completely before proceeding with the painting process.
3.2. Filling in cracks and holes
Before you start painting your walls, it’s important to prepare them properly. This includes filling in any cracks and holes to ensure a smooth surface for the paint to adhere to. You can use spackling paste or joint compound to fill in small holes and cracks, and a patching compound for larger holes. Be sure to follow the manufacturer’s instructions for application and drying times. Once the compound is dry, sand the surface with a fine-grit sandpaper to create an even surface. Finally, wipe down the walls with a damp cloth to remove any dust or debris before starting to paint.
3.3. Priming the wall
Before starting any wall painting project, it is important to properly prepare the surface of the wall. This process is called priming, and it helps create a smooth and even base for the paint to adhere to. Priming also helps to cover up any imperfections or stains on the wall.
To prime a wall, start by cleaning the surface with soap and water to remove any dirt or debris. Then, use a putty knife to fill in any holes or cracks in the wall with spackle or joint compound. Sand the surface once it is dry and smooth. Finally, apply a coat of primer using a brush or roller, and allow it to dry completely before applying your paint.
4. Tools and Techniques
When it comes to painting walls, beginners may feel overwhelmed with the task at hand. However, with the right tools and techniques, anyone can create beautiful designs on their walls. Here are some tools and techniques to consider when trying out the 10 easy wall painting designs for beginners:
1. Painter’s Tape: Use painter’s tape to create clean lines between different colors or sections of the wall.
2. Paintbrushes: Invest in a variety of paintbrushes in different sizes to achieve different effects.
3. Paint Rollers: A paint roller can help cover large areas quickly and evenly.
4. Stencils: Stencils can be used to create intricate designs without the need for freehand painting.
5. Sponges: Sponges can create a textured effect on the wall when dipped in paint.
6. Rags: Use rags to create a distressed or vintage look by dabbing or dragging them over the painted surface.
7. Glaze: Adding glaze to paint can create a glossy or matte finish and add depth to the design.
8. Chalk: Chalk can be used to sketch out designs on the wall before painting.
9. Paint Trays: Use paint trays to hold and mix different colors of paint.
10. Drop Cloths: Protect floors and furniture from paint splatters with a drop cloth or old sheet.
4.1. Types of brushes and rollers to use
When it comes to painting walls, choosing the right tools can make all the difference. Here are some of the most common types of brushes and rollers and when to use them:
1. Angled brush: Ideal for cutting in around edges and corners.
2. Flat brush: Great for painting large, flat surfaces.
3. Round brush: Perfect for detail work and small areas.
4. Foam roller: Good for smooth surfaces and applying paint evenly.
5. Textured roller: Ideal for rough surfaces and creating textures.
Remember to choose the right tool for the job and clean them properly after use to ensure they last as long as possible.
4.2. Different techniques for creating texture and patterns
Creating texture and patterns on walls can add depth and interest to any room. Here are some techniques and tools that beginners can use to achieve stunning results:
1. Sponging: Dip a natural sponge in paint and dab it onto the wall to create a textured look.
2. Stenciling: Use stencils to create intricate designs on the wall. Simply place the stencil on the wall and paint over it.
3. Ragging: Use a rag to create a soft, mottled effect on the wall. Simply dip the rag in paint and dab it onto the wall.
4. Combing: Use a comb to create linear patterns on the wall. Simply drag the comb through wet paint.
5. Strie: Use a dry brush to create a strie effect on the wall. Simply drag the brush through wet paint in long, vertical strokes.
6. Color washing: Dilute paint with water to create a translucent, washed-out effect on the wall.
7. Stippling: Use a stippling brush to create a dotted effect on the wall. Simply dab the brush onto the wall.
8. Taping: Use painter’s tape to create geometric patterns on the wall. Simply tape off the areas you want to remain unpainted.
9. Splattering: Dip a brush in paint and flick it onto the wall to create a speckled effect.
10. Freehand painting: Use a brush or roller to paint freehand designs on the wall. Let your creativity guide you!
4.3. Using stencils and tape to create clean lines
When it comes to achieving clean lines in your wall painting designs, using stencils and tape can be incredibly helpful. Stencils are pre-made designs that you can use to create uniform shapes and patterns on your walls. Simply tape the stencil to the wall and use a roller or brush to fill in the design with paint. Tape can also be used to create sharp edges and straight lines. Apply the tape where you want the edge or line to be, paint over it, and then carefully remove the tape once the paint is dry. With these tools and techniques, you can create professional-looking designs with ease.
5. Step-by-Step Guide to Painting Your Wall
Painting your walls can be a fun and creative way to give your home a fresh new look. Whether you’re a beginner or an experienced DIY-er, these step-by-step instructions will guide you through the process of painting your walls with ease. Before you begin, make sure you have all the necessary supplies, including paint, brushes, rollers, painter’s tape, and drop cloths. Once you’ve gathered your materials, follow these steps to paint your walls like a pro:
5.1. Sketching your design onto the wall
Sketching your design onto the wall is an important step in creating a beautiful and polished finished product. Before you start painting, take some time to plan out your design and practice sketching it onto a piece of paper. Once you have a clear idea of what you want your finished wall to look like, it’s time to transfer that design onto the wall itself. Here’s a step-by-step guide to help you get started:
5.2. Painting the background color
Painting the background color of your wall is an important step in creating a beautiful and cohesive design. The color you choose will set the tone for the entire room and can make a big impact on the overall look and feel. Here is a step-by-step guide to painting your wall:
1. Clean the surface of the wall with soap and water to remove any dirt or dust.
2. Apply painter’s tape to any areas you want to protect, such as baseboards or trim.
3. Apply a coat of primer to the wall to help the paint adhere and to ensure an even finish.
4. Use a paint roller to apply the background color to the wall. Start at the top of the wall and work your way down, using long, even strokes.
5. Allow the first coat of paint to dry completely before applying a second coat.
6. Once the second coat is dry, carefully remove the painter’s tape.
7. Stand back and admire your newly painted wall!
Remember to choose a background color that complements your overall design scheme and that you will be happy with for years to come.
5.3. Adding details and layers
Once you’ve chosen the design you want to paint on your wall, it’s time to start adding details and layers. This is where the painting process really comes to life and your design starts to take shape. Here’s a step-by-step guide to help you along the way:
1. Start by painting your base color on the entire wall. This will be the color that your design will be painted on top of.
2. Next, sketch out your design lightly with a pencil. This will give you a clear idea of where you need to add details and layers.
3. Start adding details to your design with a smaller brush. This could be flowers, leaves, or any other details that you want to add.
4. Once you’ve added all the details, it’s time to start adding layers. This will give your design depth and dimension. Start by adding a darker shade of your base color to the areas that need shading.
5. Blend the colors together with a dry brush to create a smooth transition between the original color and the darker shade.
6. Finally, add highlights to your design with a lighter shade of your base color. This will give your design a 3D effect and make it pop.
With these simple steps, you can create a stunning wall design that will impress everyone who sees it!
5.4. Blending colors for a cohesive look
Blending colors is an essential step in achieving a cohesive look when painting your walls. Whether you are going for a bold statement or a subtle accent, choosing the right color palette and blending the colors seamlessly is crucial. Here are some tips to help you blend colors like a pro:
1. Start with a base color: Choose a base color for your wall and then select a few shades lighter and darker to create a monochromatic look.
2. Use a color wheel: A color wheel can help you choose colors that complement each other. Choose colors that are adjacent or opposite on the wheel for a harmonious look.
3. Test your colors: Before painting your entire wall, test your colors on a small section to make sure they blend well.
4. Blend your colors: Use a dry brush or a sponge to blend your colors together. Start with the lighter shade and gradually add the darker shade until you achieve the desired look.
By following these simple steps, you can create a beautiful and cohesive look that will enhance the overall design of your space.
5.5. Sealing the finished product
After you have finished painting your wall, it is important to seal the finished product. Sealing the wall will help protect the paint from chipping, fading, or peeling. It will also make it easier to clean the wall in the future. Here is a step-by-step guide to sealing your finished wall:
1. Allow the paint to dry completely. This can take anywhere from 24-48 hours.
2. Use a clean, dry cloth to wipe the surface of the wall to remove any dust or debris.
3. Apply a coat of sealer to the wall using a brush or roller. Be sure to follow the manufacturer’s instructions for application and drying time.
4. Allow the sealer to dry completely before applying a second coat. This will usually take 24-48 hours.
5. Apply a second coat of sealer to the wall, following the same steps as before.
6. Allow the sealer to dry completely before touching or cleaning the wall.
By following these steps, you can ensure that your wall will look great for years to come.
Conclusion
In conclusion, these 10 easy wall painting designs are perfect for beginners who want to add some creativity and personality to their home decor. With a little bit of practice and patience, anyone can create a beautiful and unique wall art that reflects their style and taste. So, don’t be afraid to experiment with different colors, shapes, and patterns, and let your imagination run wild.


These 10 innovative and imaginative DIY home decor ideas from [object Object] provide a refreshing approach to enhancing ones living…