

Looking to give your home a fresh new look without breaking the bank? Look no further than these 10 furniture makeover tutorials that will transform your space in no time. From repurposing old pieces to adding a pop of color, these DIY projects are sure to inspire your inner designer. Get ready to roll up your sleeves and get creative!
- 1. Furniture Makeover Tutorials
- 1.1. Introduction to Furniture Makeover
- 1.2. Choosing the Right Furniture for Makeover
- 1.3. Essential Tools and Materials for Furniture Makeover
- 1.4. Preparation Steps for Furniture Makeover
- 1.5. Painting Techniques for Furniture Makeover
- 2. DIY Furniture Makeover Projects
- 2.1. Vintage Dresser Makeover
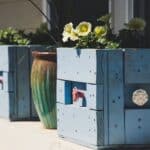
- 2.2. Chalk Painted Coffee Table
- 2.3. Reupholstered Dining Chairs
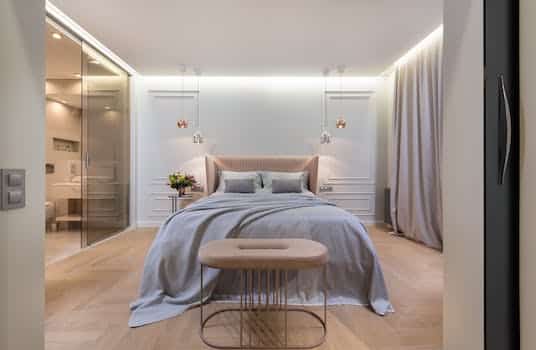
- 2.4. Refinished Wooden Headboard
- 2.5. Distressed Cabinet Makeover
- 3. Tips and Tricks for Furniture Makeover
1. Furniture Makeover Tutorials
Furniture makeovers can breathe new life into tired or outdated pieces, making them feel brand new again. With a little creativity and some basic DIY skills, you can transform your home with these 10 furniture makeover tutorials. From painting and staining to decoupage and reupholstering, these tutorials cover a variety of techniques to suit any style and skill level. Whether you’re looking to update your living room, bedroom, or dining room, these furniture makeovers will inspire you to get creative and make your home feel like new.
1.1. Introduction to Furniture Makeover
Furniture makeover is one of the best ways to transform your home without breaking the bank. With a little creativity and some DIY skills, you can turn your old and worn-out furniture into stylish and trendy pieces that will breathe new life into your living space. In this article, we will share with you 10 furniture makeover tutorials that will inspire you to take on your own furniture makeover projects and create a home that truly reflects your personal style.
1.2. Choosing the Right Furniture for Makeover
Choosing the right furniture is essential when it comes to a makeover. Whether you’re looking to transform your living room, bedroom, or any other space in your home, the right furniture can make all the difference. With so many options available, it can be overwhelming to choose the right pieces for your space. In this section, we’ll provide some tips and guidelines to help you make the best choices for your furniture makeover.
1.3. Essential Tools and Materials for Furniture Makeover
If you’re planning on embarking on a furniture makeover project, it’s important to have the right tools and materials on hand. Here are some essential items to consider: sandpaper, paintbrushes, paint or stain, primer, a drop cloth, painter’s tape, screwdrivers, pliers, and a putty knife. Depending on the specific project, you may also need a saw, drill, or other power tools. Make sure to have all necessary supplies before beginning your furniture makeover to ensure a smooth and successful process.
1.4. Preparation Steps for Furniture Makeover
Before embarking on a furniture makeover project, there are a few preparation steps you need to take. First, decide on the type of makeover you want to achieve and choose the appropriate materials and tools. Next, clean the furniture thoroughly to remove any dirt, grime, or residue. Sand the surface of the furniture to ensure the new paint or finish will adhere properly. Fill any cracks or holes with wood filler and sand again once dry. Finally, prime the surface before adding the new paint or finish to ensure a smooth and long-lasting result.
1.5. Painting Techniques for Furniture Makeover
Painting is one of the easiest and most effective ways to transform old or outdated furniture into something new and fresh. With the right painting techniques, you can give your furniture a makeover that will completely change the look and feel of your home. Whether you want to create a shabby chic vibe or a bold and modern look, there are plenty of painting techniques to choose from. From distressing and layering to stenciling and color blocking, the possibilities are endless. In this section, we’ll explore some of the best painting techniques for furniture makeover to help you achieve the perfect look for your home.
2. DIY Furniture Makeover Projects
If you’re looking to spruce up your home decor without breaking the bank, DIY furniture makeovers are the way to go. With a little bit of creativity and some elbow grease, you can transform old, outdated furniture into something fresh and stylish. Here are 10 furniture makeover tutorials to inspire your next project:
2.1. Vintage Dresser Makeover
Transforming an old, outdated dresser into a stunning vintage masterpiece is a great way to add character and charm to any room. With a little creativity and some elbow grease, you can give your dresser a whole new life. Start by removing any hardware and giving it a good cleaning. Then, sand down the surface and apply a fresh coat of paint or stain. You can also add decorative elements like stencils, decals, or new hardware to really make it pop. With a vintage dresser makeover, you’ll have a one-of-a-kind piece that’s sure to impress.
2.2. Chalk Painted Coffee Table
A chalk painted coffee table can be a great addition to any living room. It’s a simple and affordable way to give your old, worn-out table a new lease on life. To get started, you’ll need some chalk paint, a paintbrush, and some sandpaper. First, give your table a good clean and sand down any rough spots. Then, apply a coat of chalk paint and let it dry. You can add a second coat if necessary. Finally, use some sandpaper to distress the edges and give your table a rustic, shabby chic look. Voila! You have a beautiful new coffee table that will be the envy of all your friends.
2.3. Reupholstered Dining Chairs
If you’re looking for a quick and easy way to update your dining room, consider reupholstering your chairs. This DIY project can be done in just a few hours, and it’s a great way to give your dining room a fresh new look without breaking the bank. To get started, you’ll need some fabric, a staple gun, and some basic sewing skills. Choose a fabric that complements your dining room decor and that will hold up to everyday use. Then, remove the old fabric from your chairs and use it as a template to cut your new fabric. Next, staple the new fabric onto the chairs, starting at the center and working your way out. Trim any excess fabric and reattach the seats to the chairs. Voila! Your dining room chairs are now transformed and ready for your next dinner party.
2.4. Refinished Wooden Headboard
Refinishing a wooden headboard is a great way to breathe new life into an old piece of furniture. With a few simple tools and some elbow grease, you can transform a dull, worn-out headboard into a beautiful, polished centerpiece for your bedroom. Start by removing any hardware and sanding down the surface of the headboard. Apply a coat of primer and let it dry completely before painting or staining the wood. You can experiment with different finishes and colors to achieve the look you want. Refinishing a wooden headboard is a fun and rewarding DIY project that will give you a sense of accomplishment and a beautiful new piece of furniture to enjoy.
2.5. Distressed Cabinet Makeover
If you’re looking for an easy and inexpensive way to update your home decor, consider giving your old cabinets a distressed makeover. This DIY project involves sanding and painting your cabinets to create a vintage, shabby-chic look that’s both stylish and functional. With a little patience and some basic supplies, you can transform your cabinets into beautiful statement pieces that will add character and charm to any room. Here’s how to get started with your distressed cabinet makeover:
3. Tips and Tricks for Furniture Makeover
When it comes to furniture makeover, there are several tips and tricks that can make the process easier and more successful. First, always start with a clean and smooth surface before applying any paint or finish. This will ensure that the new finish adheres properly and looks smooth. Another tip is to use high-quality paint and brushes for a professional-looking finish. Additionally, consider using stencils or other decorative elements to add interest and personality to your furniture. Finally, don’t be afraid to experiment with different colors and finishes to achieve the perfect look for your home.
3.1. Using Sandpaper for Perfect Finish
When it comes to furniture makeover, using sandpaper can make all the difference in achieving a perfect finish. Sandpaper helps to smooth out rough surfaces, remove old paint or varnish, and prepare the surface for a new coat of paint or stain. When using sandpaper, it’s important to start with a coarse grit and gradually work your way up to a finer grit for a smoother finish. Additionally, be sure to sand in the direction of the wood grain to avoid any scratches or damage. With the right technique and patience, sanding can help transform your furniture into a beautiful and polished piece.
3.2. Creating a Shabby Chic Look
To create a shabby chic look for your furniture makeover, start by choosing pieces with a vintage or rustic feel. Look for pieces that have a distressed or weathered look, or those with ornate details that can be painted over for a new look. Next, choose a color palette that is muted and soft – pastel shades work well for this style. Consider using chalk paint, which can give your furniture a matte, vintage look. Once you have painted your furniture, distress the edges with sandpaper or a dry brush to give it a rustic, lived-in feel. Finally, add some vintage-inspired accessories such as lace doilies, floral fabrics, and antique knobs or handles to complete the shabby chic look.
3.3. Adding a Pop of Color to Your Furniture
Adding a pop of color to your furniture can completely transform the look of a room. Whether you choose to paint an entire piece or just add a colorful accent, this simple DIY project can make a big impact. Here are some tips and tricks for adding a pop of color to your furniture makeover:
1. Choose a bold color that complements your existing decor. Consider using a color wheel to help you select complementary colors.
2. Use high-quality paint and primer to ensure a smooth finish. Sand the furniture before painting to create a clean surface.
3. Consider adding decorative elements like stencils or decals for a unique touch.
4. If you’re hesitant to commit to a bold color, start small with colorful accents like drawer pulls or chair cushions.
3.4. Stenciling Techniques for Furniture Makeover
Stenciling is a great way to add a unique touch to your furniture makeover project. There are many different stenciling techniques that you can use to achieve different effects. One popular technique is to use a stencil to create a pattern or design on the surface of the furniture. Another technique is to use a stencil to add a border or accent to the furniture. You can use stencils with paint, stain, or even a wood burning tool to create a custom look that will set your furniture apart from the rest.
3.5. Mixing and Matching Paint Colors
Mixing and matching paint colors is a great way to give your furniture a unique and personalized look. Whether you’re working with a single piece or a whole room, there are a few tips and tricks that can help you achieve the perfect color scheme.
First, consider the mood you want to create. If you’re looking for a calm and peaceful atmosphere, choose soft and muted colors like pastels or light blues and greens. If you want to make a bold statement, go for brighter and more vibrant colors like reds, yellows, and oranges.
Once you have an idea of the mood you want to create, start experimenting with different color combinations. You can mix and match different shades of the same color, or try pairing complementary colors like blue and orange or green and red.
Don’t be afraid to get creative and try something new. With a little bit of practice and experimentation, you can create a beautiful and unique color scheme that will make your furniture stand out and give your home a fresh new look.
Conclusion
Transforming your home through DIY furniture makeovers is a fun and cost-effective way to revamp your living space. With these 10 tutorials, you can easily transform your old and worn-out furniture into chic and stylish pieces that will leave your guests in awe. So, grab your paintbrush and get started on your next home makeover project today!

These 10 innovative and imaginative DIY home decor ideas from [object Object] provide a refreshing approach to enhancing ones living…