
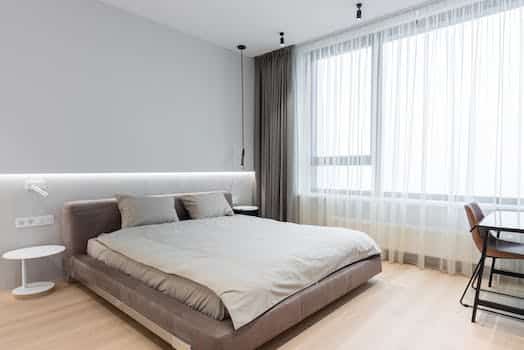
The right lighting can do wonders for your bedroom’s mood. The appropriate lighting fixtures may completely transform a room, turning it from a dull and depressing place to a lively hub of activity. We’ve compiled a list of 10 basic DIY lighting fixtures that anyone can construct to give their bedroom a more unique feel. Elegant chandeliers sit alongside more quirky string lights as potential sources of illumination inspiration.
- 1. Introduction
- 1.1. Why DIY lighting fixtures are a great idea
- 1.2. What to consider before starting a DIY lighting project
- 1.3. Tools and materials needed for the project
- 1.4. Safety precautions to take when working with electricity
- 1.5. How to choose the right light bulb for your fixture
- 2. 1. Mason Jar Chandelier
- 2.1. Materials needed
- 2.2. Step-by-step instructions
- 2.3. Tips for personalizing your chandelier
- 2.4. How to install your chandelier
- 2.5. Maintenance and care
- 3. 2. Paper Lantern Pendant
- 3.1. Materials needed
- 3.2. Step-by-step instructions
- 3.3. Tips for choosing the right paper lantern
- 3.4. How to customize your pendant
- 3.5. How to install and maintain your pendant
- 4. 3. Rope Light Accent Wall
1. Introduction
The bedroom is a place where you want to unwind and feel comfortable, therefore the lighting should reflect that. It can be intimidating to shop for pricey light fixtures. Luckily, there are a plethora of lighting fixtures that may be made at home without spending a fortune. Here are 10 inexpensive and easy-to-make DIY lighting fixtures that will spruce up your sleeping quarters.
1.1. Why DIY lighting fixtures are a great idea
There are a number of compelling arguments in favor of creating your own lighting. For starters, they are a cheap approach of making a space feel more like your own. Second, if you install your own lights, you can alter the ambiance to your liking. Third, making your own light fixtures can be a satisfying and entertaining do-it-yourself job. In this piece, we’ll look at ten easy-to-make bedside lamps that everybody may enjoy.
1.2. What to consider before starting a DIY lighting project
There are several things to think about before beginning a do-it-yourself lighting installation. To begin, you must settle on the light’s intended function. Is it for reading or setting the mood? The required light bulb and fixture will depend on this. The next step is to evaluate the room’s dimensions and arrangement. The scale and form of the fixture will depend on this. Finally, make sure you familiarize yourself with and adhere to all electrical safety regulations. For more complicated tasks, an electrician may need to be brought in.
1.3. Tools and materials needed for the project
The first step in any do-it-yourself project is to assemble all of the components you’ll need. A drill, screws, wire cutters, wire strippers, a screwdriver, pliers, a measuring tape, a pencil, electrical tape, a light bulb socket, a light bulb, and the proper wiring are all you need to put together these light fixtures. Depending on the type of light fixture you intend to create, you may also need other supplies like wood, metal wire, Mason jars, rope, and lamp shades. Before commencing the project, triple-check that you have all of the necessary materials on hand.
1.4. Safety precautions to take when working with electricity
Keep in mind that electricity can be deadly if not handled properly while working with DIY lighting fixtures. When dealing with electricity, please observe the following safety guidelines:
Before beginning any electrical work, it is imperative that the power be turned off.
Wear rubber gloves and boots and work with insulated tools.
Third, don’t bother working if it’s raining.
4. Keep your hands away from any electrical outlets.
5. Check for appropriate grounding of all cables.
By adhering to these precautions, you can make your DIY lighting project not only aesthetically pleasing, but also risk-free for your loved ones to enjoy.
1.5. How to choose the right light bulb for your fixture
The experience of birdwatching in the bush is unique. The jungle’s rich biodiversity means that visitors can see some of the world’s rarest and most stunning birds up close. The jungle is home to many different kinds of birds, including macaws and toucans. The rainforest is a birdwatcher’s delight due to the abundance of flora and fauna that serves as a haven for these creatures. In this piece, I’ll explain why the rainforest is an ideal location for birdwatchers.
2. 1. Mason Jar Chandelier
Observing tropical birds in their natural habitat is a rewarding and exciting activity. It’s a great way to unwind and appreciate the natural world around you. Learning about the habits of many animals is another benefit. The importance of birds to the ecosystem can be better understood by watching them in their natural environment. Also, regardless of your age or fitness level, you may go birdwatching and have a great time. The rainforest is a fantastic area to go birdwatching, whether you’re a seasoned pro or just starting out.
2.1. Materials needed
You can observe many different species of birds in their native environments while on a birdwatching excursion. You might get to see some of their interesting habits, such feeding, mating, building nests, and flying. You’ll get to experience their stunning vocalizations firsthand. Migratory birds and other rare animals may appear if you’re in the right place at the right time. Observing birds in their natural habitat takes time, focus, and consideration for the surrounding ecosystem. It’s a great way to unwind and reap the benefits of being one with nature.
2.2. Step-by-step instructions
Chandeliers made from mason jars are a lovely addition to any sleeping quarters. They give the room a homey, country vibe and inject some character. The following are detailed instructions for making your own:
1 Get your supplies together. You’ll need a piece of wood or metal for the base, some metal rings or hooks to hang the jars from, some wiring, and light bulbs, as well as a number of mason jars (the exact number will depend on the size of your chandelier).
Second, scale down your base. A jigsaw or circular saw can be used to customize the size and shape of your base. The rough spots can be sanded away.
Third, link them together. Place the hooks or rings evenly apart in the base and screw them in. Guarantee their safety.
Put the jars on wires. Put the light bulbs inside the jars and secure them with the wiring. To get the wires inside the jar, you might have to drill a little hole in the top.
Put the jars on hooks. Put the jars on the rings or hooks and make sure they’re evenly spaced.
Six, mount the light fixture. Chandelier lighting can be hung from the ceiling by attaching a chain or rope at its bottom. Verify its steadiness and flatness.
Seventh, switch on your new mason jar chandelier and take in its beauty.
2.3. Tips for personalizing your chandelier
Customizing your chandelier is a great way to make your bedroom feel more like your own. If you want your chandelier to really shine, use these tricks:
First, give your chandelier a splash of color with ribbon or spray paint.
Add some shine to your chandelier by suspending little trinkets or crystals from it.
Use natural materials: For a more natural look and feel, include natural materials like branches or flowers onto your chandelier.
Chandeliers can be made in a wide variety of styles and materials by combining various elements.
Use Mason jars of varying sizes and colors, or embellish them with twine or lace to make a stunning chandelier. When it comes to customizing your chandelier, the sky’s the limit.
2.4. How to install your chandelier
Putting up a Mason Jar Chandelier is a wonderful method to give your bedroom a one-of-a-kind and rustic look. Here are the measures to take:
1. assemble a chandelier using a prefabricated chandelier kit, mason jars, light bulbs, and any other required supplies and equipment.
Follow the included assembly instructions to construct the chandelier.
The third step is to take the tops off the jars and drill a hole directly in the middle of each one.
Securely fasten a light bulb under each of the covers.
Fifth, using the included hardware, fasten the mason jars to the chandelier.
The next step is to hang the chandelier wherever you like and bask in the glow of your own custom-made light.
2.5. Maintenance and care
The toucan is one of the most interesting bird species in the jungle. The toucan is a favorite among birdwatchers because to its brightly colored, oversized bill. The sociable and playful attitude of these birds is also well-known. In pursuit of food, they frequently forage in bunches, hopping from branch to branch. Toucans are large birds, but they have strong wings and can fly great distances. Toucans may be easily spotted in the forest thanks to their bright bills and distinctive sounds.
3. 2. Paper Lantern Pendant
The parrot is a species of vibrant and well-liked jungle bird. Parrots are a popular species to see because of their colorful plumage and distinct personalities. They are well-liked as pets due to their impressive mimicry skills. Parrots are common in the wild and can be seen eating fruit and seeds from great heights in the trees. The macaw, one type of parrot, has a wing span of up to 4 feet and can go great distances in the air. In general, the parrot is an interesting species of jungle bird.
3.1. Materials needed
You can make a beautiful pendant light for your bedroom with a paper lantern and some string. You’ll need a paper lantern, a pendant light kit, some scissors, and maybe some paint or ribbon to decorate it. Choose a lantern and pendant light kit that are both suitable for the size of your intended installation area. Gather your supplies and go to work on this simple but rewarding do-it-yourself endeavor!
3.2. Step-by-step instructions
You’ll need the following to make a paper lantern pendant light for your bedroom:
– Scissors – Assorted colored or patterned paper
Toolkit: Glue, Ruler, and Pencil
First, square off your paper. Depending on how big you want your lantern to be, you’ll need a square of varying sizes.
The square is best folded in half diagonally, then unfolded and folded in half again.
Cut along the newly created creases, stopping about an inch from the square’s center.
Fold the square in half horizontally and unfold it.
To make a square, take a knife and cut along the horizontal seam, stopping about an inch from the center.
Then, after another unfolding, fold the square in half vertically.
Using a sharp knife, cut along the vertical seam until you reach the center of the square, then stop.
Carefully unfold the square and press the center upwards towards the top of the lantern. 8.
Join the lantern’s upper and lower edges with glue, then 9.
Make a paper lantern pendant by punching a hole in the top and hanging it from a string or wire.
3.3. Tips for choosing the right paper lantern
Paper lanterns are a terrific option for creating a relaxing atmosphere in the bedroom. They’re cheap, simple to set up, and can make any space feel more inviting. But how can you pick the best option when there are so many available? Some things to remember are listed below.
First, evaluate the available space and the dimensions of your bedroom. You need to find the perfect size lantern for the space.
Second, make sure the lamp is constructed from materials that can resist frequent use.
Third, color is important; select a lantern whose hues work well with those already present in your bedroom. A colorful lantern is the perfect way to liven up a space with muted tones.
4. Give some thought to the lantern’s aesthetic. Paper lanterns can be found in a wide range of designs, from classic to contemporary to rustic. Make sure the design you pick complements the rest of your bedroom.
5. Think about the lighting: some lanterns cast a pleasant, gentle glow, while others are really harsh. Consider how you’d like the lighting in your bedroom to look.
Keeping these guidelines in mind will help you select the ideal paper lantern for illuminating your bedroom with warmth and character.
3.4. How to customize your pendant
Putting your own unique spin on your bedroom’s accessories can be as simple as customizing your pendant. Making a paper lantern into a pendant’s foundation is one simple option. They’re cheap, for one thing, and they come in a wide range of styles and hues to complement any decor. Follow these directions to make a unique paper lantern necklace:
Pick a paper lantern that’s the right size and shape for your desired necklace. They’re sold in most hobby shops and on the internet.
Step 2: Select a paint color or design for your pendant. Here, you can use either spray paint or acrylic paint.
Third, paint your lantern, being sure to cover it evenly. Depending on the paint, you could wind up having to apply several layers.
Finally, after your lantern has dried, you may add your chosen lighting fixture. If you’d rather not deal with wiring, a pendant light kit or battery-operated light is a good alternative.
Fifth, suspend it where you want it, and bask in your newly fashioned pendant light!
3.5. How to install and maintain your pendant
Before you can hang your paper lantern pendant light, you need to get your hands on a pendant light kit, a bulb, and a hook. To hang the pendant, first secure the hook to the ceiling. The next step is to put together the pendant light kit as directed. Put the finished pendant on the ceiling hook. To finish installing your new light, simply screw in the bulb and flip the switch. Keep your necklace in pristine condition by dusting the paper lantern on a regular basis. In order to keep the paper in good condition, you should not use any liquid cleansers or rough abrasives.
4. 3. Rope Light Accent Wall
Rope light accent walls are a fun and cozy way to transform your bedroom. Rope lights can be easily installed on the wall in whatever pattern or straight line you like. It’s a terrific method to highlight artwork or other decor while also giving off a warm, welcoming glow. Rope lights are great for any do-it-yourselfer because they are cheap and simple to set up.
4.1. Materials needed
Rope lights, wall clips, a drill, and screws are everything you’ll need to make an accent wall using rope lights. The size of the wall you want to highlight will determine how long a strand of rope lights you require and how many of them you’ll need. Take careful wall measurements and install extra rope lights to cover any twists and turns. Rope lights will be fastened to the wall with the help of wall clips, which can be attached with a drill and several screws. You may start working on your custom and fashionable accent wall in the bedroom as soon as you have all the necessary materials.
4.2. Step-by-step instructions
First, measure the length of the space where you plan to install the rope light accent wall.
2. Get enough rope lights to go the length of the space, plus some extras.
Third, prep the wall for the rope light installation by cleaning it well.
Fourth, fasten the rope light clips to the wall at regular intervals along its length.
Fifth, insert the rope lights into the clips and start stringing them up.
Six, proceed with the rest of the rope light installation, making sure to keep everything level and uniform.
Plug in the rope lights after you’ve finished installing them to check sure they’re all working.
For extra safety, connect the rope lights to the clips with a hot glue gun.
Have fun with your new rope light feature wall number 9.
4.3. Tips for measuring and planning your accent wall
It is essential to take measurements and sketch out the layout of your rope light accent wall before you begin construction. First, determine the height and width of the wall that will house the rope lights. The amount of rope lighting required can then be calculated. The next step is to sketch out your accent wall’s layout. You have the option of making a straightforward geometric pattern, or you may go all out and make an elaborate one. After you have planned out the layout and taken the necessary measurements, you can begin stringing the rope lights. When installing rope lights, pay close attention to the manufacturer’s guidelines and use the proper hardware. With some forethought and ingenuity, a rope light accent wall can be a stunning focal point in any bedroom.
4.4. How to install your rope lights
First, determine the whole length of the wall that will serve as the backdrop for your rope light accent. You’ll need enough rope lights to illuminate the entire run, plus any extensions you plan to install. Next, plan out where you want your lights to go and then make marks on the wall.
Mount your rope lights along the indicated lines using a drill and screws. When installing rope lights, make sure to leave enough slack to form the pattern or design you want. After you have installed the lighting, you should test it by plugging it into an outlet. Finally, if there are any dangling or unfastened strands of rope lights, you can clip them down with cable clips.
You may give your bedroom a one-of-a-kind and comforting vibe with the help of your new rope light accent wall.
4.5. Ideas for creating different effects with your accent wall
You may give your bedroom a one-of-a-kind look and feel by installing a rope light accent wall. These accent walls may be made quickly and adjusted to meet any design scheme. Rope lights can be easily installed on the wall in any design you can imagine. To add to the lighthearted mood, try using bulbs of various hues. If you want to brighten up your room and spruce it up a bit without installing anything permanent, an accent wall is the way to go.
Conclusion
In conclusion, there is no reason why you can’t make your own gorgeous and distinctive bedroom lighting fixtures with just a few simple materials and a little bit of ingenuity. These do-it-yourself initiatives let you shine a light on your own creativity while simultaneously providing practical illumination. If you want to make a change in your bedroom, why not try one of these 10 suggestions?


These 10 innovative and imaginative DIY home decor ideas from [object Object] provide a refreshing approach to enhancing ones living…