
When it comes to transforming the look and feel of your space, one of the most effective ways is to create stylish walls with paint. Whether you want to add a pop of color, create a dramatic focal point, or simply refresh the existing walls, paint can work wonders. With a plethora of colors, finishes, and techniques available, you have the power to unleash your creativity and turn ordinary walls into extraordinary works of art. In this article, we will explore various tips, ideas, and inspiration to help you achieve stunning and stylish walls with the magic of paint.
- 1. Choosing the Right Paint Colors
- 1.1. Consider the room’s purpose
- 1.2. Understand the color wheel
- 1.3. Take lighting into account
- 1.4. Use neutral colors as a base
- 1.5. Experiment with accent colors
- 2. Preparing the Walls
- 2.1. Clean and remove any imperfections
- 2.2. Fill in cracks and holes
- 2.3. Sand the walls for a smooth surface
- 2.4. Apply a primer for better adhesion
- 2.5. Tape off edges and protect flooring
- 3. Techniques for Stylish Walls
- 3.1. Color blocking
- 3.2. Ombre effect
- 3.3. Stripes and patterns
- 3.4. Stenciling designs
- 3.5. Creating a faux finish
1. Choosing the Right Paint Colors
Choosing the right paint colors is crucial when it comes to creating stylish walls. The color of your walls can significantly impact the overall look and feel of a room. Whether you want to create a cozy and intimate space or a bright and vibrant atmosphere, selecting the perfect paint colors is the key.
Firstly, consider the purpose of the room. If it’s a bedroom, you might want to choose calming and soothing colors such as soft blues or pastel greens. For a living room, neutral tones like beige or gray can create an elegant and timeless look. If you’re looking to add energy and excitement to a space, bold and vibrant colors like red or yellow can make a statement.
Another important factor to consider is the lighting in the room. Natural light can change the appearance of paint colors throughout the day. If the room receives plenty of sunlight, you might want to opt for lighter shades to prevent the space from feeling too bright. On the other hand, rooms with little natural light may benefit from warmer and darker colors to create a cozy and inviting atmosphere.
Additionally, take into account the size of the room. Lighter colors tend to make a space look larger and more open, while darker shades can create a sense of intimacy and make a room feel cozier. If you have a small room, consider using light-colored paints to maximize the perceived space.
Lastly, don’t be afraid to experiment and get creative with paint finishes. Different finishes like matte, satin, or glossy can add texture and depth to your walls. You can also consider using multiple paint colors to create accent walls or unique patterns.
In conclusion, choosing the right paint colors is an essential step in creating stylish walls. Consider the purpose of the room, the lighting conditions, and the size of the space to determine the most suitable colors. Remember to have fun and let your creativity shine through!
1.1. Consider the room’s purpose
When it comes to creating stylish walls with paint, one of the most important factors to consider is the purpose of the room. The paint colors you choose should align with the intended use of the space, as different colors can evoke different moods and atmospheres. Whether you’re designing a calming bedroom, a vibrant living room, or a productive home office, selecting the right paint colors is essential.
For bedrooms, it’s often recommended to choose soft, soothing colors that promote relaxation and sleep. Shades of blue, green, and lavender are popular choices for creating a tranquil atmosphere. These colors can help to create a peaceful and cozy sanctuary where you can unwind after a long day.
In contrast, living rooms are often designed to be more vibrant and energetic. Brighter colors like yellow, orange, and red can add a sense of warmth and liveliness to the space. These colors can create a welcoming environment for socializing and entertaining guests.
When it comes to home offices or workspaces, it’s important to select colors that promote focus, concentration, and productivity. Neutral tones like gray, beige, and white are commonly used to create a clean and organized work environment. These colors can help to minimize distractions and create a professional setting.
Remember, the purpose of the room should guide your choice of paint colors. While personal preferences play a role, it’s also important to consider the psychological effects of different colors and how they can enhance the overall ambiance of the space.
1.2. Understand the color wheel
Understanding the color wheel is essential when it comes to choosing the right paint colors for creating stylish walls. The color wheel is a visual representation of the relationships between different colors. It consists of primary colors (red, blue, and yellow), secondary colors (orange, green, and purple), and tertiary colors (a combination of primary and secondary colors). By understanding how these colors interact with each other, you can create harmonious and visually appealing color schemes for your walls.
When selecting paint colors, it’s important to consider the mood and atmosphere you want to create in a room. Warm colors like red, orange, and yellow can create a cozy and energetic feel, while cool colors like blue and green can evoke a sense of calmness and relaxation. Additionally, neutral colors like white, beige, and gray can provide a versatile backdrop for other decorative elements.
To create a cohesive look, you can use the color wheel to guide your color choices. Complementary colors, which are located opposite each other on the color wheel, can create a striking contrast when used together. Analogous colors, which are adjacent to each other, can create a harmonious and soothing effect. You can also experiment with monochromatic color schemes by using different shades and tints of a single color.
In conclusion, understanding the color wheel is crucial for choosing the right paint colors to create stylish walls. By considering the mood you want to achieve and using the principles of color harmony, you can transform your living space into a visually pleasing and inviting environment.
1.3. Take lighting into account
When it comes to choosing the right paint colors for your walls, it is important to take lighting into account. The lighting in a room can greatly affect how the paint color appears, so it is crucial to consider this factor before making a decision.
Natural light, such as sunlight, can make colors appear brighter and more vibrant. If your room receives a lot of natural light throughout the day, you may want to choose lighter colors to prevent the room from feeling too overwhelming. On the other hand, if your room lacks natural light, darker colors can add depth and create a cozy atmosphere.
In addition to natural light, artificial lighting also plays a significant role in how paint colors are perceived. Different types of light bulbs emit different hues, which can alter the appearance of the paint color. It is recommended to test paint colors under different lighting conditions to see how they look in both natural and artificial light.
Considering the lighting in your space will help you choose the right paint colors that will complement the overall ambiance of the room. By taking lighting into account, you can create stylish walls that enhance the beauty of your space.
1.4. Use neutral colors as a base
When it comes to creating stylish walls with paint, choosing the right colors is crucial. One key aspect to consider is using neutral colors as a base. Neutral colors such as white, beige, and gray provide a versatile and timeless backdrop that can easily be complemented with various accent colors and decor styles.
Neutral colors have the advantage of being soothing and calming, making them perfect for creating a relaxing atmosphere in any room. They also create a sense of openness and space, making smaller rooms appear larger. Additionally, neutral colors allow furniture and other decorative elements to take center stage, allowing you to showcase your personal style.
When selecting the perfect neutral color, consider the lighting in the room. Natural light can affect how colors appear, so it’s essential to test the paint samples under different lighting conditions. This will help you determine how the color will look during different times of the day.
Another factor to consider is the existing color scheme and style of your furniture and decor. Neutral colors can complement a wide range of styles, whether you prefer a modern, minimalist look or a more traditional and cozy feel.
In conclusion, using neutral colors as a base for your walls provides a solid foundation for creating stylish and versatile spaces. By carefully selecting the right neutral color and considering factors such as lighting and existing decor, you can achieve a harmonious and aesthetically pleasing result.
1.5. Experiment with accent colors
Experimenting with accent colors can add depth and personality to any room. When choosing the right paint colors for your walls, it’s important to consider the overall theme or mood you want to create. Accent colors are a great way to make a statement and draw attention to specific areas or features of a room.
To start, think about the color scheme you already have in place. Look for colors that complement or contrast with the existing colors in your furniture, artwork, or decor. For example, if your room has mostly neutral tones, adding a vibrant accent color like teal or mustard can instantly liven up the space.
Next, consider the purpose of the room. Different colors evoke different emotions and can affect the atmosphere of a space. For a calming and relaxing environment, opt for cool colors like blues or greens. If you want to create a warm and inviting atmosphere, choose warm colors like reds or oranges.
Don’t be afraid to get creative and try out bold or unconventional accent colors. Experimenting with different shades and hues can add visual interest and make your walls truly unique. Remember, you can always paint over it if you’re not satisfied with the result.
Lastly, consider the lighting in the room. Natural light and artificial light can greatly impact how colors appear. Test your chosen accent color in different lighting conditions to ensure it looks just as you envisioned.
In conclusion, choosing the right accent colors for your walls can elevate the overall style and ambiance of a room. By following these tips and being open to experimentation, you can create stylish walls that reflect your personal taste and make a lasting impression.
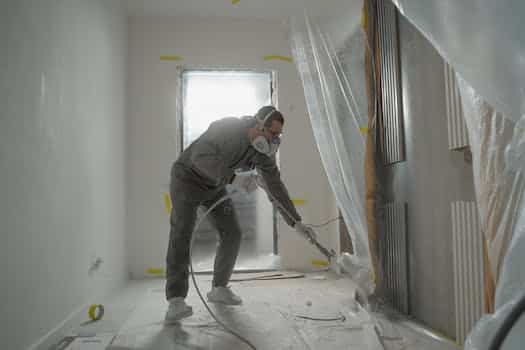
2. Preparing the Walls
Preparing the walls is an essential step in creating stylish walls with paint. Before you begin painting, it is important to ensure that the walls are clean and smooth. Start by removing any dirt, dust, or grease from the walls. You can use a mild detergent and water solution to wash the walls, or opt for a specialized wall cleaner for tougher stains. Scrub the walls gently with a sponge or soft cloth, and make sure to rinse off any residue thoroughly.
Once the walls are clean, inspect them for any cracks, holes, or imperfections. Fill in any gaps or cracks with a suitable filler or spackle. Use a putty knife to apply the filler, and make sure to smooth it out evenly. Allow the filler to dry completely before proceeding.
Next, it is important to sand the walls to create a smooth surface for painting. Use fine-grit sandpaper to gently sand the walls in a circular motion. This will help to remove any rough patches or bumps, as well as any remaining filler. After sanding, wipe the walls with a damp cloth to remove any dust.
Before you start painting, it is recommended to apply a primer to the walls. A primer will help the paint to adhere better and provide a more even finish. Choose a primer that is suitable for the type of paint you will be using. Apply the primer evenly using a paint roller or brush, and allow it to dry completely.
Once the walls are prepared, you are ready to start painting and creating stylish walls that will enhance the overall look of your space. Remember to choose high-quality paint and use proper painting techniques for the best results.
2.1. Clean and remove any imperfections
Before you start painting your walls, it is important to clean and remove any imperfections to ensure a smooth and flawless finish. Here are the steps to prepare your walls for a stylish paint job:
1. Clear the area: Remove any furniture, decorations, or wall hangings from the room. This will not only make it easier to work but also protect your belongings from getting splattered with paint.
2. Dust and vacuum: Use a duster or a dry cloth to remove any dust or cobwebs from the walls. Then, vacuum the floor to get rid of any loose dirt or debris that might interfere with the painting process.
3. Patch any holes or cracks: Inspect the walls for any holes, cracks, or dents. Use a spackling compound or filler to patch these imperfections. Smooth the surface with a putty knife and let it dry completely before moving forward.
4. Sand the walls: If there are any rough spots or uneven surfaces, lightly sand them with sandpaper. This will create a smooth and even base for the paint to adhere to.
5. Clean the walls: Use a mild detergent mixed with water to clean the walls thoroughly. Scrub off any dirt, grease, or stains that might affect the paint’s adhesion. Rinse with clean water and allow the walls to dry completely before proceeding.
By following these steps, you will ensure that your walls are properly prepared for painting. This will result in a professional-looking finish and a more durable paint job.
2.2. Fill in cracks and holes
Before painting your walls, it is essential to fill in any cracks and holes to ensure a smooth and flawless finish. These imperfections can not only affect the overall appearance of the painted walls but also cause the paint to chip or peel over time. In this section, we will discuss the necessary steps to prepare your walls by filling in cracks and holes.
1. Inspect the walls: Start by carefully examining the walls for any cracks, dents, or holes. Use a flashlight to identify any hidden imperfections that might not be visible in normal lighting.
2. Gather the necessary tools: To fill in cracks and holes, you will need a few basic tools such as a putty knife, sandpaper, a paint scraper, a caulking gun, and spackling compound or joint compound.
3. Prepare the cracks and holes: Use a paint scraper or putty knife to remove any loose paint, debris, or old caulking from the cracks and holes. Sand the area gently to create a smooth surface for filling.
4. Fill in the cracks: Apply a small amount of spackling compound or joint compound to the putty knife and press it into the cracks, ensuring it fills the entire gap. Smooth out the surface with the putty knife, removing any excess compound.
5. Patch the holes: For smaller holes, use spackling compound and a putty knife to fill them in. For larger holes, use a patching kit or a piece of drywall cut to fit the hole. Apply joint compound over the patched area, feathering the edges to blend it with the surrounding wall.
6. Let it dry: Allow the filled cracks and patched holes to dry completely. Follow the manufacturer’s instructions for the recommended drying time, usually around 24 hours.
7. Sand and smoothen: Once the compound is dry, use sandpaper to smooth out the patched areas until they are level with the wall surface. Wipe away any dust or debris with a clean cloth.
By following these steps to fill in cracks and holes, you will ensure that your walls are ready for painting. Taking the time to prepare the walls properly will result in a professional-looking finish and prolong the lifespan of your paint job.
2.3. Sand the walls for a smooth surface
To create a smooth surface for painting, it is essential to properly sand the walls before applying any paint. Sanding helps to remove any imperfections, rough patches, or old paint flakes that may be present on the walls. By doing so, you will achieve a clean and even surface, which will result in a professional-looking paint job.
Before starting the sanding process, make sure to prepare the room by covering furniture, floors, and any other items that you want to protect from dust. Use drop cloths or plastic sheets to cover these areas.
Start by inspecting the walls for any visible cracks, holes, or rough areas. Fill in any cracks or holes with a spackling compound and allow it to dry completely. Once dry, use a sanding block or sandpaper to smooth out these areas.
Next, begin sanding the walls using a fine-grit sandpaper. You can choose between sanding manually or using a power sander for larger areas. Sand in a circular motion, applying even pressure to ensure an even finish.
Remember to wear a dust mask and safety goggles during the sanding process to protect yourself from inhaling dust particles. Also, periodically clean the sanding dust from the walls using a vacuum cleaner or a damp cloth.
Once you have finished sanding, run your hand across the walls to check for any remaining rough spots. If you come across any, sand those areas again until they become smooth to the touch.
By properly sanding the walls, you are creating the ideal surface for paint adhesion, which will result in a flawless and long-lasting finish.
2.4. Apply a primer for better adhesion
Applying a primer is crucial for achieving better adhesion when painting your walls. A primer acts as a preparatory coat that helps the paint adhere to the surface more effectively, ensuring a long-lasting and professional-looking finish.
Before you begin painting, it is important to properly prepare the walls. This involves cleaning the surface to remove any dirt, dust, or grease. You can use a mild detergent and water solution or a specialized wall cleaner. After cleaning, allow the walls to dry completely.
Once the walls are clean and dry, it’s time to apply the primer. Choose a primer that is suitable for your specific wall type, whether it’s drywall, plaster, or other materials. Make sure to read the manufacturer’s instructions for the recommended drying time and application techniques.
Using a paint roller or brush, apply an even coat of primer to the walls, starting from the top and working your way down. Pay special attention to any areas that may have stains, discoloration, or previous paint patches. Allow the primer to dry completely before proceeding with the paint application.
By applying a primer, you create a smooth and uniform surface for the paint to adhere to. This not only helps the paint to last longer but also enhances the color and finish of the final paint coat. Additionally, a primer can help hide imperfections on the walls and prevent the paint from peeling or chipping.
In conclusion, applying a primer is an essential step in preparing your walls for painting. It improves adhesion, enhances the final paint coat, and ensures a professional-looking result. Don’t skip this important step if you want to achieve stylish and long-lasting walls with paint.
2.5. Tape off edges and protect flooring
Before you begin painting your walls, it’s important to properly prepare the area to ensure a smooth and clean finish. One crucial step in this process is to tape off the edges and protect the flooring. This will help prevent any accidental paint splatters or drips from ruining your floors or trim.
Start by gathering high-quality painter’s tape and drop cloths or plastic sheets. Carefully apply the painter’s tape along the edges of the walls, where they meet the trim, baseboards, or any other areas you want to keep paint-free.
Make sure to press the tape firmly to create a tight seal and avoid any paint seeping through. Take your time and be precise when applying the tape to achieve clean, straight lines.
Next, cover the flooring with drop cloths or plastic sheets to shield it from any paint spills or drips. Lay them down, making sure to overlap the edges for complete coverage. Use masking tape or heavy objects to secure the drop cloths in place.
By taking the time to tape off the edges and protect the flooring, you’ll save yourself from the hassle of cleaning up unnecessary paint messes. This step will give you a clean canvas to work on and ensure a professional-looking result.
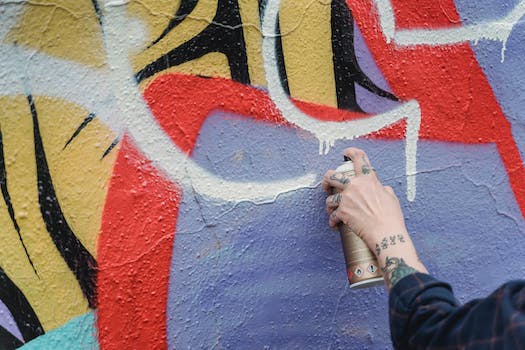
3. Techniques for Stylish Walls
When it comes to creating stylish walls with paint, there are several techniques that can be used to achieve a stunning and unique look. One technique is color blocking, where different sections of a wall are painted in contrasting colors to create a bold and contemporary effect. Another technique is the use of stencils, which allows for intricate patterns and designs to be painted onto the walls. This can be a great way to add a touch of elegance and sophistication to any room. Additionally, using textured paint or creating a faux finish can help to create a visually interesting and textured wall surface. Lastly, incorporating accent walls with a pop of vibrant color can instantly transform a space and make a bold statement. By utilizing these techniques, you can create stylish walls that will enhance the overall aesthetic of your home.
3.1. Color blocking
Color blocking is a popular technique used to create stylish walls with paint. It involves using contrasting colors to create visually appealing sections on the walls. By strategically painting different sections of the wall with bold and vibrant colors, you can add depth and dimension to a room’s design.
To achieve color blocking on your walls, start by selecting two or more colors that complement each other and fit the overall aesthetic of the room. It’s important to consider the furniture and decor in the space to ensure the colors harmonize well.
Once you have chosen your colors, you can begin mapping out the sections on the wall. This can be done by using painter’s tape to create clean and precise lines. You can experiment with different shapes and sizes, such as rectangles, squares, or even diagonals, to create interesting patterns.
After the sections are defined, it’s time to start painting. Apply each color within its designated section, making sure to use smooth and even brush strokes. Allow each color to dry completely before removing the painter’s tape to reveal the crisp lines.
Color blocking can be a bold and modern way to transform your walls. It adds visual interest and can serve as a statement piece in any room. Whether you choose to create a single accent wall or apply color blocking throughout the entire space, this technique is sure to make a stylish impact.
3.2. Ombre effect
One popular technique for creating stylish walls with paint is the ombre effect. The ombre effect involves blending two or more colors to create a gradient or fading effect on the walls. This technique adds depth and visual interest to any room.
To achieve the ombre effect, start by selecting the colors you want to use. You can choose colors from the same color family for a subtle transition or opt for contrasting colors for a bold statement.
Next, prepare the walls by cleaning and priming them. This step ensures a smooth surface for the paint to adhere to.
Once the walls are ready, begin by painting the entire wall with the lightest color in your chosen palette. Allow this coat to dry completely.
Next, mix the lightest color with a slightly darker shade from your selected colors. Apply this blended color to the middle portion of the wall, using a sponge, brush, or roller. Gradually blend the colors together, creating a smooth transition.
Finally, mix the darker shade with the darkest color from your palette. Apply this darkest color to the bottom portion of the wall using the same blending technique. Ensure a seamless transition between each color.
Remember to blend each section while the paint is still wet to achieve a cohesive ombre effect. Once the paint is dry, you can add additional coats if desired or apply a clear topcoat for added protection and durability.
The ombre effect is a versatile technique that can be used in various rooms and styles. Whether you want a soft and subtle gradient or a dramatic statement wall, the ombre effect can transform any space into a stylish and visually appealing environment.
3.3. Stripes and patterns
Stripes and patterns are excellent techniques for creating stylish walls with paint. These design elements can add depth, interest, and personality to any space. Whether you want to make a bold statement or create a subtle backdrop, stripes and patterns are versatile options to consider.
One popular technique is painting vertical stripes on the walls. This can visually elongate the room and make the ceiling appear higher. It’s important to use a level and painter’s tape to ensure straight and even lines. You can choose contrasting colors for a dramatic effect or opt for different shades of the same color for a more subtle look.
Another technique is creating a chevron pattern. Chevron is a zigzag pattern that adds a contemporary and dynamic touch to the walls. To achieve this look, you can use painter’s tape to create the desired angles and then paint the sections in alternating colors. It’s crucial to measure and mark the angles accurately to create a polished and professional finish.
If you prefer a more organic and free-spirited style, consider using a sponge or rag to create texture on the walls. Dabbing or swirling the paint can create a marbled effect or add depth and dimension to the surface. This technique is great for adding visual interest without the need for precise lines or patterns.
In conclusion, stripes and patterns offer endless possibilities for creating stylish walls with paint. Whether you choose vertical stripes, chevron patterns, or explore more experimental techniques, incorporating these design elements can transform any space into a visually captivating environment.
3.4. Stenciling designs
Stenciling is a popular technique for creating stylish walls with paint. By using stencils, you can easily add intricate designs and patterns to your walls, giving them a unique and personalized look. There are various techniques that you can employ when stenciling to achieve different effects. Here are some techniques for creating stylish walls with stencils:
1. Basic Stenciling: The most common technique is to secure the stencil firmly against the wall and use a brush or roller to apply paint over the stencil openings. This creates a crisp and clean design on the wall.
2. Layering: For a more intricate and detailed look, you can layer multiple stencils on top of each other. Start with a base stencil and then add additional layers, allowing each layer to dry before moving on to the next one. This technique adds depth and dimension to your walls.
3. Gradient Stenciling: To create a gradient effect, start by applying a lighter shade of paint at the top of the wall and gradually transition to a darker shade at the bottom. Use a stencil with a pattern that complements the gradient effect, such as a fading floral design.
4. Ombre Stenciling: Similar to gradient stenciling, ombre stenciling involves blending multiple shades of the same color. Start with the lightest shade at the top and gradually work your way down to the darkest shade. This technique creates a stunning ombre effect on your walls.
5. Metallic Stenciling: For a touch of glamour, consider using metallic paints for stenciling. Metallic stencils can add a luxurious and elegant look to your walls. Choose a metallic shade that complements your overall color scheme and apply it using the basic stenciling technique.
Remember to practice your stenciling technique on a sample board before applying it to your walls. This will help you perfect your technique and ensure that you achieve the desired result. With these techniques, you can transform your walls into stylish works of art using stencils and paint.
3.5. Creating a faux finish
Creating a faux finish is a great way to add style and character to your walls. By using different painting techniques, you can achieve a variety of stylish effects. Here are some techniques to consider when creating a faux finish for your walls:
1. Sponge Painting: This technique involves using a natural sea sponge to create a mottled or textured effect on the walls. Simply dip the sponge in the desired paint color and dab it onto the wall, repeating the process until you achieve the desired look.
2. Ragging: Ragging is a technique that involves crumpling up a rag and using it to apply paint to the walls. This creates a soft, irregular pattern and adds depth and texture to the surface.
3. Strie: Also known as dragging, strie involves using a brush or a dry brush to create long, thin stripes on the walls. This technique can give your walls a sophisticated and elegant look.
4. Stenciling: Stenciling is a popular technique for creating intricate patterns on the walls. You can use stencils and different paint colors to create a unique design that suits your style.
5. Color washing: Color washing involves applying a translucent glaze over a base coat of paint. This creates a soft, washed-out effect that adds depth and dimension to the walls.
When using any of these techniques, it’s important to prepare the wall surface properly and practice the technique on a small area before applying it to the entire wall. With some creativity and patience, you can transform your walls into stylish focal points in your home.
Conclusion
In conclusion, painting your walls with stylish techniques can transform the entire look and feel of your space. Whether you choose to use bold colors, unique patterns, or creative textures, a well-executed paint job can add personality and elegance to any room. So, unleash your creativity and create a stunning visual impact with stylishly painted walls.


These 10 innovative and imaginative DIY home decor ideas from [object Object] provide a refreshing approach to enhancing ones living…