
Are you prepared to let your imagination run wild and explore the world of do-it-yourself abstract painting with acrylics? This essay will help any artist, from novice to seasoned professional, create abstract works that are both beautiful and original. Using the correct methods and some creative thinking, you may make art that truly represents who you are. Prepare to unleash your imagination and discover the boundless potential of acrylic paint.
- 1. Introduction
- 1.1. What is abstract art?
- 1.2. Why choose acrylic paint?
- 1.3. Benefits of creating DIY abstract art
- 2. Materials and Tools
- 2.1. Choosing the right acrylic paints
- 2.2. Types of brushes to use
- 2.3. Additional materials needed
- 2.4. Preparing the canvas
- 2.5. Setting up your workspace
- 3. Exploring Techniques
- 3.1. Blending and layering colors
- 3.2. Creating texture with different tools
- 3.3. Experimenting with pouring and dripping
- 3.4. Using masking techniques
- 3.5. Incorporating mixed media
- 4. Step-by-Step Process
- 4.1. Sketching your design
- 4.2. Applying the base layer
- 4.3. Building up layers and adding details
- 4.4. Adding final touches and highlights
- 4.5. Allowing the artwork to dry
- 5. Display and Care
1. Introduction
Even if you have to avoid foods like gluten and nuts, it’s still important to start your day off well with a good breakfast. Thankfully, there are many tasty alternatives that are safe for people with gluten and nut allergies to enjoy. These sweet and savory allergy-friendly breakfast options will delight your taste buds and keep you going until lunch.
A bowl of gluten-free oats with some fresh berries and honey drizzled on top is a tasty choice. Although oats don’t typically contain gluten, you should still be sure you choose gluten-free oats. This hearty morning meal is not only filling, but also nutritious, thanks to its high fiber and protein content.
Try a gluten-free and nut-free breakfast casserole if you’re craving something heartier. Eggs, veggies, and even dairy-free cheese can be stuffed inside. This recipe can be prepared in advance and then reheated for a quick and healthy morning supper.
Pancakes and waffles that are free of gluten and nuts are a great option for individuals with a sweet craving. Make the batter using rice flour or buckwheat flour for a gluten-free option, and serve with fresh fruit, dairy-free yogurt, and maple syrup for a sweet treat. These light and tasty pastries are sure to perk you up first thing in the morning.
A gluten-free and nut-free smoothie bowl is another viable alternative. Mix frozen bananas and berries with almond milk or another dairy-free milk and blend. Then, for extra flavor and nutrition, sprinkle on some gluten-free granola, coconut flakes, and chia seeds. This vibrant and healthy breakfast bowl is as delicious as it is photogenic.
In conclusion, avoiding gluten and nuts should not entail eating a boring breakfast. Start your day off properly with a hearty meal that respects your dietary restrictions by trying one of these delicious allergy-friendly breakfast recipes.
1.1. What is abstract art?
If you’re looking for a healthy and gluten-free breakfast option, consider a Fruit and Yogurt Parfait. This tasty dish is safe for those with food allergies, and it has a healthy dose of carbohydrates, protein, and vitamins. You may make a delicious fruit and yogurt parfait by layering your favorite fruit with your favorite creamy yogurt. For extra crunch, try mixing in some granola or gluten-free oats. This tasty mixture is not only filling, but it’s also a terrific way to kick off your day on the right foot.
1.2. Why choose acrylic paint?
Acrylic paint may be used for a wide variety of projects and is therefore favored by artists of all ability levels. Because of its many advantages, it can be used to create beautiful abstract art. Acrylic paint has several benefits for artists of all skill levels, and for this reason it is often the medium of choice.
For starters, acrylic paint dries quite quickly. Acrylic paint dries rapidly, allowing artists to add layers and make corrections to their artwork without having to wait days or weeks for oil paints to dry. Because of its quick drying period, acrylic paint is great for building up depth of color and texture.
Acrylic paint also comes in a variety of hues and sheens. Acrylic paint gives you the freedom to express yourself creatively, regardless of whether you want bright, vivid colors or more subdued tones. Since acrylics may be blended to make new colors, painters are free to explore and develop their own unique color palettes.
The adaptability of acrylic paint is yet another perk. Canvas, paper, wood, and even metal are all suitable substrates for its application. Because of this adaptability, artists are free to try out new approaches and play around with varied textures and visual effects.
In addition, acrylic paint has a reputation for lasting a long time. It provides a water-resistant and flexible covering that prevents the artwork from yellowing, splitting, or fading over time as it dries. Because of their durability, acrylic paintings can be displayed in a variety of settings, from private homes to public galleries to even the great outdoors.
Finally, the many benefits of acrylic paint make it a great option for do-it-yourself abstract art. Artists are given the freedom to express themselves and produce works of astonishing beauty thanks to its quick drying time, wide range of colors, adaptability, and durability. Acrylic paint is a versatile medium that can be used by artists of all skill levels to realize their creative dreams and reach new heights in abstract art.
1.3. Benefits of creating DIY abstract art
Breakfast bowls made with quinoa are gaining popularity as a healthy alternative for those who must avoid gluten and nuts. The rich protein and fiber content of the versatile grain quinoa make it a great breakfast option. Cook the quinoa as directed on the package for a healthy and filling breakfast dish. After it’s cooked, you can add in whatever you prefer, whether it’s fresh fruit like berries or sliced banana, nuts or seeds like pumpkin seeds or chia seeds, or a touch of sweetener like honey or maple syrup. For extra creaminess, try stirring in some Greek yogurt or almond milk. Making a quinoa breakfast bowl that’s just right for you is as easy as adding whichever toppings you like. This gluten-free and nut-free breakfast alternative is not only a delicious way to start the day, but it also accommodates those with food allergies.
2. Materials and Tools
Gluten-Free Smoothie Fixin’s
If you have food allergies, such as to gluten or nuts, smoothie bowls are a healthy and delicious option for breakfast. This dish has no gluten or nuts, yet it’s still full of taste and beautiful hues. A gluten-free smoothie bowl can be made with the ingredients listed here.
Smoothie bases can be made by blending your preferred fruits (bananas, berries, or mangoes) with a non-dairy milk (such as almond or coconut milk). For even more nutritional value, throw it some kale or spinach.
Pour your prepared smoothie base into a bowl and then add whichever toppings you choose. Several gluten-free choices are listed below.
1. Fresh fruit, such as cut strawberries, blueberries, or kiwis.
2. Gluten-free oats, nuts, and seeds are used to create a crunchy granola.
For a tropical flair, add some coconut flakes.
Add some chia or flaxseeds for some crunch and some healthy omega-3s.
Add some sweetness with honey or maple syrup in step 5.
You can customize your pizza by combining different toppings. You can also try using different gluten-free ingredients, such as pumpkin seeds, dried fruits, and cacao nibs.
This gluten-free and nut-free smoothie bowl is the perfect way to start your day off right.
2.1. Choosing the right acrylic paints
DIY abstract paintings in acrylic require the correct supplies in order to succeed. Acrylic paints are widely used in the art world because to their adaptability, vivid colors, and durability. It can be difficult to choose the right acrylic paints for your project due to the market’s plethora of options.
Consider the acrylic paints’ quality, consistency, and pigmentation as you make your decision. The longevity and vibrancy of your colors will be preserved with the use of high-quality paints. Paints with a creamy consistency are preferable since they are less messy and simpler to combine.
Also, paint pigmentation is something to keep in mind. Some acrylic paints have more pigment in them, making the colors more intense and rich. Use these colors to make striking abstract paintings.
The selection of colors is another factor to think about. Choose acrylic paint kits with a wide selection of colors, from the primary and secondary colors to a variety of tints and hues. You’ll have the freedom to experiment with different color combinations as you see fit.
In addition, it’s crucial to have the proper equipment when working with acrylic paints. To create a wide range of looks and textures, it’s worth it to invest in a selection of high-quality brushes. Large regions are best painted using flat brushes, whereas details and lines are best painted with round ones. The use of a palette knife can help you make interesting patterns and textures.
In conclusion, compelling DIY abstract art relies heavily on the artist’s choice of acrylic paints and instruments. You can free your imagination and produce magnificent works of art by paying attention to details like the product’s quality, consistency, pigmentation, and color range.
2.2. Types of brushes to use
The appropriate brushes are crucial while working on DIY abstract paintings using acrylic paint. The results of your painting depend critically on the brush you use. Brushes typically used in abstract art include the following:
To make elaborate designs, lines, and details, artists employ round brushes, which have a pointed tip. They work wonderfully as a color blender as well.
The squared-off tip of a flat brush makes it great for covering vast areas with sweeping sweeps. They’re adaptable, and you can use them for things like glazing and layering.
Brushes with a flat, rounded tip like an almond’s are called filbert brushes. They are great for blending colors smoothly, adding texture, and making rounded shapes.
Fan brushes, so named because of their fan-like bristles, are our fourth type of brush. They work wonderfully for making abstract paintings look more realistic, whether you want to add vegetation, grass, or texture.
Brushes with angled bristles are ideal for sketching sharp corners, lines, and other geometric shapes. They can also be used to highlight specific areas of your artwork.
It’s vital to think about the brush’s size, shape, and bristle type when deciding which brushes to use for your do-it-yourself abstract painting project. If you want to learn new techniques and get specific results in your acrylic paintings, try out a variety of brushes.
2.3. Additional materials needed
Having the proper supplies is crucial when working with acrylic paint to create abstract works of art. In order to fully express your imagination, you will need the following supplies:
First, decide what size canvas best represents your creative goals. More room for creativity and expression.
Secondly, acrylic paints of various colors should be purchased. This will provide you with a great deal of flexibility.
Third, a variety of paintbrushes in various sizes will allow you to create a wide range of effects and textures in your work.
The fourth tool is a palette, which is used to blend and mix acrylic paints. You can use either a permanent palette or a temporary one made of plastic or paper.
The fifth tool is a palette knife, which may be used to apply thick layers of paint and produce interesting textures.
Keep a container of water handy for rinsing out your paintbrushes and diluting your acrylic colors.
The seventh item on the list is paper towels, which you’ll need to clean your brushes and fix any mistakes you make.
Wearing an apron or old clothes and laying down a drop cloth will help keep you and your workspace clean while working with acrylic paints.
You’ll be ready to explore the world of do-it-yourself abstract art using acrylic paint once you have these supplementary materials and tools at your disposal.
2.4. Preparing the canvas
It is crucial to have all of your supplies in order before you start your acrylic paint abstract art project. If you have everything you need, you can let your imagination run wild and finish strong. The bare minimum of what you’ll need is listed below.
First, decide on the size of your canvas. It’s up to you whether you want it stretched or not.
Acrylic paints can be used for a wide variety of projects and are very user-friendly. Choose a palette that speaks to you and fits the mood of your abstract piece.
Third, paintbrushes: choose a high-quality set that includes brushes of various sizes and shapes. You’ll be able to experiment with different brushstrokes and textures with this.
Fourth, a palette, which you will need to mix and combine your acrylic paints. A disposable palette pad is an alternative to the more common wooden palette.
5. Water Container: Have a water container handy to dilute colors and clean brushes.
A palette knife can be used to apply thick layers of paint and create textural effects.
Use masking tape to make sharp corners and outline forms on your canvas.
Protect your workspace by spreading out a drop cloth or newspapers to collect any drips or spills that may occur.
Make sure you have some paper towels or rags on hand to mop up any spills or remove any paint that may have gotten on your clothing.
If you’re just starting out with abstract art, it can be beneficial to have some reference images or inspirations to look back on as you’re working.
Keep in mind that the quality of your supplies and equipment has a direct bearing on the end product of your artwork. Get your supplies together and get ready to let your imagination go wild!
2.5. Setting up your workspace
DIY abstract paintings with acrylic paint require a well-organized and motivating work area. Having all the essential components on hand can make the experience more satisfying and productive. The following are recommended additions to your office space:
Choose a wide range of colors and try out new techniques with acrylic paints.
Have a variety of paintbrushes in varying sizes and shapes so you can create a wide range of textures and fine details.
Colors should be blended and mixed on a palette or other disposable surface.
4. Canvas or paper: Pick your medium, whether it be a stretched canvas, a canvas board, or a sheet of paper.
Water container: Have a water container handy to dilute paint or clean brushes.
Colors may be blended, textures can be made, and paint can be applied with the same tool—the palette knife.
You may make crisp lines using masking tape or use it to section off the canvas.
Make sure your workspace is protected from paint messes by using a drop cloth or newspaper.
Set up a stable and comfortable workspace, such as an easel or a table. 9.
10. Gather images, sketches, and other visual aids that serve as sources of inspiration for your work.
using all of these resources at your disposal, you can delve headfirst into the realm of do-it-yourself abstract art using acrylic paint and let your imagination run wild.
3. Exploring Techniques
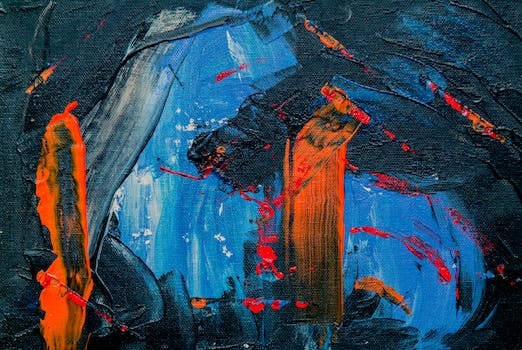
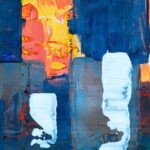
Acrylic paint abstract painting is a fun method to express your individuality while also sprucing up your living space. Stunning works of abstract art that you made yourself using the appropriate approaches will wow your friends and family. It doesn’t matter if you’re just starting out or if you’ve been painting for years; acrylic paint lends itself to a wide variety of abstract painting approaches.
The pouring method is one option. Acrylic paints of various hues and a pouring medium are combined and then poured onto a canvas. Interesting textures and patterns are produced when the paint flows and reacts with one another. To direct the paint and produce one-of-a-kind patterns, simply tilt the canvas.
Palette-knife painting is yet another method. Applying thick, even coats of acrylic paint to the canvas with a palette knife. Using the palette knife, you can alter the paint’s consistency and shape to your liking. With this method, abstract artists have greater freedom and accuracy in their work.
Dripping paint onto a canvas is yet another common approach to abstract art. This is done by splattering or pouring the acrylic paint onto the canvas. Try out different paint colors and textures to see what works best for you. The abstract art created with this method can be full of life and energy.
You can also use the sponge method. Applying acrylic paint with a sponge in thin layers onto a canvas. You may make some neat textures and patterns in the paint by dabbing or stippling. Using this method, you may give your abstract paintings new levels of depth and dimension.
Acrylic paint can also be used in the mixed media style, which incorporates other mediums such as collage papers, cloth, or other objects. This opens the door for an original and daring take on abstract art. Visual interest can be achieved by using a variety of textures and mediums in your artwork.
In conclusion, experimenting with acrylic paint on your own to make abstract art is a great way to have some fun and learn something new. There are countless ways to go about it, such as the pouring method, the palette knife technique, the drip technique, the sponge technique, or a combination of the two. Indulge your inner artist and let your fancy run wild as you craft original works of abstract beauty.
3.1. Blending and layering colors
DIY abstract paintings using acrylic paint require mastery of color blending and layering techniques. Using these methods, you can express yourself fully and create work with beautiful visual effects.
Smooth transitions between colors can be achieved by blending them together. Colors are typically blended on the canvas with a brush or sponge. Adding gradients, shadows, and highlights to your abstract painting is as simple as blending a few colors together.
However, layering colors entails building up several coats of paint on top of one another. Using this method, you may gradually add depth to your artwork by layering different colors, textures, and shapes. Interesting patterns, striking contrasts, and engaging visual effects can be achieved by stacking various tints and hues.
Color blending, like color layering, is best learned via experience and practice. In order to get the required effects, don’t be afraid to experiment with new color combinations, brush approaches, or even unconventional instruments. The secret to successfully creating abstract DIY art is to allow your imagination run wild.
Abstract artworks can be made to express the artist’s personal vision and style through the use of blending and layering techniques. Embark on an amazing DIY abstract painting voyage using acrylic paints, brushes, and a canvas, and let your imagination run wild.
3.2. Creating texture with different tools
Quinoa and ground turkey stuffed bell peppers are a delicious gluten-free and nut-free dinner option. This tasty, allergy-friendly dish is not only nutritious, but also quick and simple to cook. The cooked quinoa and seasoned ground turkey that fill bell peppers make for a filling and delicious meal. Quinoa, a nutritious grain-like seed, is a wonderful substitution for cereals that contain gluten. It’s a great option for folks on a gluten-free diet because it’s high in protein and other minerals. A healthy addition to the dish, ground turkey is high in protein and low in fat. This recipe is guaranteed to be a hit at the dinner table thanks to the complementary flavors of the bell peppers, quinoa, and ground turkey. These stuffed bell peppers are a great alternative for dinner for everyone, whether you’re following a special diet or just trying to eat healthier.
3.3. Experimenting with pouring and dripping
DIY abstract acrylic paintings can be given a dynamic and compelling boost by experimenting with pouring and dripping techniques. Unique and captivating patterns and textures can be created by letting the paint to flow freely and move around the canvas. One way to apply paint to a canvas is by pouring it on, while the other is by letting it drip or trickle down from above. Both methods can be used to create an infinite variety of abstract works of art. Pouring and dripping paint can help you generate amazing and unpredictable outcomes, whether you want to play with color combinations, layering techniques, or paint consistency. Get some acrylic paints, prime a canvas, and let your creativity run wild as you experiment with pouring and dripping techniques in abstract art that you can create on your own.
3.4. Using masking techniques
To give your do-it-yourself acrylic paint abstract painting more dimension and visual appeal, try using masking techniques. To create distinct shapes or patterns on your canvas, you might use a technique called “masking.” Using this method, you can make your artwork look more polished and professional with crisp lines and edges. You may take your abstract painting to the next level by experimenting with different masking techniques. Here are a few methods to investigate:
3.5. Incorporating mixed media
DIY abstract paintings with acrylic paint can benefit from the addition of mixed media for greater depth and visual intrigue. You may let your imagination run wild and make truly remarkable pieces of art by combining different mediums and approaches. Some methods to try are listed below.
1. Collage: Using a gel medium or glue, adhere cut-out images, patterns, or text from magazines or old books to your canvas. Your picture will gain depth and dimension as a result of this.
Stenciling is a technique in which stencils are used to make elaborate motifs or patterns on a canvas. Acrylic paint and spray paint both have their uses and can be used to create unique looks.
Third, texture paste: using a palette knife or a brush, apply texture paste to your canvas. Your artwork will gain depth and complexity as a result of the elevated textures created.
Use gel medium or transfer paper to adhere printed pictures or photographs to your canvas. This method gives your work a retro or grungy feel.
Five, make collages on your canvas with beautiful papers like scrapbooking paper or tissue paper. Create eye-catching collages by stacking various sheets.
Use items you’ve found, such buttons, beads, or scraps of fabric, in your creations. Use these items to give your abstract paintings some interesting new textures and features.
Using these mixed media techniques, you can take your acrylic paint abstract paintings to the next level and really let your imagination run wild.
4. Step-by-Step Process
Abstract art is a fantastic medium for showcasing personal expression and bringing a certain flair to interior design. Making your own work of abstract art using acrylic paint is a thrilling and enjoyable do-it-yourself activity. In this tutorial, we’ll show you how to use acrylic paint to make your own abstract artwork at home. Let your imagination run wild, and let’s get going!
First, assemble your supplies.
Get everything you need for the project together before you start working on it. Acrylic paints of various colors, a canvas (or other surface), paintbrushes, palette knives, water, and a palette (or mixing surface) are all part of the necessary equipment.
The Second Step: Set Up Your Office
Find a place with good lighting and air flow where you can concentrate on your abstract artwork. Use a plastic drop cloth or newspaper to shield your workspace from paint splatters and drips.
Step Three: Decide on a Color Scheme
Make a choice about the colors you’ll be using. Acrylic paints are available in a broad variety of hues, allowing you to select a monochromatic color scheme or play with complementary or contrasting hues. It’s totally up to what you choose!
Fourth, try out different approaches.
Acrylic paints allow for a wide range of experimentation in terms of surface texture and effect. Create unique patterns and textures on your canvas by trying out new painting techniques including splattering, dripping, swirling, and even using palette knives.
5. Get to Work on the Painting
When you’ve settled on the methods you’ll employ, you can begin painting. Use a wide brush or roller to lay down a foundational coat of paint on your canvas. You’ll use this as a canvas for your abstract creations.
Sixth Stage: Constructing and Layering
Build up from a foundation layer using a variety of hues and finishes. Details and depth can be added with the help of smaller brushes or palette knives. Don’t be hesitant to try out new color combinations or brush techniques to get the impression you want.
Evaluation, the Seventh Step
Stop what you’re doing every so often and take a look at your work objectively. The areas that need improvement or additional work can then be targeted. If you feel like something needs tweaking or extra layers, don’t be hesitant to do so.
The Final Touches, Step 8
Your abstract painting is finished when you’re delighted with it and it’s entirely dry. When the painting is dry, you can apply the final touches, such as varnishing it to preserve it and give it a glossy appearance.
Step Nine: Enjoy Your Work
Once you’ve found the ideal area, you may proudly exhibit your abstract art that you made yourself. Your original work of art will be a point of interest and a reflection of your creative personality wherever it is displayed.
Keep in mind that the key to success in creating abstract art is to abandon the pursuit of perfection in favor of uninhibited self-expression. This fun DIY project awaits you, so gather your materials, set up your workplace, and let your imagination go wild!
4.1. Sketching your design
If you want to make your own abstract painting with acrylic paint, sketching out your concept first is a must. This method facilitates conceptualization and preparation for painting. If you need a step-by-step approach to sketching your design, here it is:
Step one is to assemble your supplies, which should include sketch paper, pencils, erasers, and any photos that can serve as references or sources of inspiration.
Step 2: Think of a concept for your piece of abstract art. Forms seen in nature, geometric patterns, or even completely arbitrary outlines would all work.
3. Make a rough drawing of your subject to begin with. Outline your artwork’s structure using thin lines and basic forms. In this phase, it is more important to have a feel for the big picture than to get every last detail right.
Play around with composition by trying out various layouts of your subject on the sketch pad. You can reposition, resize, and rotate items to create a customized layout.
Once you’re happy with the composition, move on to step five, refining the sketch. Improve your design by filling it up with more information, outlining the shapes, and striking a harmonious balance between them all.
During the drawing phase of creating abstract art, you can also consider the color scheme you intend to utilize. Check out how various color combos work with your design concept.
Seventh, finalize the sketch by reviewing it once again for any last-minute changes or additions. Be sure that the design is cohesive and that the lines are distinct.
The first step in creating your own DIY abstract painting is sketching out your design. Before you unleash your creativity with acrylic paint, you can use this method to plan and improve your ideas.
4.2. Applying the base layer
When making your own abstract paintings using acrylic paint, the first step is to apply the foundation layer. This is the first layer of the painting, and it offers a surface for the paint in the future layers to attach to. The final result’s depth and texture are greatly aided by the base layer.
Obtain the components you’ll need, such as acrylic paints, a canvas or other surface to paint on, brushes, a palette knife, and a palette to mix colors on. Make sure there is enough of airflow and that your workplace is protected from spills with a drop cloth or newspapers.
Pick a color to use as the foundation. It’s best to pick a shade that either harmonizes with or stands in sharp contrast to the artwork’s intended color palette. Put a lot of the color you want on the palette.
Next, begin applying paint to the canvas in an even layer using a broad brush or a palette knife. Create a uniform and smooth foundation by working in long, sweeping motions. Painting in different directions or with other implements can also be tried for a variety of textural effects.
When you’ve finished painting the canvas’s base coat, hang it up to dry. This normally takes a few hours, however it might be longer or shorter depending on the paint’s thickness and the ambient temperature and humidity.
DIY abstract art using acrylic paint can be taken further after the first layer has dried. The base layer serves as a firm groundwork upon which the artist can build by applying additional layers of color, texture, and other aesthetic aspects.
4.3. Building up layers and adding details
Making DIY abstract paintings with acrylic paint requires building up layers and adding details. This is the stage at which you give your artwork the depth and dimension that will make it so much more intriguing to look at. To help you through this phase, here is a detailed procedure:
First, choose a canvas of the size and shape you want to work with. Make sure it hasn’t collected any dust or dirt.
Second, lay down a foundational coat of acrylic paint on the canvas with a wide brush or a roller. This layer will offer a base color for your artwork and act as its base.
Third, build up layers: once the first coat of paint has dried, begin adding more. To add dimension and appeal, experiment with a variety of hues, materials, and approaches. Try out new brushstrokes, palette knife maneuvers, or even splattering paint for a one-of-a-kind finish.
The composition of your artwork should be kept in mind as you build up layers. Consider the order in which you use different colors, shapes, and forms. Making a composition that’s easy on the eyes requires finding the right focal point and balancing the items around it.
Once you’re happy with the layers, it’s time to add the finishing touches. If you want to add intricate patterns, lines, or textures, use tiny brushes or even fine liners. Your abstract piece will gain depth and appeal from these inclusions.
Sixth, take a moment to look at your work from a distance and evaluate it. You may then see what needs fixing or what new layers to be added. Feel free to make adjustments or add more information until you reach a point of satisfaction.
Don’t forget that abstract painting is all about taking risks and letting your imagination run wild. Let your creativity run wild as you experiment with acrylic paint to create an original and appealing work of abstract art.
4.4. Adding final touches and highlights
After the foundations of your DIY abstract painting with acrylic paint have been laid, it is time to add the finishing touches and highlights that will make your creation truly shine. In this final stage, you have complete freedom to express yourself creatively and give your work its own identity.
First, take a look at your work and pick out the spots where you think more detail or color would be welcome. To add subtle details like lines, dots, or texture, try switching to a smaller brush or even a palette knife. This can add dimension and interest to your work.
Techniques like dry brushing and splattering can be played with to create unique outcomes. These methods can give your work a sense of motion or drama.
Try out some bold color combinations! Make use of contrasting or complementary colors to draw attention to specific features. Metallic and iridescent paints can also be used to achieve this effect.
It’s important to take stock of your progress from time to time. This will show you where you can improve or where you need to provide more information. Follow your gut and have some fun with it!
Let your artwork dry completely once you have added the finishing touches. The number of paint layers you use will determine how long this process takes.
Finally, be sure to sign your name to your work. In the corner or at the base of your piece, carefully add your signature using a little brush or pen. This final step in your do-it-yourself abstract painting project will give it a polished look and feel.
4.5. Allowing the artwork to dry
An key part of making your own abstract painting with acrylic paint is waiting for it to dry between steps. Allowing enough time for the paint to dry ensures that the colors will fully set and the artwork will be preserved.
To properly let the artwork dry, follow these steps:
First, find a place with good air circulation where the artwork can dry without being disturbed. Make sure there is enough airflow to facilitate drying.
Position the artwork flat on a smooth, clean surface. This will stop the fabric from stretching or drying unevenly.
It is important to wait until the paint is dry before touching or moving the artwork once it has been painted. Wet paint is easily ruined if touched.
4. Patience is rewarded: although acrylic paint dries quickly, it is best to wait at least 24 hours before handling it again.
5. To check if the painting is dry, touch a small, discreet part of it with your finger. More drying time is required if it is still chilly or damp to the touch. It’s done when your finger can touch it without picking up any color.
You can make stunning and long-lasting DIY abstract art using acrylic paint if you follow these techniques and give yourself plenty of drying time.
5. Display and Care
Abstract art is a fantastic medium for showcasing personal expression and bringing a certain flair to interior design. Making your own abstract paintings using acrylic paints may be a lot of fun. Not only can you express yourself artistically, but you can also make something very unique to display in your home.
There are a few things to remember when it comes to showcasing and maintaining your DIY abstract art. First, think about where you’ll hang your artwork. Pick a wall or space that will serve as a showcase for your masterpiece. A place to admire and enjoy it is necessary.
The next step is to contemplate the proportions of your finished piece. Consider making a monumental work of art to fill a spacious wall. However, a tiny artwork or a sequence of smaller artworks can create a visually pleasing exhibit even in a limited space.
It is recommended that your homemade abstract art be kept clean and free of dust and debris. Putting a glass or acrylic cover over your artwork is one way to achieve this. In addition to keeping things neat, this gives your work a polished, completed appearance.
To keep your artwork looking its best, routine cleaning is also vital. Dust the artwork carefully with a clean, lint-free cloth. To protect the paint job, don’t use anything too abrasive or chemically strong.
Finally, think about the lighting in the space where your artwork will be placed. A well-lit space will bring out the most in your artwork’s hues and textures. If you can’t utilize natural light, you can get the same effect with track lighting or other adjustable light fixtures.
In conclusion, using acrylic paint to create abstract art at home is a fun and rewarding method to express your individuality. You can make a beautiful presentation of your artwork by giving thought to its location, scale, and maintenance.
5.1. Choosing a suitable frame
Choosing the right frame is a crucial part of making your own abstract acrylic painting. The visual impact of your artwork can be greatly improved by selecting an appropriate frame. Follow these guidelines to pick out the best frame for your painting.
First, think about the physical dimensions of your piece. Your painting’s frame should not compete with its size but rather enhance it. Choose a minimal frame that won’t detract from your artwork if it’s on the smaller side. An even and impressive presentation can be achieved with a bigger and more solid frame for larger objects.
Next, consider the subject matter and aesthetic of your piece. The frame you choose for your artwork should complement its style and add to the meaning of the work as a whole. A sleek and modern frame in a contrasting tone, for instance, might add visual interest to an abstract work of art with bright and dramatic colors. However, if your piece of art is more subtle and delicate in tone, an antique or ornate frame may be more suitable.
Think about the frame’s substance as well. Common materials include wood, metal, and plastic. Each material brings something special to the table, and can enhance your work in several ways. Wooden frames typically have a more traditional and elegant look, while metal frames can be more modern and sleek. For less permanent or casual exhibitions, plastic picture frames are a more cost-effective option.
Finally, keep in mind that framed artwork requires special attention. Regular cleaning of the frame and the glass or acrylic cover is necessary because dust and debris can accumulate over time. To remove dust, dust lightly with a microfiber cloth or rag. If you don’t want to risk scratching the surface, don’t use abrasive cleaners or other rough materials.
In conclusion, if you want to make an impression with your DIY abstract art, you need to pick a good frame. Take into account the artwork’s overall look while choosing a frame size, style, and material. In addition, give your framed artwork the TLC it deserves to ensure that it retains its beauty for years to come.
5.2. Hanging and positioning the artwork
Preparing the walls and setting up the artwork
Hang it up wherever you choose once you’ve finished your acrylic paint abstract painting DIY project. The aesthetic impact and lifespan of your artwork can be greatly improved by giving it a proper display. For guidance on how to best hang and place your artwork, consider the following:
The first step is to find the perfect spot for your abstract art. This wall or area should have colors and decor that work well together. Think about the atmosphere and lighting in the room.
As a rule of thumb, artwork should be hung such that it is 57–60 inches from the floor, or at eye level. This gives a harmonious appearance and enables for relaxed viewing.
Third, make use of hooks, nails, or picture hangers, as suitable, depending on the weight and size of your artwork. Verify if they are strong enough to hold the object.
Fourth, think about the composition; try out a few various layouts and arrangements before settling on one. Think about how your abstract piece will react to its environment.
5. Keep appropriate spacing: give artwork some room to “breathe” and “stand out.” Don’t jam the wall with too many puzzle pieces.
If you follow these guidelines, you’ll be able to enjoy your acrylic-painted abstract DIY masterpiece for years to come while letting your inner artist shine through.
5.3. Protecting the artwork with varnish
Applying a varnish coat is a must if you want your artwork to last and look its best for a long time. Varnish adds a layer of defense against the elements that can damage your artwork, such as dirt and dampness. It improves the colors and gives a glossy finish, making your work look more finished and professional.
Use varnish in the following ways to preserve your acrylic paint abstract art projects:
You should wait until the acrylic paint is totally dry before applying varnish. Depending on the paint’s thickness, this can take anywhere from 24 hours to two days.
The second step is to select the appropriate varnish among the many varieties available, including gloss, satin, and matte finishes. Think about the final result you want to achieve before deciding on a varnish.
Find a well-ventilated place with a spotless, dust-free surface, and you’ll be good to go. Put down some newspaper or a drop cloth to shield the floor.
Use a soft-bristled brush or a foam brush to apply the varnish in thin, uniform applications. Apply the paint in thin, even coats, beginning in one corner and working your way to the opposing corner. Overbrushing might cause streaks or bubbles, so be careful.
Do not apply a new coat until the previous one has dried: Do not apply another coat of varnish until the last one has dried fully. Drying times should be adhered to as per manufacturer’s specifications.
After the last coat has dry, you should evaluate your work for any flaws or uneven areas. Apply another coat of varnish after softly sanding the surface with fine-grit sandpaper.
Your DIY abstract art will last longer and be safer from harm if you follow these procedures and varnish it. If you want your artwork to retain its quality and vibrancy over time, you should clean it often and keep it out of direct sunlight and high humidity.
5.4. Cleaning and maintaining the artwork
It is essential to clean and maintain the artwork regularly to extend its life and keep it looking its best. Proper maintenance is necessary for any abstract art piece, whether it was done by a professional artist or was created by the owner themselves using acrylic paint.
To begin, make sure the artwork is stored in a spotless, dust-free area. The quality of an artwork can be diminished as dust particles settle on the surface and build up over time. Dust can be removed off artwork by regularly dusting it with a soft, lint-free cloth or a feather duster.
In order to protect the paint or surface, you should not use any strong cleaning agents or chemicals on the artwork. Use a light cleaning solution that is made for artwork instead. The paint is safe from damage, and the remedies are effective.
Before using any cleaning solution on the artwork, check a small, hidden area to be sure it won’t damage the piece. Use a clean, soft cloth to apply the solution to the surface, wiping in a circular motion.
It is essential to shield the artwork from direct sunlight and drastic temperature changes, in addition to washing it regularly. Sunlight can fade the colors over time, and fluctuations in temperature can cause the canvas to break or deform.
To avoid these problems, it is best to exhibit the artwork in a room with curtains or blinds, or in a shaded area. You should also keep the artwork away from any sources of heat or humidity.
Adhering to these guidelines for cleaning and maintaining your acrylic paint abstract art can keep it looking great for years to come.
5.5. Storing and transporting your abstract art
Abstract art transportation and storage:
Careful handling of your abstract artwork during storage and transport is essential for preserving its authenticity and avoiding damage. Some suggestions for safeguarding your masterpieces during shipping and storage:
To prevent your artwork from deteriorating over time, you should use acid-free materials such as acid-free storage boxes, folders, and tissue paper. Paint can deteriorate and discolor when exposed to acidic substances.
Avoid exposing your abstract artwork to direct sunlight by storing it in a cool, dark place. Colors can fade and paper or canvas can be damaged from direct sunlight.
3. Ideal conditions for storing artwork: keep the temperature and humidity consistent. Warping, cracking, and mold growth are all possible results of exposure to extremely high temperatures and humidity. Try to find somewhere cool and dry.
If your abstract art already has a frame, check it to make sure it is secure and will protect your piece. If not, you may want to have it framed under UV-resistant glass or acrylic.
Carefully adhere to the following guidelines when transporting your abstract artwork:
First, make sure your artwork is well-protected before shipping it out by wrapping it in acid-free tissue paper or glassine. Wrap it in protective foam or bubble wrap for further safety.
Use a strong cardboard box that is just a tad bigger than your artwork for shipping purposes. Use packing peanuts or bubble wrap to fill any empty space in the box.
Third, be sure to designate the package as delicate and describe how it should be held during transport. Don’t put anything too heavy on top of the box or it might crush.
If you follow these steps, your abstract artwork should survive shipping and storage in pristine shape, allowing you to take pride in and show off your creation for years to come.
Conclusion
Enjoy the pinnacle of island vacations with scuba diving and snorkeling. When visiting a tropical destination, sampling the regional specialties is always a delight. There is a vast variety of delectable foods to try on tropical islands, from fresh seafood to exotic fruits.
Explore the local eateries and indulge in the exotic tastes of the tropics. Devour grilled fish scented with aromatic herbs, tropical fruit salads overflowing with the tastes of their fresh components, and spicy curries created with the season’s first harvest.
The cuisine on tropical islands ranges from five-star restaurants to roadside stands, so there’s sure to be something for every taste. Try some local specialties like jerk chicken, ceviche, or coconut shrimp while you’re there. Indulge on mango sticky rice, pineapple upside-down cake, or passion fruit sorbet, all of which are tropical specialties.
Tropical island holiday packages include a wealth of outdoor activities in addition to the fantastic dining options. Adventures in snorkeling and scuba diving await after a satisfying supper. Submerge yourself in pristine waters teaming with tropical fish, coral reefs, and other sea life.
Snorkeling is a fun and easy way to see what is beneath the surface of the sea. Put on your mask, snorkel, and fins, and you’ll be ready to swim among colorful fish and reefs. Scuba diving provides a more in-depth experience, allowing divers to get closer to the ocean’s intriguing marine life.
Divers of all experience levels can find a great dive spot off the coast of a tropical island. Explore mysterious caverns and sunken ships, and be amazed at the richness of marine life.
If you want the full tropical island experience, book a trip that includes not only beautiful beaches and high-end lodging, but also the chance to try out some authentic local dishes and participate in some exciting water sports like snorkeling and scuba diving.


These 10 innovative and imaginative DIY home decor ideas from [object Object] provide a refreshing approach to enhancing ones living…