
Are you looking to add a touch of creativity and style to your walls? Look no further! In this article, we will explore the fascinating world of DIY geometric wall art using tape. With just a few simple materials and a bit of imagination, you can transform any dull wall into a stunning focal point. Get ready to unleash your artistic side and let’s dive into the world of geometric designs and tape art!
- 1. Introduction
- 1.1. What is DIY geometric wall art?
- 1.2. Benefits of creating your own wall art
- 1.3. Materials needed for this project
- 1.4. Time required for completing the project
- 1.5. Tips for beginners
- 2. Step-by-Step Guide
- 2.1. Prepare the wall surface
- 2.2. Choose your geometric design
- 2.3. Measure and mark the wall
- 2.4. Apply the tape to create the design
- 2.5. Paint the wall and remove the tape
- 3. Ideas and Inspiration
1. Introduction
Geometric wall art is a popular trend in home decor that adds a modern and stylish touch to any space. Creating your own DIY geometric wall art using tape is a fun and affordable way to customize your walls. With just a few simple materials and a little creativity, you can transform a plain wall into a stunning focal point. In this article, we will guide you through the steps to create your own geometric wall art using tape, providing you with inspiration and tips along the way. Get ready to unleash your inner artist and give your walls a unique and eye-catching makeover!
1.1. What is DIY geometric wall art?
DIY geometric wall art is a popular and creative way to decorate your walls using simple materials and techniques. It involves creating geometric shapes and patterns on your walls using tape as a stencil. This form of artwork allows you to add a unique and personalized touch to any room in your home. By using different colors, shapes, and sizes, you can create a visually stunning and eye-catching design that reflects your individual style. Whether you’re looking for a modern, minimalist look or a bold and vibrant statement piece, DIY geometric wall art offers endless possibilities for expressing your creativity and transforming your space.
1.2. Benefits of creating your own wall art
Creating your own wall art can be a fulfilling and rewarding experience. Not only does it give you the opportunity to showcase your creativity and personal style, but it also allows you to customize your living space according to your preferences. One popular DIY wall art idea is to create geometric designs using tape. This technique is not only budget-friendly but also easy to execute, making it perfect for both beginners and experienced DIY enthusiasts. In this article, we will explore the benefits of creating your own wall art and how you can achieve a stunning geometric design using tape.
1.3. Materials needed for this project
To create your own DIY geometric wall art using tape, you will need a few materials to get started. These materials are easily accessible and will help you achieve a stunning and unique design on your walls.
Here are the materials needed for this project:
1. Painter’s tape: This is a crucial component for creating clean and precise lines. Make sure to choose a good quality painter’s tape that adheres well to the wall without causing any damage when removed.
2. Acrylic paints: Select a variety of colors that complement your overall room decor. Acrylic paints work best for this project as they dry quickly and are easy to work with.
3. Paintbrushes: Have a range of paintbrushes in different sizes to help you achieve different effects and details in your design.
4. Measuring tape: This will come in handy when measuring and marking the desired lengths and angles for your geometric patterns.
5. Pencil: Use a pencil to lightly sketch out your design on the wall before applying the tape. This will help you visualize the final look and make any necessary adjustments.
6. Drop cloth or newspaper: To protect your floor or furniture from any accidental paint splatters, lay down a drop cloth or spread out some old newspapers.
7. Sponge or rag: Keep a sponge or rag nearby to quickly clean up any mistakes or smudges while painting.
With these materials at hand, you are ready to embark on your DIY geometric wall art project. Gather them all together and let your creativity flow!
1.4. Time required for completing the project
Creating DIY Geometric Wall Art Using Tape can be a fun and creative project that allows you to add a unique touch to your living space. While the time required for completing the project may vary depending on your skill level and the complexity of the design you choose, it is generally a relatively quick and easy process. With a few simple materials and a bit of patience, you can transform a plain wall into a stunning piece of art.
The time required for completing the project will depend on factors such as the size of the wall, the intricacy of the design, and your familiarity with the process. For smaller walls and simpler designs, you can expect to finish the project in a few hours. However, if you’re working on a larger wall or a more complex design, it may take a bit longer.
It’s important to set aside enough time for the project to ensure that you can work at a comfortable pace and pay attention to detail. Rushing through the process may result in less precise lines and an overall less polished look. Taking the time to plan your design and execute it carefully will yield the best results.
In the following sections, we will explore the materials needed for this project, step-by-step instructions, and some helpful tips and tricks to create your own stunning DIY Geometric Wall Art Using Tape.
1.5. Tips for beginners
Are you a beginner looking to add a touch of creativity to your walls? Do you want to create a unique and eye-catching piece of art using simple materials? Look no further! In this article, we will share some useful tips for beginners who are interested in DIY geometric wall art using tape. This fun and easy project will not only unleash your creative side but also transform any boring wall into a stunning focal point. So, let’s dive into the world of geometric designs and unleash your inner artist!
2. Step-by-Step Guide
Geometric designs have become increasingly popular in home decor, and one way to incorporate this trend into your space is by creating DIY geometric wall art using tape. This simple and affordable project allows you to add a modern and stylish touch to any room. In this step-by-step guide, we will walk you through the process of creating your own geometric wall art.
Step 1: Gather your materials
Before you begin, gather all the necessary materials for this project. You will need a roll of painter’s tape, a canvas or a blank wall, acrylic paint in your desired colors, paintbrushes, and a ruler.
Step 2: Plan your design
Decide on the geometric design you want to create. It could be as simple as a triangle or more complex like a hexagon or diamond pattern. Use your ruler to measure and mark the points where you will place the tape.
Step 3: Apply the tape
Using your ruler as a guide, apply the painter’s tape to create the outline of your geometric design on the canvas or wall. Press down firmly to ensure the tape adheres properly.
Step 4: Paint within the lines
Once the tape is securely in place, it’s time to start painting. Choose your desired paint colors and carefully fill in the spaces between the tape lines. You can use a paintbrush or even try sponge painting for a unique texture.
Step 5: Let it dry
Allow the paint to dry completely before moving on to the next step. This may take a few hours, so be patient.
Step 6: Remove the tape
Once the paint is dry, carefully remove the painter’s tape to reveal your beautiful geometric design. Make sure to peel off the tape slowly and at a 45-degree angle to avoid any damage to the painted areas.
Step 7: Touch up if necessary
Inspect your design and touch up any areas that may need additional paint or cleaning up. Use a small brush to fix any imperfections.
Step 8: Display your artwork
Finally, choose the perfect spot to display your DIY geometric wall art. It could be a focal point in your living room, bedroom, or even a hallway. Hang it using nails or adhesive hooks, making sure it is secure and level.
Now you have a stunning piece of geometric wall art that you created yourself! This project is a fun and creative way to add a personal touch to your home decor. Experiment with different designs, colors, and sizes to create a unique and eye-catching display.
2.1. Prepare the wall surface
Preparing the wall surface is an essential step before creating DIY geometric wall art using tape. Follow this step-by-step guide to ensure a smooth and successful project:
1. Clean the wall: Start by cleaning the wall surface thoroughly. Remove any dust, dirt, or debris using a mild detergent and water solution. Wipe the wall dry using a clean cloth.
2. Repair any damages: Inspect the wall for any cracks, holes, or imperfections. Fill these areas with spackling compound or putty, and smooth them out using a putty knife. Allow the compound to dry completely.
3. Sand the wall: Once the spackling compound is dry, lightly sand the wall surface using fine-grit sandpaper. This will create a smooth and even texture for better tape adhesion.
4. Prime the wall (optional): If you have a highly textured or uneven wall surface, consider applying a primer before painting. This will help the tape adhere better and prevent bleeding of paint.
5. Measure and mark: Plan your geometric design by measuring and marking the wall. Use a pencil or painter’s tape to outline the desired shape or pattern. Ensure the lines are straight and accurately positioned.
By following these steps, you will have a well-prepared wall surface ready for the next stage of creating your DIY geometric wall art using tape.
2.2. Choose your geometric design
When it comes to creating geometric wall art using tape, the first step is to choose your design. Geometric designs can range from simple shapes like triangles and squares to more intricate patterns like chevron or hexagon. Consider the overall theme and style of your space to determine the right geometric design for your wall art.
To start, gather the necessary materials including painter’s tape, a pencil, a ruler, and your chosen paint colors. It’s important to have a clear plan and measurements in mind before you begin.
Next, prepare your wall by cleaning it thoroughly and ensuring it is dry. This will help the tape adhere properly and prevent any paint bleeding.
Now it’s time to create your geometric design on the wall. Use the ruler and pencil to lightly mark the desired shape and size of each element. Then, carefully apply the painter’s tape along the pencil marks, forming the outline of your design.
Once the tape is in place, it’s time to start painting. Make sure to use paint that is suitable for your wall surface and chosen colors. Apply the paint evenly within the taped-off sections, using a brush or roller. Allow the paint to dry completely before removing the tape.
Finally, carefully peel off the painter’s tape to reveal your finished geometric wall art. Take your time to ensure clean edges and remove any excess tape residue if necessary. Step back and admire your DIY creation, which adds a modern and visually appealing touch to your space.
2.3. Measure and mark the wall
To create a DIY geometric wall art using tape, you first need to measure and mark the wall. This step-by-step guide will help you achieve the desired design.
1. Choose the wall: Select a wall in your home that you want to transform into a stunning geometric art piece.
2. Clean the wall: Before starting, make sure to clean the wall thoroughly to remove any dust or dirt that might affect the adhesion of the tape.
3. Plan your design: Decide on the geometric pattern you want to create. It could be a simple chevron, herringbone, or even a more intricate design like a hexagon or diamond.
4. Gather your materials: You will need painter’s tape, a measuring tape, a level, a pencil, and a ruler.
5. Measure and mark: Use the measuring tape and pencil to mark the starting point of your design. If you’re creating a repeating pattern, determine the distance between each section and mark it accordingly.
6. Apply the tape: Take the painter’s tape and carefully apply it along the marked lines, ensuring it is straight and secure.
7. Check for levelness: Use a level to make sure your tape lines are straight and level. Adjust if necessary.
8. Fill in the shapes: Once all the tape is applied, you can start filling in the shapes with your desired colors. Use paint or markers to create a vibrant and eye-catching design.
9. Let it dry: Allow the paint to dry completely before removing the tape. This will ensure clean lines and prevent smudging.
10. Remove the tape: Gently peel off the painter’s tape, starting from one corner and pulling it back at a 45-degree angle.
11. Touch up if needed: Inspect the design and make any necessary touch-ups or corrections.
Now you have your very own DIY geometric wall art created using tape. It’s a cost-effective and creative way to add a unique touch to your home decor.
2.4. Apply the tape to create the design
To create a stunning geometric wall art using tape, follow these step-by-step instructions:
1. Prepare the wall: Start by cleaning the wall surface thoroughly to ensure that the tape adheres properly. Remove any dust or dirt using a damp cloth.
2. Choose your design: Decide on the geometric design you want to create. It could be a simple pattern like triangles or more complex shapes like hexagons or diamonds.
3. Measure and mark: Use a measuring tape and a pencil to mark the desired dimensions and angles for your design. This will help you achieve precise and symmetrical lines.
4. Apply the tape: Start by applying tape along the marked lines, following the design you have chosen. Make sure the tape is firmly pressed against the wall to prevent any paint bleeding.
5. Paint the wall: Once the tape is applied, it’s time to paint! Select your desired colors and start filling in the shapes created by the tape. Use a small brush or a roller for larger areas.
6. Remove the tape: After the paint has dried, carefully remove the tape. Start from one corner and slowly peel it off at a 45-degree angle to achieve clean and crisp lines.
7. Finishing touches: Once the tape is removed, assess the design and make any necessary touch-ups. Add extra details or embellishments if desired.
And voila! You have successfully created a beautiful geometric wall art using tape. Admire your work and enjoy the artistic touch it adds to your space.
2.5. Paint the wall and remove the tape
Once you have finished painting the geometric design on your wall, it is time to remove the tape. Follow these step-by-step instructions to ensure a clean and crisp finish.
1. Start by examining the painted wall to ensure that the paint has dried completely. This will prevent any smudging or smearing when removing the tape.
2. Gently peel off the painter’s tape at a 45-degree angle. Pull the tape slowly and steadily to avoid any paint peeling off with it.
3. If you encounter any resistance or find that the tape is sticking to the wall, use a utility knife or a razor blade to gently score along the edge of the tape. This will help loosen it and make it easier to remove.
4. Continue removing the tape in the same manner until all the tape has been peeled off the wall.
5. Once all the tape has been removed, carefully inspect the edges of your geometric design. If you notice any areas where the paint has bled under the tape, use a small brush and touch-up paint to correct it.
6. Allow the touch-up paint to dry completely before considering your DIY geometric wall art project complete.
Removing the tape is an important final step in achieving a professional-looking geometric design on your wall. Take your time and be gentle to ensure the best results.
3. Ideas and Inspiration
Are you looking for a creative and budget-friendly way to add some personality to your walls? Look no further than DIY geometric wall art using tape! This trendy and modern art form is easy to create and allows you to customize your space with unique designs. Whether you’re a seasoned DIY enthusiast or just starting out, this project is perfect for anyone looking to add a touch of style to their home.
One of the great things about DIY geometric wall art is that it requires minimal supplies. All you need is some painter’s tape, a few paint colors of your choice, and a blank canvas or a wall. The possibilities are endless when it comes to the design options. You can go for a simple and clean look with basic shapes like triangles or squares, or get more intricate with complex patterns.
To get started, measure and mark the desired dimensions of your geometric design on the canvas or wall. Use the painter’s tape to create the outlines of the shapes, making sure they are well-adhered to prevent any bleeding of paint. Once the tape is in place, it’s time to get creative with colors! Choose your favorite paint shades and fill in the shapes using a brush or a roller.
After the paint has dried, carefully remove the painter’s tape to reveal your masterpiece. The clean lines and crisp edges will instantly give your space a modern and artistic vibe. You can hang your DIY geometric wall art as a standalone piece or create a gallery wall by adding other artwork and photographs.
Not only is DIY geometric wall art a fun and rewarding project, but it also allows you to express your personal style and creativity. You can experiment with different color combinations, sizes, and shapes to create a look that suits your taste and complements your existing decor. So why wait? Grab some tape and paint, and let your imagination run wild with this exciting DIY project!
3.1. Geometric patterns and shapes
Geometric patterns and shapes are a great way to add visual interest and a modern touch to any space. Whether you’re looking to spruce up your living room, bedroom, or office, incorporating geometric designs into your wall art can create a stunning focal point. From simple lines and angles to intricate polygons and symmetrical patterns, the possibilities are endless when it comes to DIY geometric wall art using tape.
One idea for geometric wall art is to create a large-scale geometric design using different colored tapes. Start by mapping out your desired pattern on the wall using pencil marks and a ruler. Then, carefully apply strips of tape to create the lines and shapes of your design. Experiment with different angles and sizes to achieve the desired effect. Once you’re satisfied with the arrangement, step back and admire your unique and eye-catching geometric masterpiece.
Another inspiration for geometric wall art is to incorporate geometric shapes into a gallery wall. Mix and match different shapes such as triangles, squares, and hexagons to create an eclectic and visually appealing display. You can use tape to outline the shapes on the wall or even create stencils to paint the shapes directly onto the surface. Play around with different colors and sizes to create a dynamic and personalized gallery wall that reflects your style and personality.
If you’re feeling adventurous, you can also create a three-dimensional effect with your geometric wall art. Use tape to outline shapes on the wall and then apply multiple layers of paint in different shades to create depth and dimension. This technique adds an extra level of visual interest and can make your geometric wall art truly stand out.
In conclusion, geometric patterns and shapes offer endless possibilities for DIY geometric wall art using tape. Whether you prefer a simple and minimalistic design or a bold and vibrant statement piece, incorporating geometric elements into your wall art can transform any space into a stylish and modern haven.
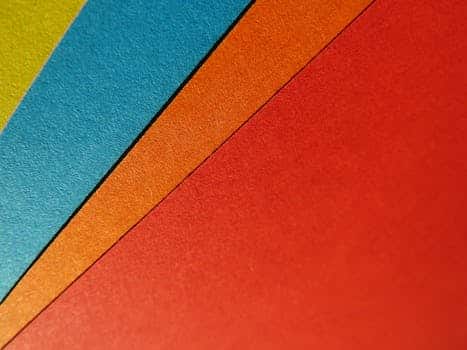
3.2. Color combinations
When it comes to creating DIY geometric wall art using tape, choosing the right color combinations is crucial. The colors you choose can greatly impact the overall look and feel of your artwork. Whether you want to create a bold and vibrant design or a more subtle and calming piece, there are endless possibilities to explore.
One popular color combination for geometric wall art is black and white. This classic combination creates a sleek and modern look that can easily fit into any room decor. You can create various geometric patterns using black tape on a white wall or vice versa. This high contrast design is perfect for adding a touch of sophistication to your space.
If you’re looking for a more colorful and playful design, consider using bright and bold colors. For example, combining vibrant shades of blue, yellow, and pink can create a cheerful and energetic geometric wall art. You can experiment with different shapes and patterns to make your artwork truly unique.
Another option is to go for a monochromatic color scheme. Choose different shades of the same color to create a subtle and harmonious look. This can be achieved by using different tones of blue, for instance, to create a calming and serene atmosphere in your space.
Lastly, don’t be afraid to mix and match contrasting colors. Combining colors that are opposite each other on the color wheel, such as orange and blue or purple and yellow, can create a striking and eye-catching geometric wall art. This bold choice will surely make a statement in any room.
Remember, the key is to experiment with different color combinations and find what resonates with your personal style and the overall aesthetic of your space. Have fun and let your creativity shine as you create your very own DIY geometric wall art using tape!
3.3. Using different types of tape
When it comes to creating DIY geometric wall art, using different types of tape can be a great way to add interest and creativity to your design. Tape is not only a practical tool for creating clean lines and sharp edges, but it also comes in various colors and patterns, allowing you to experiment with different looks and styles.
One idea for using tape in your geometric wall art is to create bold and graphic shapes. You can use painter’s tape or washi tape to outline triangles, squares, or even hexagons on your wall. By layering different colors of tape or alternating between thick and thin lines, you can achieve a visually striking and modern design.
Another inspiration for using tape in your DIY project is to create a geometric pattern or a unique mural. You can use masking tape or electrical tape to form intricate shapes and lines, such as chevron patterns or zigzags. By playing with different angles and directions, you can create a sense of movement and dimension on your wall.
Additionally, tape can be used as a guide or stencil for painting geometric shapes. By sticking tape onto the wall in the desired shape and then filling in the exposed areas with paint, you can achieve a clean and precise design. This technique is especially useful when creating larger-scale geometric wall art.
In conclusion, using different types of tape can offer endless possibilities for creating DIY geometric wall art. Whether you want to create bold shapes, intricate patterns, or use tape as a guide for painting, tape can be a versatile and fun tool to incorporate into your artistic endeavors.
3.4. Incorporating other materials
Incorporating other materials for DIY Geometric Wall Art Using Tape can add unique visual elements and enhance the overall design. By combining tape with various materials, you can create interesting textures, patterns, and dimensions. Here are some ideas and inspiration for incorporating other materials into your tape-based geometric wall art projects:
1. Wood: Use wooden dowels or sticks to create a frame or border for your tape design. This adds a natural and rustic touch to the artwork.
2. Fabric: Cut and glue fabric pieces onto the tape lines to add texture and a soft feel to the geometric shapes. You can experiment with different patterns, colors, and materials such as lace or burlap.
3. Metallic Foil: Apply metallic foil sheets onto selected areas of the tape design to create a metallic accent. This can add a glamorous and eye-catching element to the artwork.
4. Paint: Combine tape with different paint colors to create a multi-dimensional effect. Paint sections within the tape lines or use paint to fill in the geometric shapes for a vibrant and colorful design.
5. Mirrors or Mirror Tiles: Incorporate small mirrors or mirror tiles into your tape-based wall art. This will not only add a reflective quality but also create an illusion of depth and spaciousness.
6. Washi Tape: Explore the world of washi tape, which comes in various patterns and colors. Use different washi tapes to create intricate designs or mix them with regular tape for a unique and playful look.
Remember, the possibilities are endless when it comes to incorporating other materials into your DIY geometric wall art using tape. Let your imagination run wild and experiment with different combinations to create stunning and personalized artworks.
3.5. Creating a focal point
When it comes to DIY Geometric Wall Art Using Tape, the key is to create a focal point that will captivate and inspire. This section will provide you with some ideas and inspiration to kickstart your creativity.
1. Geometric Shapes: Experiment with different geometric shapes such as triangles, squares, and hexagons. These shapes can be easily created using painter’s tape or masking tape.
2. Colorful Patterns: Add a pop of color to your geometric wall art by using different shades and hues. You can create a vibrant and visually appealing design by using a variety of colors.
3. Optical Illusions: Play with optical illusions by incorporating patterns and lines that create a sense of depth and movement. This can make your wall art more dynamic and visually intriguing.
4. Nature-Inspired Designs: Take inspiration from nature and incorporate elements like leaves, flowers, or even animals into your geometric wall art. This can add a touch of whimsy and create a unique and personalized design.
5. Minimalist Approach: If you prefer a more minimalist look, opt for a monochromatic color scheme and clean lines. This can create a sleek and modern aesthetic.
Remember, the possibilities are endless when it comes to DIY geometric wall art using tape. Let your imagination run wild and have fun exploring different ideas and inspirations!
Conclusion
In conclusion, DIY geometric wall art using tape is a creative and affordable way to transform any space. With just a few simple materials and some imagination, you can easily create stunning designs that add a modern touch to your home. Whether you’re a beginner or an experienced DIY enthusiast, this project offers endless possibilities to showcase your artistic skills. So, grab some tape and get ready to bring your walls to life with stylish geometric patterns!


These 10 innovative and imaginative DIY home decor ideas from [object Object] provide a refreshing approach to enhancing ones living…