
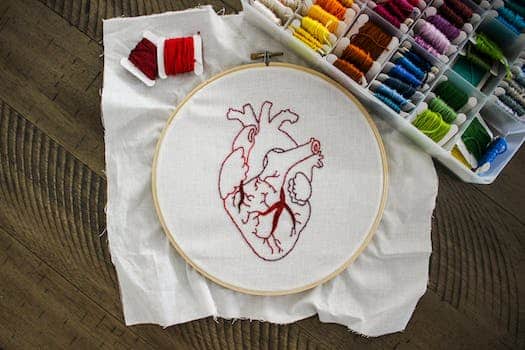
Do you want to make your home feel more like your own? Fabric and embroidery hoops make for a simple and inexpensive DIY wall art project. It doesn’t matter if you’re a seasoned craftsman or just getting started; you’ll find inspiration in these original ideas. There is a wide variety of embroidery patterns and fabric prints from which to choose. Inject some new life into your walls by trying one of these do-it-yourself projects.
- 1. Introduction
- 1.1. What is DIY wall art?
- 1.2. Why use fabric and embroidery hoops?
- 1.3. Benefits of creating your own wall art
- 1.4. Materials needed for this project
- 1.5. Choose a design or pattern
- 2. Preparing the Fabric and Hoops
- 2.1. Selecting the fabric
- 2.2. Washing and ironing the fabric
- 2.3. Cutting the fabric to size
- 2.4. Preparing the embroidery hoop
- 2.5. Securing the fabric in the hoop
- 3. Creating the Wall Art
1. Introduction
Want to give your room a more personal feel but don’t know where to start? Embroidery hoops and fabric can be easily transformed into beautiful wall hangings. Make your home more fashionable and unique without breaking the bank with this easy and inexpensive DIY project. This is a great DIY for anyone, whether you’ve done it before or have never touched a glue gun. There are countless ways to make amazing wall art that reflects your personal style, from the choice of cloth to the positioning of the embroidery hoop. Learn how to make gorgeous, one-of-a-kind wall art with fabric and embroidery hoops by reading this article and getting inspired by the many different techniques and ideas presented.
1.1. What is DIY wall art?
Making your own wall art is a great way to give your home a personal touch and show off your creative side. It’s a great way for people to put their unique stamp on their homes while also expressing their individuality. When you create your own wall art, it will be completely unique because it will reflect your personal style and preferences. In this piece, we’ll discuss some unique DIY wall art ideas that center around using fabric and embroidery hoops.
1.2. Why use fabric and embroidery hoops?
Fabric and embroidery hoops are a great tool for making one-of-a-kind decorative pieces for your walls. The ways in which you can customize your home with these adaptable materials are practically limitless. Fabric and embroidery hoops are simple to work with, whether you’re an experienced DIYer or just getting started. This post will discuss why fabric and embroidery hoops are ideal for your do-it-yourself wall decor projects.
1.3. Benefits of creating your own wall art
Making your own wall decorations is a great way to personalize your home. It’s an inexpensive method to give your home a new look and feel while still letting you express your individuality. Fabric and embroidery hoops allow you to express your individuality via the creation of one-of-a-kind garments and accessories. DIY wall art made from fabric and embroidery hoops may be a great way to express your creativity while also sprucing up a drab wall. In this piece, we’ll go through several clever approaches to decorating your home with fabric and embroidery hoops.
1.4. Materials needed for this project
You only need a few simple supplies to make beautiful DIY wall art out of cloth and embroidery hoops. You can find all of these supplies at any arts and crafts store or even online. What you’ll need to complete this task is detailed below.
Fabric First, select a fabric that works well with your decor. Think about how the fabric’s hue, print, and hand will help you achieve the look you’re going for.
To add visual interest to your wall hangings, choose embroidery hoops in a range of sizes. The fabric will be stretched across these hoops.
Thirdly, scissors are essential for cutting the fabric and removing any extra.
Embroidering designs or fastening the fabric to the hoops requires a needle and thread, which you will need.
5. Adhesive: cloth glue or a hot glue gun can be used to secure the cloth to the embroidery hoops.
Embellishments: buttons, beads, and ribbons are great options if you want to give your wall art a little something more.
With your supplies in hand, it’s time to get creative and enhance your home with some handmade wall art made from fabric and embroidery hoops.
1.5. Choose a design or pattern
Do-it-yourself wall art is a great way to put your stamp on a room and make it truly your own. Fabric and embroidery hoops can be used to make a beautiful and inexpensive wall hanging. Using only your imagination and some of these inexpensive supplies, you may create works of art that are truly unique to you. Fabric and embroidery hoops provide unlimited opportunities for personal expression, whether you’re wanting to add a splash of color, a hint of texture, or a bold statement. In this piece, I’ll go over some of the options you have for making your own DIY wall art that will look great and cost you nothing.
2. Preparing the Fabric and Hoops
Fabric and Hoop Preparation
For a successful DIY wall art project using fabric and embroidery hoops, appropriate preparation of the fabric and hoops is essential. Here are the measures to take:
Step one: select a fabric that works with the room’s existing aesthetic. Think about the fabric’s design and texture as well.
To begin, it is recommended that you wash and iron the fabric, especially if it is brand new. This will prevent wrinkles and future shrinking.
Third, prepare the fabric by cutting it to the correct size for your embroidery hoop. If you want to make sure it fits snugly, leave a few inches of fabric all the way around.
4. Stabilize the fabric by laying it over the inner hoop, which you’ve already placed on a flat surface. After that, you just tighten the screw and press the outer hoop over the fabric and inner hoop to keep everything in place.
5. Cut away the excess fabric: Once the fabric is safely encased in the hoop, you may use a pair of sharp scissors to remove the excess fabric from the edges.
If you follow these instructions, you’ll have the materials you need to create your own work of art for the wall. This will serve as the basis for the rest of your innovative wall decoration.
2.1. Selecting the fabric
The fabric you choose will have a major impact on the final result of your do-it-yourself wall art project with embroidery hoops. The appearance and feel of your finished product may vary dramatically depending on the fabric you use. Achieve your artistic goals by following these guidelines while you shop for cloth.
You should start by thinking about the function and concept of your wall decor. Is a modern, minimalist, or classic look what you’re going for? The fabric you choose should reflect the intended aesthetic and work in harmony with the room’s current furnishings.
Next, evaluate the fabric’s hand and weight. Lightweight fabrics like chiffon and organza are perfect if you’re going for a feminine, airy vibe. Heavier fabrics, such as canvas or linen, are great if you’re going for a more structured and substantial look.
Fabric choice also heavily depends on factors like color and design. It’s up to you whether you want to complement the existing decor or make a striking contrast. Patterns should be thought of that either complement or add to the overall concept.
Consider the fabric’s longevity and care requirements as well. Choose fade-resistant, easy-to-clean materials for wall art that will be displayed in direct sunlight or a high-traffic area.
Selecting the appropriate cloth for your do-it-yourself endeavor is the first step. To begin, eliminate wrinkles and stains by washing and ironing the fabric. This will give your artwork a polished, gallery-quality appearance on the wall.
In addition, you need to make sure the fabric is the right size for the embroidery hoop. Don’t cut off all the excess at the edges; you’ll need it to pull it taut and secure it. The finished product will be more stable if you do this.
Finally, make sure there is no dust or other material in the embroidery hoop. This will help the fabric stay put and give it a professional finish.
Embroidery hoops can be used to make beautiful works of DIY wall art if the fabric is chosen with care and the project is prepared properly. Put your unique stamp on the room by letting your imagination run wild.
2.2. Washing and ironing the fabric
It is essential to thoroughly prepare the fabric and hoops before beginning your DIY wall art project. The end effect will be more polished and presentable if you follow these steps.
The first step is to clean and iron the fabric. This is a crucial process for getting rid of any creases, dust, or grime. Before attempting any sort of cleaning on a new piece of clothing, it’s a good idea to consult the label. Most fabrics can be safely washed by hand with a moderate detergent. You should not use bleach or other harsh chemicals on the cloth.
After washing, put the fabric flat on a dry surface and give it a gentle push to remove excess water. Get rid of creases by pressing with your hands or a cool iron. Before applying the solution to the entire piece of fabric, test a small, hidden section.
After ironing out any wrinkles, you may set up your embroidery hoop. To disassemble a hoop, you need to take the outer ring off and the inner ring off. To center a design or pattern on the cloth, lay the inner ring on a flat surface and drape the fabric over it. Make sure the fabric is taut before placing the outer ring over the inner and middle rings.
To keep the cloth from slipping out of the embroidery hoop, tighten the screw or clamp. Avoid distortion and puckering by stretching the fabric uniformly across the hoop. Remove any surplus material from the edges, leaving a narrow seam allowance.
After you’ve washed and ironed the fabric and prepared the embroidery hoops, you’re ready to go on to the next steps in making your DIY wall art.
2.3. Cutting the fabric to size
Fabric and embroidery hoops must be cut to size before they can be used in your do-it-yourself wall hanging. Fabric needs to be measured and cut precisely to fit the size of your embroidery hoops for a professional finish.
The first step is to spread out your fabric on a level surface and iron away any creases or wrinkles. Hoop the fabric and secure it in place where you want it.
Carefully trim the fabric around the hoops using fabric scissors, leaving about 1 to 2 inches of fabric on all sides. This spare material will be used to fasten the cloth securely to the hoops.
When cutting cloth, be sure to use a straight line that moves with the grain. This will keep the edges from becoming uneven or frayed.
After you’ve finished making your fabric cuts, you can put the hoops away. Having completed this stage, you can continue working on your DIY wall art.
2.4. Preparing the embroidery hoop
Preparing the embroidery hoop is a crucial step in making a beautiful DIY wall hanging out of fabric. By doing this, you can rest assured that the cloth will be taut and stable, which will result in professional-looking stitching. The following are the procedures for setting up the embroidery hoop:
First, unhook the embroidery hoop’s inner and outer rings. Loosen the top screw and carefully separate the inner and outer rings.
After taking them apart, you can drape the fabric over the center piece. The fabric needs to be big enough to wrap around the inner ring and then some.
Step 3: Place the outer ring over the inner ring with the cloth facing outward and make sure the notches or screws are lined up. To keep the outer ring from slipping out of place, press down hard on it.
4. Keeping the fabric taut, gradually tighten the screw at the top of the embroidery hoop. If you tighten it too much, the fabric could get stretched out of shape.
Once the hoop is snug, cut away any excess fabric, but be sure to leave about an inch of cloth hanging past the hoop’s perimeter.
By the end of this guide, you’ll be ready to start prepping the fabric and beginning the creative process of transforming your home with gorgeous DIY wall art thanks to your newly constructed embroidery hoop.
2.5. Securing the fabric in the hoop
Hooping the fabric and securing it in place is a crucial step in getting your materials ready for your do-it-yourself wall hanging. This keeps the fabric from sagging and gives the project a polished look.
First, get a fabric scrap that works with your preferred color scheme and is large enough to fill your embroidery hoop. Fabric should be cut slightly larger than the embroidery hoop to allow for any necessary alterations.
Arrange the embroidery hoop such that the inner and outer rings are distinct. Center the design or pattern on the fabric and lay it over the inner ring.
When the cloth is at the desired location, the outer ring is placed above it and aligned with the inner ring. Spread the tension throughout the fabric by gently pressing the rings together.
The cloth can be held in place by tightening the embroidery hoop’s screw or fastening mechanism. Beginning with one side, tighten it before moving on to the other and repeating the process until the fabric is firmly in place. Be careful not to overtighten or the fabric could stretch or even tear.
After the cloth is in place, use fabric scissors to cut away any extra, leaving a narrow border around the embroidery hoop.
If you follow these instructions, your DIY wall art will have a sturdy base on which to hang finished pieces of cloth. Now that you have your fabric and embroidery hoop patterns, you can let your imagination run wild and completely revamp any room.
3. Creating the Wall Art
Making your own wall art is a fun and creative way to give your home a unique look and feel. Making your own wall decor is more popular than ever because to the growing do-it-yourself movement. Using fabric and embroidery hoops is a great choice because of how flexible and pretty it is. You can make beautiful artwork out of these inexpensive materials that would look great everywhere in your house.
First, amass the necessary supplies. Embroidery hoops of various sizes, the fabric of your choosing, scissors, and a hot glue gun are all you need to get started. Pick fabrics that go well with the room’s overall design and color palette. For a one-of-a-kind appearance, you can choose daring designs, subdued tones, or a combination of both.
Fabric must then be sized appropriately for the embroidery hoop. If you want a perfect fit, leave a couple of inches of extra fabric all the way around. Fabric is secured by placing the larger hoop on top of the smaller one and pressing down.
If there is any spare fabric after securing the fabric, you can hot glue it to the back of the hoop. Your artwork will look more polished and complete if you do this. To add more hoops to your design, simply repeat the preceding steps.
The next step is the most enjoyable: arranging the hoops in a way that is pleasing to the eye. Experiment with various dimensions and orientations until you settle on a design you like. You can hang the hoops in a straight line for a simple effect, or you can overlap and stagger them for a more interesting design.
Once you’ve finished covering the hoops, you can mount them on the wall using nails or sticky hooks. Before hanging, make sure all hoops are properly measured and leveled for a uniform appearance.
Making your own fabric and embroidery hoop wall art is easy and inexpensive. You may use this DIY to show off your individuality and give your home a special feel. It’s never too soon to begin the rewarding process of making your own stunning wall decor.
3.1. Choosing the placement
DIY wall art made from fabric and embroidery hoops can really change a room if hung in the correct spots. It’s vital to think about how your wall art will interact with other elements in the room before you hang it.
Prior to purchasing fabric and embroidery hoops, you should measure the area you intend to decorate. Create a gallery-like arrangement with many hoops of varied sizes to fill a large, empty wall. This has the potential to give visual appeal and dimension to the room.
However, a single piece of fabric and an embroidery hoop can still create a bold impact, even on a narrow wall or in a small room. Find a hoop that works with the dimensions of the wall, and maybe even add some framed pictures or artwork to tie everything together.
Next, consider the room’s dominant aesthetic. Fabric selection and embroidery hoop style should complement the room’s existing aesthetic, be it boho, minimalist, or eclectic. Think about the colors, patterns, and textures that will enhance the room’s design.
Finally, think about where you’ll put the embroidery hoop and where you’ll hang the fabric. While aiming at eye level is a safe idea, experimenting with varying heights can provide visual intrigue. Example: for drama, place a larger hoop higher on the wall; for playfulness, hang a succession of smaller hoops at varying heights.
Fabric and embroidery hoop wall art may greatly improve the look and feel of a room if they are strategically placed. Use your imagination, try up new layouts, and have fun turning your walls into works of art!
3.2. Adding embellishments (optional)
DIY cloth wall art may be taken to the next level of originality and beauty with the addition of accessories. Embellishments are not required, but they can make your artwork more beautiful. Some suggestions are as follows:
Use a variety of embroidery methods to create elaborate motifs and patterns on your fabric. Floral designs, geometric patterns, and even your initials can all be embroidered! The embroidery on your wall hangings will make them look more expensive and classy.
Beading is a technique used to add shimmer to cloth artwork by using beads or sequins. You can build a border with beads or sew them onto certain spots on the fabric. Beading is a fun and easy way to add a touch of glitz to your wall decor.
Practice appliqué methods by stitching fabric scraps or patches onto a background fabric. Designing with several layers and textures is now possible. Fabrics with contrasting patterns or textures can add aesthetic appeal.
Add a soft and feminine touch to your fabric art by sewing on some ribbons or lace. Ribbons can be used to make borders, bows, or even woven into the cloth itself. Ribbons and lace are great ways to give your wall decor a feminine touch.
Fabric paint is a great way to experiment with color and pattern on your artwork. You can paint a design onto the wall using stencils, brushes, or even freehand. Fabric paint lets you construct one-of-a-kind wall hangings that no one else will have.
Always remember that embellishments are optional and that you can combine different methods to make something that is uniquely you. DIY fabric wall art is a great opportunity to let your creativity run wild and try out a variety of exciting decoration techniques.
3.3. Creating a fabric collage
Making your own fabric collage to hang on the wall is a creative and entertaining hobby. To assist you in getting going, here are some suggestions:
One, assemble the required equipment: scraps of fabric in a variety of colors and designs, embroidery hoops, scissors, and a hot glue gun.
Fabric selection: use the room’s existing color and design scheme as inspiration. To spice up your design, try incorporating contrasting materials and patterns.
Third, snip the cloth: Use a pair of sharp scissors to snip the fabric into various sizes and shapes. You can make whatever form you want, from squares and circles to triangles and pentagons.
Fourth, try out several layouts by laying down the fabric pieces on a flat surface. Try with several color schemes and design patterns until you discover one you like.
Once you’re satisfied with the layout, you may secure the cloth to the embroidery hoop with a hot glue gun. The perimeter should be fortified before the interior is worked on.
Fabric collages can be further improved by the addition of accessories like buttons, beads, and ribbons. This is a great way to add some enchantment to your wall decor.
The final step is to hang your fabric collage on the wall after the glue has set. The embroidery hoop should be hung using a nail or hook.
Making a fabric collage is an easy and impressive method of decorating with personal expression. Creating a one-of-a-kind piece of wall art that reflects your personal style can be a lot of fun if you play around with different materials and ideas.
3.4. Embroidering designs or patterns
DIY wall art can be given a special and individual touch with embroidery designs or motifs. Fabric and embroidery hoops allow you to make stunning works of art that may completely alter a room. No matter how much or how little experience you have with embroidery, there is always something new to try.
First, amass the required supplies: needles, thread, scissors, and embroidery hoops. Pick a cloth that works with the existing decor of your space. You have the choice of using solid colors or patterns to achieve the look you want.
The next step is to choose on an embroidered pattern. Books, journals, and the Internet are just a few places to go for motivation. It’s a good idea to use props that relate to your chosen theme if you have one. Make a paper pattern of your design, or use a stencil, to follow while you sew.
The next step is to transfer the design onto the fabric. You can use a washable fabric pen or transfer paper to trace the design onto the fabric. Place the embroidery hoop so that it focuses attention where you want to embroider.
Now comes the exciting part: sewing! Start stitching along the drawn lines after threading your needle with embroidery floss. You can utilize stitches like the backstitch, satin stitch, and French knots to embroider. If you want your needlework to stand out, try using a variety of stitches and thread colors.
Maintaining a taut cloth within the embroidery hoop is essential as you work. The tension and form of your artwork will be preserved in this way. Clean up your work as you go by cutting away any extra thread or fabric.
When you’re done embroidering, take the fabric out of the hoop and give it a light press to get rid of the creases. Fabric looks great when mounted on backing board or framed. You might improve the look by adding some decorative touches, such beads, sequins, or ribbons.
Now that you’ve finished your DIY embroidery project, you can hang it on the wall and marvel at the instant makeover it provides. These one-of-a-kind items, whether presented singly or in a group, will give any setting a dash of originality and character.
DIY wall art made from fabric and embroidery hoops is beautiful because it allows you to show off your own unique sense of style and creativity. Let your imagination go wild and enjoy yourself while you work.
3.5. Finishing touches and hanging the art
Installation and final touches on artwork:
The last step in making fabric wall art in embroidery hoops is to hang it up and admire your handiwork. Here are the measures to take:
To begin, use a pair of sharp scissors and gently cut away the excess fabric that is protruding from the sides of the embroidery hoops. This will help your artwork appear more professional.
Second, fasten the cloth to the hoop’s back by either using a hot glue gun or a needle and thread. It must be stretched tightly and uniformly throughout the hoop.
Embellishing your wall art with ribbons, buttons, or beads is a great way to give it a personal touch and make it stand out. Use your imagination and play around with various mediums and textures.
The final step, once you’ve achieved the desired effect, is to put the artwork on the wall. To fasten the hoops to the wall, you can use adhesive strips or picture hanging hooks. Make sure each hoop is placed at the same height and with equal distance from the others.
Fabric and embroidery hoops can be transformed into stunning one-of-a-kind wall hangings if you follow these instructions. It’s an exciting opportunity to express your individuality via house decoration.
Conclusion
DIY fabric wall art with embroidery hoops is a fresh and original approach to decorating your walls. With all the options available and a little bit of your own flair, you can make something truly one-of-a-kind and visually amazing. This do-it-yourself project is enjoyable and satisfying whether you’re an experienced crafter or just starting out. Get your supplies together, let your imagination run wild, and get ready to decorate your walls!

These 10 innovative and imaginative DIY home decor ideas from [object Object] provide a refreshing approach to enhancing ones living…