
Maximizing small spaces can be a challenging task, but with the clever solution of built-in shelves, you can transform any cramped area into a functional and stylish haven. These space-saving wonders not only provide much-needed storage, but also add a touch of elegance to your home decor. Whether you have a tiny apartment, a cozy office, or a compact bedroom, built-in shelves offer the perfect solution to make the most of every inch. In this article, we will explore the various benefits and creative ideas for incorporating built-in shelves into your small space, helping you optimize storage and create an organized and visually appealing environment.
- 1. Introduction
- 1.1. Benefits of built-in shelves
- 1.2. Choosing the right location
- 1.3. Measuring the available space
- 1.4. Considering the style and design
- 1.5. Materials and tools needed
- 2. Installation Process
- 2.1. Preparing the wall
- 2.2. Building the frame
- 2.3. Installing the shelves
- 2.4. Securing the shelves
- 2.5. Finishing touches
- 3. Maximizing Storage
1. Introduction
Small spaces can often present a challenge when it comes to storage and organization. However, with the clever solution of built-in shelves, you can maximize every inch of available space and create a functional and stylish environment. Whether you live in a compact apartment, a tiny house, or simply have limited room in certain areas of your home, built-in shelves offer a practical and efficient way to make the most of your small space. In this article, we will explore the various benefits and design ideas for incorporating built-in shelves into your living space, showing you how this smart solution can transform your home.
1.1. Benefits of built-in shelves
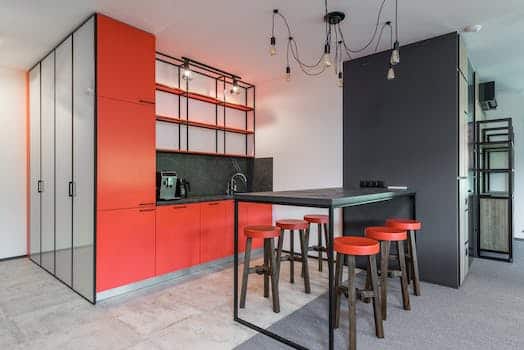
Built-in shelves offer numerous benefits for maximizing small spaces. These clever storage solutions provide a practical and efficient way to utilize every inch of available space. With built-in shelves, you can declutter and organize your belongings effectively, creating a clean and tidy living environment. Additionally, these shelves can be customized to fit any space, whether it’s a tiny nook or a larger wall. By utilizing vertical space, built-in shelves help to free up valuable floor space, making your small room feel more spacious and open. Moreover, these shelves can be designed to blend seamlessly with the existing decor, adding a touch of elegance and sophistication to your living space. Overall, the benefits of built-in shelves are immense, offering both functional and aesthetic advantages for maximizing small spaces.
1.2. Choosing the right location
Choosing the right location for built-in shelves is crucial when it comes to maximizing small spaces. These clever solutions can help you make the most out of every inch in your home. Whether you have a tiny apartment or a compact office, built-in shelves can provide valuable storage and display options without taking up precious floor space. In this article, we will explore the various factors to consider when selecting the perfect location for built-in shelves, ensuring a seamless integration that enhances both functionality and aesthetics.
1.3. Measuring the available space
When it comes to maximizing small spaces, one clever solution that has gained popularity is the use of built-in shelves. These shelves not only provide a practical storage solution but also add a touch of sophistication to any room. Whether you live in a tiny studio apartment or have a small nook in your home that needs to be utilized efficiently, built-in shelves can make a significant difference.
The first step in utilizing built-in shelves effectively is to measure the available space. Before you start planning the design or purchasing materials, it is crucial to have accurate measurements. This will ensure that the shelves fit perfectly into the designated area without wasting any precious space.
Measuring the available space involves taking precise measurements of the height, width, and depth of the area where the shelves will be installed. Use a measuring tape or a laser measure to get accurate readings. It is important to consider any obstacles such as electrical outlets, windows, or doors that may affect the placement and size of the shelves.
Once you have the measurements, you can start exploring different design options for your built-in shelves. Consider the overall aesthetic of the room and the purpose of the shelves. Are you looking for additional storage for books, displaying decorative items, or organizing everyday essentials? Understanding your needs will help you determine the number of shelves required and their arrangement.
In conclusion, measuring the available space is an essential first step when it comes to maximizing small spaces with built-in shelves. By ensuring accurate measurements, you can create a functional and visually appealing storage solution that optimizes every inch of your limited space.
1.4. Considering the style and design
When it comes to making the most out of small spaces, built-in shelves can be a clever solution. These versatile storage units not only provide a practical way to maximize storage but also offer a stylish and organized look to any room. Whether you’re living in a tiny apartment or have limited space in your home, incorporating built-in shelves can help you create a functional and visually appealing environment. In this article, we will delve into the various aspects of utilizing built-in shelves to maximize small spaces, from choosing the right style and design to practical tips on how to make the most of these storage solutions.
1.5. Materials and tools needed
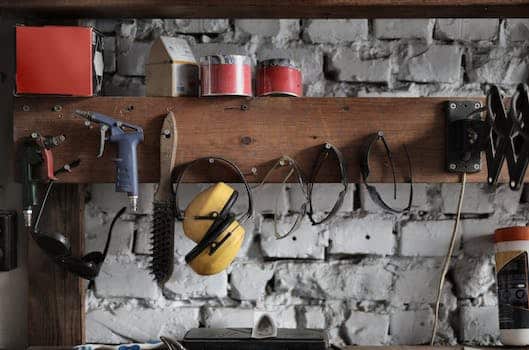
When it comes to maximizing small spaces, built-in shelves offer a clever solution. These space-saving wonders not only help you make the most of limited room, but also add a touch of style and organization to your living space. Before you embark on the journey of creating your own built-in shelves, there are a few materials and tools that you will need to have on hand. Gathering these essentials beforehand will make the process smoother and more efficient.
First and foremost, you will need sturdy and durable wood boards. Opt for high-quality plywood or solid wood, depending on your preference and budget. These boards will serve as the foundation of your built-in shelves, providing the necessary support and structure.
In addition to the wood boards, you will require a measuring tape, a level, and a pencil. These tools are essential for accurately measuring and marking the dimensions of your shelves. A level will ensure that your shelves are perfectly straight and aligned, while a pencil will allow you to make precise markings on the wood.
To assemble the shelves, you will need screws, a power drill, and a screwdriver. The screws will secure the wood boards together, creating a sturdy and stable unit. A power drill will make the process quicker and easier, while a screwdriver will come in handy for any finishing touches or adjustments.
Lastly, you may choose to enhance the appearance of your built-in shelves with paint or stain. This will add a pop of color or a natural finish to complement your existing decor. Make sure to select a paint or stain that is suitable for wood and apply it using a brush or roller for a smooth and even finish.
By having these materials and tools ready, you will be well-prepared to tackle the project of maximizing your small space with built-in shelves. With a bit of creativity and craftsmanship, you can transform any cramped area into a functional and aesthetically pleasing storage solution.
2. Installation Process
Installing built-in shelves is a clever solution to maximize small spaces. This article will guide you through the installation process, ensuring that you make the most of your available space.
1. Planning: Start by assessing the area where you want to install the built-in shelves. Measure the dimensions and consider the height, width, and depth of the shelves. Take into account any existing furniture or obstacles that may affect the installation.
2. Design: Determine the layout and design of your built-in shelves. Consider the overall aesthetics and functionality. Decide on the number of shelves, their spacing, and the materials you want to use.
3. Preparation: Clear the area and remove any existing furniture or fixtures that might hinder the installation process. Ensure that the walls are clean and free from any obstructions.
4. Marking: Use a level and pencil to mark the desired height and placement of the shelves on the wall. Make sure the markings are accurate and aligned.
5. Stud Finding: Locate the studs in the wall using a stud finder. This step is crucial for proper support and stability of the shelves. Mark the stud locations on the wall.
6. Shelving Units: Install the shelving units by attaching them to the wall using screws or brackets. Make sure to secure them into the studs for optimum strength and durability.
7. Finishing Touches: Once the shelves are securely installed, check for any wobbling or instability. Adjust as needed. Paint or stain the shelves to match your desired aesthetic.
By following these steps, you can successfully install built-in shelves to maximize small spaces. Enjoy the additional storage and organization they provide!
2.1. Preparing the wall
Preparing the wall: Before starting the installation process of built-in shelves, it is important to properly prepare the wall to ensure a sturdy and reliable installation. The following steps can be followed to prepare the wall:
1. Clear the area: Remove any furniture, decorations, or other items from the wall area where the shelves will be installed. This will provide clear access and prevent any obstructions during the installation.
2. Clean the wall: Thoroughly clean the wall surface using a mild detergent and water solution. This will remove any dirt, dust, or grease that may affect the adhesive or paint.
3. Repair any damages: Inspect the wall for any cracks, holes, or uneven surfaces. Fill any holes or cracks with a suitable filler and smoothen any uneven areas using sandpaper.
4. Measure and mark: Use a measuring tape and level to determine the desired height and position of the shelves. Mark the measurements on the wall using a pencil or tape.
5. Locate wall studs: Locate the wall studs using a stud finder or by tapping the wall and listening for a solid sound. Mark the stud locations on the wall as they will provide additional support for the shelves.
By following these steps, you can ensure that the wall is properly prepared for the installation process, allowing for a successful and long-lasting built-in shelves solution for maximizing small spaces.
2.2. Building the frame
Installing built-in shelves is a practical and clever solution for maximizing small spaces. By making use of vertical wall space, you can create additional storage without taking up valuable floor area. The installation process for built-in shelves may seem daunting, but with the right tools and preparation, it can be a straightforward DIY project.
To begin, gather all the necessary materials and tools. You will need a measuring tape, level, drill, screws, brackets, and the shelves themselves. It’s essential to measure the wall accurately to determine the dimensions of the shelves and ensure a proper fit.
Next, mark the desired height and placement of the shelves on the wall. Use a level to ensure that the markings are straight and even. Double-check the measurements before proceeding.
Once the markings are in place, it’s time to install the brackets. Use a drill to screw the brackets into the wall securely. Make sure to align them with the markings and ensure they are level.
After the brackets are securely in place, attach the shelves to the brackets. This step may vary depending on the type of shelves you have chosen. Some shelves may require screws or clips for attachment, while others may simply slide onto the brackets.
Finally, double-check the stability and levelness of the shelves. Make any necessary adjustments to ensure they are secure and properly aligned. Once you’re satisfied with the installation, you can start organizing and decorating your newly created storage space.
In conclusion, installing built-in shelves is an excellent way to maximize small spaces. With careful planning and proper installation, these shelves can provide functional storage while adding a touch of style to any room.
2.3. Installing the shelves
Installing the shelves is a crucial step in the process of maximizing small spaces with built-in shelves. This section will guide you through the installation process to ensure a successful outcome.
Before you begin, make sure you have all the necessary tools and materials. You will need a drill, screws, a level, a measuring tape, and of course, the shelves themselves.
Start by measuring the area where you want to install the shelves. Use a measuring tape to determine the length, width, and height of the space. This will help you choose the right size and quantity of shelves.
Next, mark the positions where the shelves will be mounted. Use a pencil to make light marks on the wall or the designated area. Make sure the marks are level and evenly spaced for a visually appealing result.
Now it’s time to drill pilot holes for the screws. Use a drill bit that matches the size of your screws. Start by drilling small holes at the marked positions. These pilot holes will make it easier to insert the screws and prevent the shelves from splitting or cracking.
After drilling the pilot holes, align the shelves with the holes and secure them in place using screws. Make sure the shelves are level by using a level tool. Double-check the alignment and adjust if necessary.
Once all the shelves are securely attached, give them a gentle shake to ensure they are stable. If they feel wobbly, reinforce the screws or add additional support.
Finally, step back and admire your newly installed built-in shelves. You can now start organizing and arranging your items to make the most of the available space.
Remember, proper installation is essential for the longevity and functionality of your built-in shelves. Take your time, follow the steps carefully, and enjoy the benefits of a clever solution for maximizing small spaces.
2.4. Securing the shelves
Securing the shelves is an essential step in the installation process of maximizing small spaces with built-in shelves. This ensures that the shelves are stable and can safely hold the desired items. To secure the shelves, follow these steps:
1. Determine the placement: Before installing the shelves, carefully consider the location where they will be mounted. Take measurements and ensure that the shelves will fit properly in the chosen space.
2. Mark the wall: Use a pencil or tape to mark the exact positions where the shelves will be installed. Ensure the marks are level and evenly spaced.
3. Find the studs: It is crucial to locate the wall studs before drilling any holes. Studs provide the necessary support for the shelves. You can use a stud finder or tap the wall to listen for a solid sound, indicating the presence of a stud.
4. Drill pilot holes: Using a drill bit slightly smaller than the screws or anchors, drill pilot holes at the marked positions. This will prevent the wall from splitting or cracking when inserting the screws.
5. Install brackets or supports: Depending on the design of the built-in shelves, install brackets or supports onto the wall. Make sure they are aligned with the pilot holes and securely fastened.
6. Slide the shelves into place: Once the brackets or supports are properly installed, carefully slide the shelves onto them. Ensure they are level and adjust if necessary.
7. Secure the shelves: Using screws or appropriate fasteners, secure the shelves onto the brackets or supports. Make sure they are tightly fastened to prevent any wobbling or instability.
8. Test the stability: Give the shelves a gentle shake to test their stability. If they feel sturdy and secure, they are ready to be used.
By following these steps, you can successfully secure the shelves during the installation process, allowing you to maximize small spaces with built-in shelves.
2.5. Finishing touches
After successfully installing the built-in shelves, there are a few finishing touches that can further enhance the overall look and functionality. These final steps will ensure that the shelves blend seamlessly with the surrounding space and maximize the small area.
1. Paint or Stain: Consider painting or staining the shelves to match the existing color scheme of the room. This will create a cohesive and polished appearance, making the shelves appear as if they were always a part of the space.
2. Decorative Backing: Adding a decorative backing to the shelves can elevate their visual appeal. Consider using wallpaper, fabric, or even a contrasting paint color to create an eye-catching backdrop. This will add depth and personality to the shelves while also serving as a focal point in the room.
3. Lighting: Incorporating lighting into the built-in shelves can not only add a beautiful ambiance but also make the items on the shelves more visible. LED strip lights or small spotlights can be installed to highlight specific objects or create a warm glow throughout the shelves.
4. Organizational Accessories: To maximize the functionality of the built-in shelves, consider adding organizational accessories such as baskets, bins, or dividers. These can help keep items organized and easily accessible, especially in small spaces where every inch of storage matters.
By paying attention to these finishing touches, the installation process of built-in shelves can be completed with style and efficiency. The end result will be a clever solution that maximizes small spaces while adding both aesthetic and practical value to the room.
3. Maximizing Storage
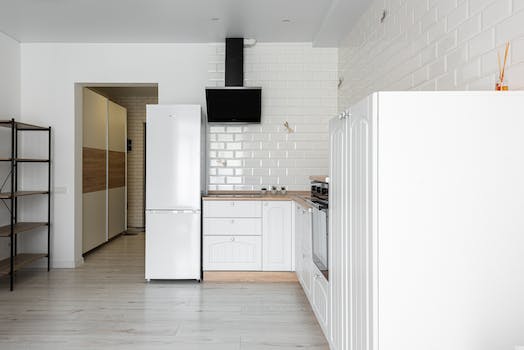
One of the biggest challenges in small spaces is finding enough storage. However, with the clever use of built-in shelves, you can maximize the storage capacity of any room. Built-in shelves are a great solution for utilizing vertical space and making the most of every inch. Whether it’s a living room, bedroom, kitchen, or even a bathroom, built-in shelves can be customized to fit any space and provide ample storage for your belongings. From books and decor items to clothing and kitchen essentials, these shelves can accommodate a variety of items while keeping them organized and easily accessible. By incorporating built-in shelves into your small space, you can create a clutter-free and functional environment that feels much more spacious.
3.1. Utilizing vertical space
When it comes to maximizing storage in small spaces, built-in shelves offer a clever solution. Utilizing vertical space is key in making the most out of limited room. By installing shelves directly into the walls, you can free up valuable floor space while creating additional storage options.
Built-in shelves can be customized to fit any area, whether it’s a tiny nook or an entire wall. They can be designed to blend seamlessly with the existing décor or stand out as a unique focal point. These shelves are not only functional but also add a touch of style to any room.
One of the advantages of built-in shelves is their versatility. They can be used to store books, display decorative items, or organize various belongings. With different shelf depths and heights, you can accommodate different sizes of items and maximize the storage potential.
In addition to saving space, built-in shelves are also an efficient way to keep your belongings organized. By having designated spots for specific items, you can easily find what you need without rummaging through cluttered drawers or cabinets. This not only saves time but also helps maintain a tidy and organized living environment.
Overall, maximizing small spaces with built-in shelves is a clever solution for those seeking both functionality and aesthetics. With their ability to utilize vertical space and provide ample storage options, these shelves offer a practical and stylish way to make the most out of limited room.
3.3. Organizing small items
When it comes to organizing small items, maximizing storage is key. One clever solution to make the most of small spaces is to install built-in shelves. These shelves can be a game-changer, providing a practical and efficient way to keep your belongings in order. By utilizing vertical space, you can maximize storage capacity without taking up valuable floor area. Built-in shelves can be customized to fit any nook or cranny, making use of every available space in your home. Whether it’s in the kitchen, bathroom, or living room, built-in shelves offer a stylish and functional storage solution for small items. With the right organization techniques and the addition of built-in shelves, you can transform cluttered spaces into organized and tidy areas.
3.4. Using adjustable shelves
Using adjustable shelves is a smart way to maximize storage in small spaces. These versatile shelves allow you to customize the height and arrangement of your storage units, making it easier to fit items of various sizes and shapes. Whether you have a tiny apartment, a cramped office, or a compact closet, built-in shelves with adjustable features can provide a clever solution to your storage needs. By utilizing every inch of available space, you can create a more organized and clutter-free environment. Adjustable shelves also offer the flexibility to adapt to your changing storage requirements over time. With their efficiency and functionality, these shelves are a must-have for anyone looking to make the most out of limited space.
3.5. Adding decorative elements
One effective way to maximize storage in small spaces is by adding decorative elements such as built-in shelves. Built-in shelves not only provide additional storage space, but they also serve as a clever solution to make use of unused vertical space. By utilizing the walls, you can free up valuable floor space and create a more organized and clutter-free environment. Built-in shelves can be installed in various areas of the house, including living rooms, bedrooms, kitchens, and even bathrooms. They can be customized to fit the specific needs and aesthetics of the space, making them a versatile storage solution. Whether you need a place to display your books, showcase decorative items, or store everyday essentials, built-in shelves can help you make the most out of your small space.
Conclusion
In conclusion, incorporating built-in shelves is an innovative and practical way to maximize small spaces. These clever solutions not only provide ample storage but also add aesthetic appeal to any room. Whether it’s utilizing vertical space or creating hidden storage options, built-in shelves offer endless possibilities for organizing and decluttering. By making the most of every inch available, small spaces can be transformed into functional and stylish areas that meet all your storage needs.


These 10 innovative and imaginative DIY home decor ideas from [object Object] provide a refreshing approach to enhancing ones living…