
Do you want your property to reflect your unique personality and style? You can do it by creating a pendant lamp in your own home. By carefully following the instructions, you may make a magnificent pendant light that is uniquely yours and perfectly complements your decor. In this article, you’ll find everything you need to know to launch into this thrilling do-it-yourself endeavor. Let’s jump in and learn how fun it is to make your own pendant light!
- 1. Introduction
- 1.1. Why choose a homemade pendant light?
- 1.2. Materials needed
- 1.3. Safety precautions
- 1.4. Budget-friendly option
- 1.5. Personalize your lighting
- 2. Step 1: Planning and Design
- 2.1. Determining the location
- 2.2. Selecting the style and size
- 2.3. Choosing the right bulb
- 2.4. Sketching the design
- 2.5. Gathering inspiration
- 3. Step 2: Gathering Materials
- 3.1. List of required materials
- 3.2. Sourcing affordable options
- 3.3. Quality considerations
- 3.4. Tools needed
- 3.5. Organizing the materials
- 4. Step 3: Assembly
- 4.1. Preparing the workspace
- 4.2. Wiring and electrical connections
- 4.3. Attaching the pendant holder
- 4.4. Installing the bulb
- 4.5. Securing and testing the light
- 5. Step 4: Finishing Touches
1. Introduction
Do you want to make your home more interesting and distinctive? Making a pendant light at home from scratch can be a satisfying and entertaining DIY project. As an added bonus, you can save money by making your own pendant light instead of purchasing one off the shelf. In this detailed tutorial, you will learn all you need to know to make your own pendant light, from procuring the components to hanging it in your home. Let’s dive headfirst into this fun do-it-yourself adventure!
1.1. Why choose a homemade pendant light?
There are a number of situations in which a pendant lamp that you manufactured yourself would be an excellent choice. For starters, it lets you be creative with your interior design. When you make your own pendant light, you may choose the exact look, feel, and color scheme that you want. This will make your pendant light a unique expression of your style.
Second, you can spare some cash by going the route of the DIY pendant light. Pendant lights sold in stores can be pricey, especially if you’re seeking for something high-quality and fashionable. You may save a lot of money without sacrificing quality or design by building your own pendant light. It’s an attractive option that won’t break the bank.
Making your own pendant light may be a fun and rewarding weekend project. You can let your imagination run wild while partaking in a tangible endeavor that will leave you feeling accomplished. Making your own pendant light is an enjoyable project that may give you a sense of accomplishment regardless of your level of DIY expertise.
Lastly, the style and performance of pendant lights you make at home can be tailored to your specific needs. Your area and lighting requirements will determine the dimensions, form, and materials you select. With so many possible configurations, you can be confident that your pendant light will complement any space’s decor.
In conclusion, there are several advantages to using a DIY pendant light, such as uniqueness, economy, originality, and adaptability. It’s a great option that lets you exhibit your individuality while also making your house more special.
1.2. Materials needed
It’s crucial to get together everything you’ll need before you go out on the thrilling adventure of creating your own DIY pendant light. Having everything prepared ahead of time will make the procedure go more quickly and easily. The most crucial components are listed below.
The primary building block of your do-it-yourself pendant light will be the pendant light kit. The plug, cord, and mounting hardware are all part of the package.
Pick a bulb that complements your decor and fits the pendant light kit’s socket.
Third, an electrical cable of sufficient length is required for connecting the pendant light kit to the electrical outlet.
Wire cutters and strippers are useful for severing and removing insulation from electrical wire.
Fifth, a screwdriver may be required, depending on the pendant light kit you purchase.
If you want to suspend your pendant light from the ceiling, a ceiling canopy is a good idea.
Add ornamental items to your pendant light to make it unique, such as beads, crystals, or fabric.
Now that you know everything you’ll need, it’s time to dive into the detailed instructions for making your very own gorgeous pendant light at home.
1.3. Safety precautions
Prioritizing safety measures is essential while creating a DIY pendant light. Not taking the required precautions when working with electricity might have serious consequences.
Always disconnect the power at the circuit breaker before working on an electrical system. In this way, electrical shocks and fires can be avoided. To make sure the electricity is truly turned off, a voltage tester should be used.
Wearing protective equipment like goggles and gloves is also crucial. Your eyes and hands will be safe from any flying particles or sharp objects.
It’s also important to make sure your workspace has adequate ventilation. It’s important to have good ventilation since some electrical parts give off gases or fumes that could be harmful to your health.
Finally, make sure you read and adhere to any documentation included with your pendant light kit. Be sure you read and fully comprehend the installation and safety instructions included with the kit you intend to use.
You may make your own pendant light at home while minimizing the danger of injury by following these guidelines.
1.4. Budget-friendly option
Is it your goal to improve the aesthetic of your home without spending a fortune? If you want a simple solution, consider building a pendant light. It’s inexpensive, yes, but more importantly, it lets you put your artistic skills to work in making a one-of-a-kind light for your home. In this detailed tutorial, you will learn all you need to know to make a pendant light at home, from procuring the components to hanging it. Prepare to amaze guests with a magnificent do-it-yourself pendant light!
1.5. Personalize your lighting
Modify the lighting in your home to make it feel more like you. Making a pendant lamp from scratch is one approach. If you make your own pendant light, you can customize it to your own specifications, down to the last detail. In this detailed tutorial, you will learn how to make a pendant light that is both functional and visually appealing for your home.
2. Step 1: Planning and Design
Planning and design are crucial stages of making a DIY pendant light. This will guarantee that you have all you need to complete the task at hand. The steps to take at the conceptualization stage are as follows:
First, decide what you’ll use the pendant light for and what kind of aesthetic you’re going for. The mood you wish to set in the room it will be installed in should be taken into account.
Do some homework and collect ideas by perusing design periodicals, websites, and hardware stores. To better visualise your thoughts, gather images or make a mood board.
3. Select Appropriate Materials Think about your preferred aesthetic and budget before making any final material selections. Metal, glass, fabric, and even repurposed materials are just some of the options for constructing a pendant lamp.
Decide on the exact dimensions you want your pendant light to be. Take precise measurements of the area it will be installed in to guarantee a perfect fit and prevent the finished product from looking out of place.
Make a rough drawing or utilize design tools to conceptualize your pendant light before you start building it. You can then make any necessary tweaks after seeing how everything fits together.
Make sure you understand the electrical requirements and get help from an expert if you don’t if you’re intending on wiring a pendant light you’re making.
If you take the time to carefully plan and design your DIY pendant light, you’ll have a better idea of how to proceed. The construction process will go more smoothly and the likelihood of success will rise.
2.1. Determining the location
One of the most crucial aspects of making a pendant lamp from scratch is deciding where to put it. The next step is to plan and design the pendant light so that it not only provides adequate lighting but also enhances the room’s visual appeal.
First, you should measure the space where you want to hang the pendant light. Think about the room’s dimensions, layout, and current furnishings. The best spot for your pendant light will become clear after reading this.
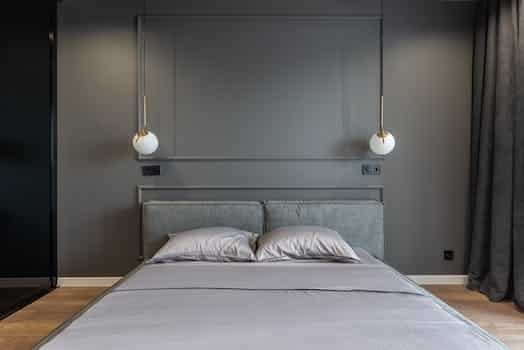
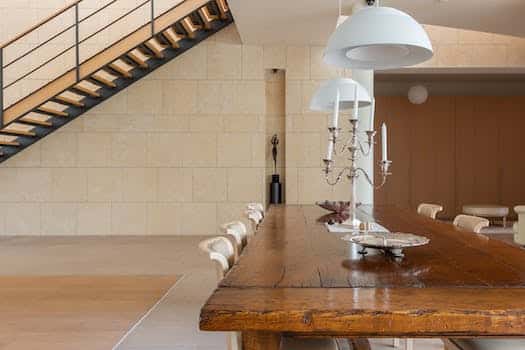
Reading nooks, dining tables, and kitchen islands are just a few examples of places where extra light might be welcome. You may also utilize a pendant lamp as a statement piece by hanging it over a table or other decorative feature.
After a list of possible sites has been compiled, it is time to think about the logistics. Verify that there is adequate wiring and availability to electricity in the desired location. A licensed electrician should be consulted if this is not the case.
The ceiling height is also an important consideration when choosing a pendant light. The light’s purpose and the room’s ceiling height are two factors to consider here. Pendant lights over a dining room table, for instance, should be hung at a height that allows for enough illumination of the tabletop.
Generally speaking, you should think about the room’s layout, current design, and functional needs when deciding where to hang your DIY pendant light. If you take the time to carefully plan and create this feature, you may increase the likelihood that your pendant light will improve the aesthetics and practicality of the room as a whole.
2.2. Selecting the style and size
The planning and design process for a DIY pendant light begins with choosing the desired style and size. How your pendant lamp looks and feels in its final location is entirely up to you.
It’s important to take into account the existing decor’s theme and style before getting started. Is a classic, rustic style more your thing, or do you favor something more up-to-date? The style of your pendant light will be determined in part by this consideration.
The next consideration is the overall size of the pendant. Think about how big the space is and how big the spot is where you want to hang the light. You may create a big impression and draw attention to a space with a giant pendant light, or you can go for a more understated look with a smaller pendant light.
Don’t rush into purchasing a pendant lamp before you’ve looked into all of your options. Look around at different lighting retailers, interior design websites, and home décor magazines to get some ideas. Keep an eye out for patterns that speak to you and fit in with the style you’ve established for the room.
Step two of this DIY pendant light guide is to gather the supplies and tools you’ll need once you’ve decided on the pendant light’s style and size in step one.
2.3. Choosing the right bulb
Popular for both breakfast and brunch, avocado toast may be customized to suit any palate. Avocado and smoked salmon is a tasty twist on the classic. The smokiness of the salmon pairs wonderfully with the avocado’s smooth texture, making for a delicious meal.
To create smoked salmon and avocado toast, simply toast a slice of your preferred bread. While the bread is toasting, mash up a ripe avocado with some salt, pepper, and lemon juice. Make sure the toast is completely covered in the mashed avocado.
Layer smoked salmon slices on the avocado. The salmon can be flaked into smaller pieces for a more rustic appearance, or it can be arranged in a tidy layer. Fresh dill or chives can be sprinkled on top for an additional flavor boost.
The end result is a decadent take on the classic avocado toast. The richness of the smoked salmon and the smoothness of the avocado combine to provide a delicious and filling meal. Avocado toast with smoked salmon is a crowd-pleaser no matter what time of day you eat it.
2.4. Sketching the design
Planning and designing the overall look and feel of your DIY pendant light is essential before you begin construction. With this in mind, you may proceed with confidence in your vision and purpose as you create. Instructions for creating your own pendant light are as follows.
First, think about why you want a pendant light and where you will be hanging it. Do you need general lighting in the space, or do you want to highlight a specific area?
The second step is to do some preliminary research and find some sources of inspiration. Gather photos and concepts that speak to your individual tastes and interests. This will aid in your comprehension of the various design components and options available to you.
3. Begin by drawing your design for the pendant light. Try out a variety of sizes, shapes, and materials. Think about the look you’re going for and how the light will be diffused.
Fourth, think about the components and resources you’ll need for your pendant lamp. Everything from the light bulb and wiring to the fixture’s socket and shade could fall under this category. Find out how much these things will cost and where you can buy them.
Take accurate measurements of the area where you intend to hang the pendant light, paying close attention to scale. Take the fixture’s size in relation to the room’s dimensions into account. You don’t want it to look too tiny or too massive in the space.
Budgeting: Determine how much money you can put toward your DIY pendant light project. Don’t forget to include in the price of supplies, equipment, and any expert help you might require. You can use this to keep your expenditures in check.
You may make a beautiful DIY pendant light if you put some thought into the design.
2.5. Gathering inspiration
When it comes to making your own homemade pendant light, the first step is to gather inspiration and plan the design. This initial stage is crucial as it sets the tone for the entire project. Whether you’re looking to create a unique statement piece or simply want to add some personalized flair to your home decor, careful planning and design will ensure a successful outcome.
Start by exploring various sources of inspiration. Browse through interior design magazines, visit online platforms, such as Pinterest or Instagram, or even take a walk in nature to find elements that catch your eye. Pay attention to different styles, shapes, colors, and materials used in pendant light designs.
Once you’ve gathered enough inspiration, it’s time to start planning. Consider the space where you intend to hang the pendant light. Take measurements and evaluate the existing decor and furniture to determine the appropriate size and style of the light. Think about the atmosphere you want to create in the room – whether it’s cozy and intimate or bright and lively.
Next, sketch out your ideas on paper or use digital design tools to visualize the pendant light. Experiment with various shapes and configurations until you find a design that resonates with your vision. Don’t be afraid to think outside the box and incorporate unique elements that reflect your personal style.
During the planning and design phase, it’s also essential to consider the practical aspects of the pendant light. Think about the type of bulb and its wattage, as well as the wiring and installation process. Research any necessary safety guidelines or codes to ensure your homemade pendant light is both functional and secure.
By dedicating time to the planning and design stage, you’ll lay a strong foundation for the rest of the project. This initial step allows you to explore your creativity, gather ideas, and ensure that your homemade pendant light aligns with your aesthetic preferences and practical requirements.
3. Step 2: Gathering Materials
Once you have decided to make your own homemade pendant light, the next step is to gather all the materials you will need for this project. This step-by-step guide will help you through the process of collecting everything you need.
Firstly, you will need a pendant light kit. This kit typically includes a socket, cord, chain, and ceiling plate. You can find these kits at your local home improvement store or online.
Next, you will need a lightbulb that fits the socket of your pendant light kit. Consider the wattage and type of bulb you want to use to achieve the desired lighting effect.
In addition to the kit and lightbulb, you will need a pendant light shade. You can choose from a variety of shades such as glass, metal, fabric, or even DIY options like mason jars or woven baskets.
To hang your pendant light, you will need a sturdy hook or anchor in the ceiling where you plan to install it. Make sure it can support the weight of the pendant light.
Lastly, gather the necessary tools such as wire cutters, pliers, a screwdriver, and possibly a drill depending on the installation requirements.
Once you have gathered all the materials and tools, you are ready to move on to the next step of the process: assembling your homemade pendant light.
3.1. List of required materials
To start creating your own homemade pendant light, you will need a few materials. Here is a list of the required items for this project:
1. Pendant light kit: This kit typically includes a socket, cord, and necessary hardware to assemble the pendant light.
2. Lightbulb: Choose a lightbulb that fits the socket and provides the desired brightness for your pendant light.
3. Electrical wire: You will need some electrical wire to connect the pendant light kit to a power source.
4. Ceiling canopy: This is the cover that attaches to the ceiling and hides the electrical wiring.
5. Chain or cord: Depending on your design preference, you can use a chain or cord to hang the pendant light from the ceiling.
6. Decorative elements: Optional decorative elements such as beads, crystals, or lampshade can be added to enhance the appearance of your pendant light.
Make sure you have all these materials ready before starting the project to ensure a smooth and efficient process.
3.2. Sourcing affordable options
Finding inexpensive material selections is crucial when creating a DIY pendant light. You can make a gorgeous, one-of-a-kind pendant light without going into debt if you shop around for cheaper options. Here are some suggestions for saving money while still acquiring all the components you need:
Look around secondhand stores and flea markets for items to use in making your pendant lamp. You can make a stunning pendant light out of an old lamp, lampshade, or even a chandelier if you look hard enough.
Use internet marketplaces like Etsy, eBay, or Craigslist to get low-cost components. You can locate one-of-a-kind and reasonably priced materials for your Do-It-Yourself project on several of these sites.
To save money, try reusing something you already have at home instead of buying anything new. With enough ingenuity, you can turn any old glass bottle, mason jar, or even vintage teacup into a beautiful pendant light.
For number four, keep an eye out for sale or discounted areas in hardware and lighting stores. These areas typically have sales on electrical components and lighting fixtures that can be used in your pendant light build.
5. Tools and materials for do-it-yourself projects: instead of buying a pendant lamp kit, try buying the parts separately and putting them together yourself. You can save cash and have greater leeway for personalization if you do this.
If you want to make a pendant lamp for cheap, remember that ingenuity and resourcefulness are the keys. You may make a beautiful lamp that complements your interior and doesn’t break the bank with just a little time and creativity.
3.3. Quality considerations
One of the most important things to think about when creating your own pendant light at home is the quality of the materials you use. You can trust that your pendant light will do its job well and keep you safe if you use only high-quality materials.
Choosing a solid and long-lasting base for your pendant light should be your first step. A metal or wooden framework will do the trick for keeping everything in place. Be sure to pick a base that can support the lamp and any extra embellishments you intend to add.
Next, think about the wiring and electrical parts that will be used. Using wiring and electrical connections that are up to code and appropriate for pendant lights is essential. This will protect you from electrical shock and extend the life of your DIY pendant light.
Also, make sure the light fixture is of high quality. Make sure the fixture is well-made and robust whether you go with a modern design or one that is inspired by the past. It’s important to think about the durability and performance of the fixture in terms of its material, finish, and general construction.
Last but not least, remember the light bulbs! Pick up bulbs that are both stylish and functional for your pendant light. Due to their long service life and low energy usage, LED bulbs are increasingly used.
You may make a pendant light at home that is both attractive and practical by paying attention to the quality of the materials you use.
3.4. Tools needed
There are a few key components you’ll need to complete your own DIY pendant light. Collecting them ahead of time will make the procedure run more smoothly and quickly. The essentials are as follows:
The first step in making your own pendant light is purchasing a pendant light kit. A standard set will have a canopy, cord, and plug.
Second, select a light bulb that both complements your decor and gives adequate illumination.
Tools for cutting and bending wires, which will be required for the installation process.
For working with and securing the electrical connections, pliers are a necessary tool.
Fifth, a screwdriver may be needed for assembly if your pendant light kit requires screws.
Your pendant light will be hung from the ceiling using this, the sixth, ceiling hook.
Depending on your aesthetic choices, you may wish to add decorative elements to your pendant light, such as beads, crystals, or cloth.
Before beginning the job, make sure you have all the necessary tools and supplies on hand. Because of this, it will be more easier and more fun.
3.5. Organizing the materials
For distributed teams, Kanban boards are crucial for managing workflow. The use of these visual boards has greatly improved the efficiency and organization of our team’s work tracking and prioritization processes. Cards representing tasks are moved horizontally across the board as they go through their respective columns on the Kanban board. This gives everyone on the team a bird’s-eye view of the workflow, making it easy to see what roles they play and when they need to complete their tasks. Team members can see at a glance who is in charge of certain tasks and how far along they are thanks to Kanban boards, which furthers the goals of transparency and teamwork. Kanban boards are an excellent method for distributed teams to coordinate their efforts and get things done.
4. Step 3: Assembly
To-do lists are crucial for every team, but especially for those working remotely. Remote teams can maintain efficiency and consistency by using task management software. Essential collaborative tools with advanced task management capabilities are listed below.
First, there’s Trello, a widely used project management platform where groups may make their own boards and organize their work on them. It has a user-friendly design and is great for keeping track of tasks.
Asana is an all-purpose task management application with functions including assigning tasks, monitoring your progress, and setting reminders for when certain tasks need to be completed. It helps groups work together and share up-to-date information about their projects.
Thirdly, Monday.com is a flexible and powerful project management platform with features like task tracking and individualized workflows. It facilitates streamlined communication and task management among distributed teams.
Wrike, number four on our list, is a full-featured task management solution that allows users to prioritize tasks, share files, and work together in real time. It’s a useful tool for keeping remote teams organized and productive.
Among the many features it provides, Basecamp’s to-do lists, discussion forums, and file-sharing capabilities have made it a favorite among project managers and teams. It’s a hub for distributed teams to coordinate their efforts.
Sixth, Microsoft Teams is a platform for teamwork that works with other Microsoft products. To-do lists, delegating work to others, and keeping tabs on your progress are just some of the task management capabilities it provides.
To-do lists, reminders, and app integrations are just a few of the task management tools offered by Slack, a communication and collaboration platform. It facilitates communication and order among dispersed teams.
For number eight, we have Google’s Workspace (formerly known as G Suite), which includes useful applications like Google Docs, Sheets, and Calendar for organizing your work. In a group setting, members can make and add items to shared to-do lists.
Jira, number nine, is a widely used project management application in the software development industry. Features such as bug monitoring, agile board collaboration, and project management are all available.
Task reminders, due dates, and priority levels are just a few of the features that make Todoist one of the best task management apps available. It aids remote teams in maintaining concentration and output.
These collaboration technologies equip distributed teams with powerful capabilities that boost efficiency and effectiveness in task management.
4.1. Preparing the workspace
It’s crucial to get your work area set up before you begin installing your DIY pendant light. This will keep your work space neat and tidy, with everything you need where you need it. Here are some suggestions for getting your office in working order:
First, clean up your desk by getting rid of anything that isn’t essential to your task. This will reduce the likelihood of mistakes being made during the pendant light’s assembly.
Second, amass the components: Get together everything you’ll need to complete the construction. A screwdriver, electrical tape, wire cutters, and pliers might also be useful.
Find a strong and level surface to use as a workspace, and then set it up. A table or a workbench, depending on your needs. Make sure it’s spotless and uncluttered.
Set up a workspace with all of your tools and supplies neatly organized for quick and easy access. This will speed up the assembling process and save you time.
If you take the effort to organize your desk, you’ll be able to get more done in less time. In the end, you’ll have a DIY pendant light that you may be pleased to show off.
4.2. Wiring and electrical connections
After you have amassed all the components for your DIY pendant lamp, the following step is to wire and connect the electrical components. Doing so is essential to the pendant light’s aesthetics, functionality, and longevity. If you need some help with the electrical wiring and connections, here is a quick and easy guide:
To install a pendant lamp, step one is to read and completely comprehend the manufacturer’s instructions. This will give you detailed instructions for installing your pendant light, including wiring diagrams.
It is imperative that the electricity to the area be cut off before any electrical repair can begin. This is crucial for avoiding any sort of electrical mishaps and protecting your safety.
Third, start by joining the pendant light kit’s black wire to the black wire coming out of the electrical box. Wire nuts can be used to firmly connect the wires. The white wires should be connected in the same way, using wire nuts.
Fourth, if your pendant light kit has a ground wire, run it to the electrical box’s green or bare copper wire. When making a connection, utilize wire nuts once again.
Carefully re-insert the wires into the electrical box once you’ve made sure they’re all connected. Verify that none of the pendant light’s wires are showing or touching any bare or metal surfaces.
Check all your connections twice to be sure they are secure. Any frayed wires or unsecured connections can reduce electrical efficiency and potentially start a fire.
Seven, once the power has been restored, try out your new DIY pendant light. Now that you’ve finished wiring and connecting everything, your pendant light should shine brightly and uniquely in your room.
Always call a professional electrician for help with the safe and proper installation of your DIY pendant light if you have any doubts about the wiring process or if you lack experience with electrical work.
4.3. Attaching the pendant holder
In conclusion, remote teams that don’t use collaboration technologies are missing out on an opportunity to increase efficiency, productivity, and communication. The correct technology allows for distributed teams to communicate and collaborate effectively despite physical distance.
4.4. Installing the bulb
Before you start putting in the light bulb, make sure you have everything you need. A pendant lamp, bulb, wire strippers, electrical tape, and a stepladder or a stool are all part of this kit.
Before you even think about hanging the pendant lamp, make sure the electricity is turned off to the room. To protect yourself from potential electrical harm, this is an absolute must. Find the fuse or circuit breaker and turn it off or take the fuse out.
Then, take the pendant light fixture out of its package and disassemble it. A cover, plug, cable, and fasteners might all be there. Spread things out on a clear table so you can find what you need quickly.
Take the plug and insert it into the socket. Verify the socket’s connection to the cord is tight. If they are available, use the manufacturer’s guidelines.
Then, using wire strippers, remove a half an inch or more of insulation from the cord’s end. Take care not to nick the internal wiring. The bare wires should be twisted together securely after being stripped.
Electrical tape should be used to thoroughly cover the exposed area once the wires have been twisted together. This will insulate the wires and stop any shorts from happening.
The wiring must be properly fastened before the canopy can be installed. Align the holes in the canopy with the socket and the cord. Screw the canopy into place using the included screws and a screwdriver.
At long last, the bulb may be put in. Select an appropriate light bulb and securely screw it into the socket by turning the screw in the clockwise direction. Avoid damaging the socket by overtightening.
Congratulations! You’ve finished wiring your handmade pendant light and can now attach the bulb. Now that you’ve finished, you can flip the switch and bask in the glow of your masterpiece.
4.5. Securing and testing the light
Light installation and verification:
After you’ve gathered all the parts and pieces, it’s time to put the light in place and give it a test run.
To begin, make sure the power is off to eliminate any potential for injury. In order to ensure your safety throughout the procedure, this is essential. Make sure the master switch is turned off by turning it on and off again.
After that, carefully connect the light socket to the end of the wire, taking care to adhere to any specific installation guidelines provided by the manufacturer. To make sure the wires stay connected, you can use connectors or electrical tape.
Once the socket is in place, insert the bulb and tighten the nut. Make that the plug and wattage requirements are met. Doing so will guarantee that your pendant light works as intended.
After installing the light bulb, make sure it works. See if the light bulb lights up when you switch on the power. If it doesn’t, make sure everything is properly connected.
It is critical to put the light through its paces to make sure everything is in working order. It also helps you spot any flaws or problems that need fixing before moving further with the assembly.
You can prevent problems in the future by securing and testing the light now. It’s a crucial part of making a handmade pendant light that’s both safe and effective.
5. Step 4: Finishing Touches
Now that you’ve made it this far, it’s time to give your DIY pendant light a last polish. Here’s where you can put your own stamp on things and make something truly one-of-a-kind.
The first step is to decide the light bulb you wish to install. Edison bulbs for a retro aesthetic, or energy-saving LED lighting, are just two examples of the many possibilities. Before purchasing a pendant lamp, think about the mood and atmosphere you want to create in the room.
The next step is to decide on a cable or chain that will work well for suspending the pendant. This can be anything from a thin cotton cord for a spare look to a glitzy chain for an extravagant one. Consider the ceiling height and the location of the light fixture when making your selection.
In addition, the pendant light’s aesthetic value can be improved by adding embellishments. Adding crystals, beads, or another ornament to the thread or chain is one option. Use your imagination and try using various materials until you find one that works.
Finally, before installing your DIY pendant light, make sure it works. Check that the light switch is functioning properly and that all electrical connections are tight. When handling electrical components, remember to always put safety first.
With these tips in mind, you can transform your homemade pendant light from a simple DIY project to a beautiful and unique lighting fixture that will bring personality to any room.
5.1. Painting or staining the pendant
Now that you’ve finished the hard work, it’s time to put the final touches on your DIY pendant light. The choice between painting and staining the pendant is a crucial one. Which option you go with is totally up to you and the look you’re going for.
Painting the pendant might give it a more contemporary and sophisticated look. Pick a paint color that works well with your decor and coat the pendant completely. Use a paint made for metal or wood, depending on whether your pendant is made of those materials.
However, the pendant’s organic beauty can be accentuated by staining it if you’d want a more natural and rustic look. The wood grain in your pendant should be emphasized or brought out by the stain color you choose. Follow the manufacturer’s instructions and apply the stain with a brush or cloth, then let it dry completely.
Be sure to use several coats of paint or stain for the longest lasting result. It’s important to wait for each coat to dry before moving on to the next. After the last coat has dried, your pendant lamp will be ready to illuminate and bring a special flair to any room.
5.2. Adding decorative elements
After the framework of your DIY pendant lamp is finished, it’s time to add some finishing touches to make it look more presentable. Put your own stamp on your lighting with these accessories. Some suggestions are as follows.
Attaching a beautiful shade to the bottom of your pendant lamp will diffuse the light and create a warm, inviting atmosphere. Select a tone that works with the decor already in place.
Hang strands of beads or crystals around the outside of your pendant light to give it some shine and class. When the light is turned on, the result will be breathtaking.
Third, ribbons or fabric: tie ribbons or fabric strips around the cord or dangle them from the bottom of the pendant to include them into your design. This will be a fun addition that can be switched out for the seasons or special events.
The wooden parts of your pendant light can be painted or stained for a more personalized look. You’ll be able to coordinate it with the rest of the room’s decor or use it as a showpiece thanks to this.
The important thing is to play about and enjoy adding those last touches. Create a one-of-a-kind pendant light that reflects your individual style.
5.3. Adjusting the height
Your DIY pendant light is nearly complete; the last step is to adjust the height so that it hangs at precisely the right spot in your room. To put the finishing touches on your paper, follow these steps:
First, get out a measuring tape and figure out how high you’d like your pendant light to dangle. Think about the room’s purpose and the height of the ceiling.
If the length of the cable hanging from your pendant light is too lengthy, you can easily cut it to the right size. To determine how much cable has to be cut, carefully untie any knots or loops in the cord. Use sharp scissors or a wire cutter to snip off the excess cord, but allow enough length for proper installation and fine-tuning.
Third, after adjusting the cord length, re-secure the canopy to hide the electrical connections. Check that it is properly aligned with the pendant light and that it is fastened firmly.
Before permanently installing the pendant light, make sure the height is correct by testing it with a hook or other makeshift fixture. Checking the height in this way will let you make any necessary modifications.
After determining the optimal height, the pendant lamp should be firmly fastened in position. Fo
5.4. Installing a dimmer switch
After you’ve successfully installed the dimmer switch and linked the cables, you may move on to the final touches. This step is essential for the successful operation and aesthetic appeal of your DIY pendant light. To finish the setup, please follow these instructions:
First, make sure the dimmer switch cover is firmly attached over the switch by using the screws that included with the dimmer. Check its alignment and wall fit to ensure a correct fit.
Turn on the electricity and test the dimmer switch before installing the pendant light to make sure it is functioning properly. Make sure the light intensity varies as you move through the dimmer’s settings.
Third, hang the pendant light by following the directions provided by the manufacturer. The canopy of the fixture is normally fastened to the ceiling’s electrical box, and the wires are connected in the specified manner.
After the fixture has been placed securely, the pendant light shade can be attached. It may be screwed onto the fixture or secured in any other way as directed by the manufacturer.
Fifth, if your pendant lamp has an adjustable height, set it to the ideal height, and then move it to the appropriate location. Check that the lamp is set up properly and that it provides adequate lighting.
Wit
5.5. Ensuring proper installation
Accommodations in the desert provide a very unique experience for those who are looking to get away from it all. These one-of-a-kind lodgings offer guests to experience the serenity and beauty of the desert without sacrificing any of the comforts of home. There’s a wide range of places to stay in the desert, from high-end resorts to more unique options, so anyone can enjoy the wonders of the region. Here we’ll take a look at 10 of the most interesting places to stay in the desert, certain to make your trip there one you’ll never forget.
Conclusion
Professionals in today’s fast-paced world may find it difficult to put their health first. Many professionals have a hard time incorporating healthful routines into their busy schedules due to the pressures of their jobs. However, if you want to be at your best physically and mentally, you need to stick to a healthy routine. This essay will discuss the significance of maintaining healthy habits for successful workers and offer practical advice for doing so.


These 10 innovative and imaginative DIY home decor ideas from [object Object] provide a refreshing approach to enhancing ones living…